Tesla Model 3: DC Input Assembly - HV Battery- Install
Tesla Model 3 2017-2024 Service Manual / Battery System / HV Battery Electrical Components / DC Input Assembly - HV Battery (Remove and Replace) / DC Input Assembly - HV Battery- Install
Install
.png)
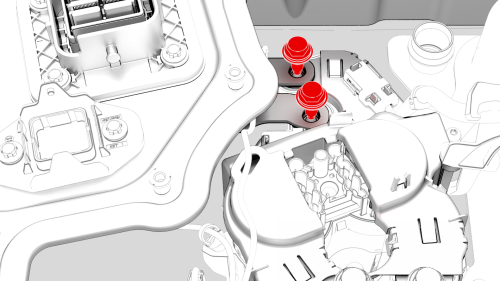
- Install the DC input assembly to the penthouse, install the bolts (x4)
that attach the DC input assembly to the penthouse, and then mark the bolts
with a paint pen after they are torqued.
.png) Torque 6 Nm
Torque 6 Nm
- Install new bolts (x2) to attach the DC input busbars to the fast charge
contactor busbars, and then mark the bolts with a paint pen after they are
torqued.
.png) Torque 9 Nm
Torque 9 Nm
.jpg) Generic Measurement - Actual busbars and fasteners might appear
different
Generic Measurement - Actual busbars and fasteners might appear
different
- Use the Hioki resistance meter to measure the resistance at the HV joint between the positive DC input busbar and the positive (LH) fast charge contactor busbar.
Note: The maximum acceptable resistance is 0.060 mΩ (60 μΩ). If the resistance is above this value, escalate a Toolbox session, as appropriate.
Generic Measurement - Actual busbars and fasteners might appear
different
- Use the Hioki resistance meter to measure the resistance at the HV joint between the negative DC input busbar and the negative (RH) fast charge contactor busbar.
Note: The maximum acceptable resistance is 0.060 mΩ (60 μΩ). If the resistance is above this value, escalate a Toolbox session, as appropriate.
.png)
- Install the insulator for the DC input assembly.
.jpg)
- Connect the electrical harness to the DC input assembly connector.
- Install the pyrotechnic battery disconnect into the penthouse. See Pyrotechnic Battery Disconnect (Remove and Replace).
READ NEXT:
 Fuse - A/C Compressor - HV Battery- Remove
SPECIAL TOOLS
Ratchet, 1/4" Sq Dr, HV Insulated (1057602-00-A)
Ext Bar, Wobble, 1/4" Dr, HV Insulated (1057603-00-A)
Skt, 1/4" Sq Dr, 8mm, HV Insulated (1057604-00-A)
Magnet, Flexible, HV Insulated,
Fuse - A/C Compressor - HV Battery- Install
Install
Install the A/C compressor fuse to the RH penthouse bus, and then
install new nuts to attach the fuse to the bus.
Torque 2.5 Nm
Generic Measurement - Actual busbars and fasteners mi
SEE MORE:
Duct - Air Wave - RH (Remove and Replace)
Remove
Remove the glove box. See
Glove Box (LHD) (Remove and Replace).
Remove the RH footwell air duct from the HVAC module, and then remove
the duct from the vehicle.
Release the clips that attach the RH air wave duct to the cross car
beam, and then remove the duct from the cross
Light - Fog / Reverse - Rear - LH (Remove and Replace)
Remove
Remove the trunk lid trim. See Trim - Lid - Trunk (Remove and Replace).
Disconnect the electrical wiring harness connector from the LH rear fog/reverse
light.
Remove the nut that attaches the LH rear fog/reverse light to the trunk
lid.
Torque 3.2 Nm
Remove the LH rea
© 2019-2024 Copyright www.tmodel3.com
