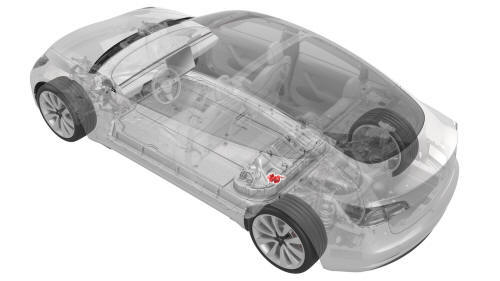
Tesla Model 3: Guide - Probing - HV Battery- Remove
SPECIAL TOOLS
Ratchet, 1/4" Sq Dr, HV Insulated (1057602-00-A)
Ext Bar, Wobble, 1/4" Dr, HV Insulated (1057603-00-A)
Skt, 1/4" Sq Dr, 13mm, HV Insulated (1057606-00-A)
Magnet, Flexible, HV Insulated, 18" (1057607-00-A)
Connector Removal, Coolant, PCS, M3 (1111868-00-B)
Kit, Svc Plug, Cooling Hose, Model 3 (1135762-00-A)
Skt, 1/4in Dr, 5-Lobe Torx Plus External (1059330-00-B)
Resistance meter, microohm, Hioki RM 3548 (1076927-00-A)
Note:
Only technicians who have been trained in High Voltage Awareness are permitted to perform this procedure. Proper personal protective equipment (PPE) and insulating HV gloves with a minimum rating of class 0 (1000V) must be worn at all times a high voltage cable, busbar, or fitting is handled. Refer to Tech Note TN-15-92-003, "High Voltage Awareness Care Points" for additional safety information.
Remove
- Drain the coolant from the power conversion system. See Penthouse Coolant (Drain and Refill).
- Remove the HV battery negative contactor. See Contactor - Negative - HV Battery (Remove and Replace).
- Remove the power conversion system coolant output tube. See Tube - Output - Coolant - Power Conversion System (Remove and Replace).
.png)
- Remove the clip that attaches the HV battery penthouse harness from the HV battery fast charge contactor.
.png)
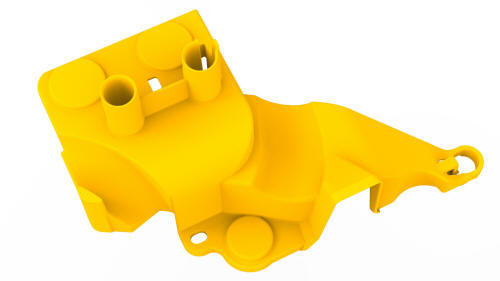
- Release the clips that attach the HV battery probing guide to the HV
battery and remove the guide from the penthouse.
READ NEXT:
 Guide - Probing - HV Battery- Install
Install
Wipe up any spilled coolant.
Caution: Spilled coolant can create an electrical path.
Install the HV battery probing guide into the penthouse, and then fasten
the clips that attach the
Harness - AC Inlet - HV Battery- Remove
SPECIAL TOOLS
Resistance meter, microohm, Hioki RM 3548 (1076927-00-A)
Warning:
Only technicians who have been trained in High Voltage Awareness are
permitted to perform this procedure. Proper per
SEE MORE:
Bracket - 12V Battery (RWD) -Install
Install
Install the front hook onto the battery bracket, and then install a new
nut to attach the front hook to the battery bracket.
Torque 9 Nm
Install the tie down bracket onto the battery bracket, and then install
a new nut to attach the tie down bracket to the battery bracket.
Master Cylinder and Reservoir
Assembly - Install
Install
Position the reservoir and master cylinder
in the vehicle
Align the brake booster rod wi
