Tesla Model 3: HV Battery (Dual Motor) - Remove
SPECIAL TOOLS
Adapter, Lift Pad, Model 3 (1453419-00-A)Key, Seat Belt Release, Model 3 (1133787-00-A)
ASY, Battery Table, Manual Lift (1020566-00-F)Top Plate, Battery Table, Manual Lift (1020566-99-A)
Hoist, H-Frame EMEA (1129166-00-A)Kit, Alignment Rods, Battery, Model 3 (1134523-00-A)
Lever Lock, HV Connector, Model 3 (1140311-00-A)Drive Unit Pressure Test Fixture (1053600-00-B)
Adapter, Coolant Reservoir Pressure Test (1130942-00-B)Kit, Coolant Leak Test Adapters, Model 3 (1132185-00-B)
Kit, Coolant Drain & Fill Adapters, M3 (1133843-00-A)Kit, Svc Plug, Cooling Hose, Model 3 (1135762-00-A)
Kit, Battery Coolant Drain and Fill (GSN-TL-000564)Pack Enclosure Leak Tester, HV Battery (1026636-00-A)
Pack Kit, Enclosure, Leak Test, HV Battery, Complete (1140501-00-A)Kit, Encl Leak Test Adapters, HV Battery (1144879-00-A)
Cap, Logic Conn, Inv, 3DU (1108272-00-B)Remove
- Remove the LH and RH lower rocker panel covers. See Cover - Rocker Panel - Lower - LH (Remove and Replace).
- Open all doors.
Note: Latch the rear doors to prevent accental lockout.
- Lower all windows.
- Remove the rear underhood apron. See Underhood Apron - Rear (Remove and Replace).
- Remove the cabin intake duct. See Duct - Cabin Intake (Remove and Replace).
- Move the driver seat fully rearwards.
- Remove the LH instrument panel end cap. See End Cap - Instrument Panel - LH (Remove and Replace).
- Remove the LH mdle A-pillar trim. See Trim - A-Pillar - Mdle - LH (Remove and Replace).
- Remove the LH lower A-pillar trim. See Trim - A-Pillar - Lower - LH (Remove and Replace).
- Remove the driver footwell cover. See Cover - Footwell - Driver (Remove and Replace).
- Remove the LH front floor mat.
- Remove the LH center console se panel carpet. See Carpet - Se Panel - Center Console - LH (Remove and Replace).
- Move the front passenger seat fully rearwards.
- Remove the RH instrument panel end cap. See End Cap - Instrument Panel - LH (Remove and Replace).
- Remove the RH mdle A-pillar trim. See Trim - A-Pillar - Mdle - LH (Remove and Replace).
- Remove the RH lower A-pillar trim. See Trim - A-Pillar - Lower - LH (Remove and Replace).
- Remove the front passenger footwell cover. See Cover - Footwell - Passenger (LHD) (Remove and Replace).
- Remove the RH front floor mat.
- Remove the RH center console se panel carpet. See Carpet - Se Panel - Center Console - LH (Remove and Replace).
- Move the driver and front passenger seats fully forward.
- Remove the 2nd row floor mat from the vehicle.
- Remove the 2nd row lower seat cushion. See Seat Cushion - Lower - 2nd Row (Remove and Replace).
- Remove the RH 2nd row seat se bolster. See Bolster - Se - Seat - 2nd Row - LH (Remove and Replace).
- Remove the RH rear sill panel trim. See Trim - Sill Panel - Rear - LH (Remove and Replace).
- Remove the RH upper B-pillar trim. See Trim - B-Pillar - Upper - LH (Remove and Replace).
- Remove the RH lower B-pillar trim. See Trim - B-Pillar - Lower - LH (Remove and Replace).
- Repeat step 23 through step 26 for the LH se of the vehicle.
.png)
- Remove the clips (x4) and hook-and-loop strips that attach the rear carpet to the vehicle.
- Lift up the RH se of the rear carpet and insert a hand to feel if the 4th RH HV battery bolt is present. If the bolt is present, then remove the bolt.
.png)
- Lift up the LH se of the rear carpet and insert a hand to feel if the 4th LH HV battery bolt is present. If the bolt is present, then remove the bolt.
.png)
- Move the driver seat fully rearwards.
.png)
- Remove the clips (x3) that attach the LH front carpet to the vehicle.
- Fold the LH front carpet for access, and then release the seat harness from the clip to allow the carpet to fold back further.
Note: The driver footrest is part of the LH front carpet.
.png)
- Remove the LH front inner HV battery bolts.
.png)
- Check to see if the 3rd LH HV battery bolt is present. If the bolt is present, remove the bolt.
.jpg)
- Remove the 3rd LH inner HV battery bolt.
- If the vehicle had the 3rd or the 4th LH inner HV battery bolts, move the driver seat to the center position and the seat back to the upright position. Otherwise, skip to the next step.
- Separate the LH se of the rear main carpet perforations to access the 4th LH inner HV battery bolt, if the bolt is present.
Note: Might need to undo the hook-and-loop strips that are attach the front carpets to the body.
Note: Might need to move the driver seat forwards or rearwards if necessary to allow access for the bolt.
.jpg)
- Remove the 4th LH inner bolt that attaches the HV battery to the body.
.png)
- Remove the 5th LH rear inner bolt that attaches the HV battery to the body.
Note: Lift up the rear main carpet for access.
- Unfold the LH front carpet back to its original position.
Note: Move the front edge down, and then sle back the carpet to ease positioning.
- Move the front passenger seat fully rearwards.
.jpg)
- Remove the clips (x4) that attach the RH front carpet to the vehicle.
.jpg)
- Release the seat electrical harness from the clips to allow the RH front carpet to fold back more.
.png)
- Remove the RH front inner bolts (x2) that attach the HV battery to the body.
.png)
- Check if the 3rd RH bolt is present. Use a flashlight, if needed. Remove the bolt, if present. Otherwise, skip to the next step.
- Move the front passenger seat to the center position and the seatback to the upright position, if the 3rd RH and 4th RH inner HV battery bolts are present.
Note: Might need to undo the hook-and-loop strips that are attach the front carpets to the body.
Note: Might need to move the driver seat forwards or rearwards if necessary to allow access for the bolt.
- Remove the 4th RH inner bolt that attaches the HV battery to the body, if equipped. Otherwise, skip to the next step.
.png)
- Remove the 5th RH rear inner bolt that attaches the HV battery to the body.
.jpg)
- Unfold the LH front carpet for access, and then release the seat harness from the clip to allow the carpet to fold back further.
- Put chocks on one of the rear wheels to prevent the vehicle from rolling.
- Connect a laptop with Toolbox to the vehicle.
- In Toolbox, click Actions, type "proc_epb" in the search field, click the play button next to "PROC_EPBL_START-SERVICE-MODE", and then select Run.
- Press the brake pedal, click Actions, click the play button next to "PROC_EPBR_START-SERVICE-MODE," and then select Run.
- Click Actions, type "thermal" in the search field, click the play button next to "PROC_VCFRONT_X_THERMAL-FILL-DRAIN", and then select Run.
- Using Toolbox, click the play button next to the "PROC_VCFRONT_X_THERMAL-FILL-DRAIN," and then select Run.
Note: The 5-way valve is set to Series position, and the coolant pumps are disabled.
- Remove the laptop from the vehicle, but do not close Toolbox.
- Disconnect 12V power. See 12V Power (Disconnect and Connect).
- Perform the vehicle electrical isolation procedure. See Vehicle Electrical Isolation Procedure.
.png)
- Remove the HV cap that covers the HV harness located on the LH se of the penthouse.
.jpg)
- Remove the bolts that attach the charge port to HV battery harness bracket at the penthouse.
.jpg)
- Release the clip that attaches the charge port to HV harness connector at the sill area.
.jpg)
- Raise the handle, and then pull up to disconnect the charge port to HV harness connector from the penthouse.
.png)
- Remove the bolts that attach the LH and RH inner penthouse rails to the penthouse cover.
- Remove the DCDC ground busbar. See Busbar - DCDC Ground (Remove and Replace).
- Remove and discard the nut that attaches the positive 12V output cable to the DCDC passthrough, and then remove the cable from the passthrough.
- Partially close all doors in preparation for pushing the vehicle.
- Remove the wheel chocks from the wheel.
- Remove the wheel chocks from the wheel, and with an assistant, push the vehicle to a lift, then re-chock the wheel.
Push the vehicle for a very short distance and at less than 1 MPH.
- Remove the body plugs from the underse of the vehicle, and insert the lift pad adapters into the holes at each lifting arm pad.
- Raise the vehicle to a comfortable working height.
Verify that the vehicle is stable on the lift.
- Remove the front aero shield panel. See Panel - Aero Shield - Front (Remove and Replace).
.png)
.png)
- Release the clips along the bottom edge of the LH and RH wheel arch liners.
- Install bungee straps to pull the LH and RH wheel arch liners away from the HV battery and expose the coolant hoses.
- Remove the front HV battery sk plate. See Sk Plate - HV Battery - Front (Remove and Replace).
.jpg)
- Disconnect the electrical harness from the PTC heater HV connector, and then release the electrical harness from the bracket.
.jpg)
- Disconnect the electrical harness from the A/C HV connector, and then release the electrical harness from the bracket.
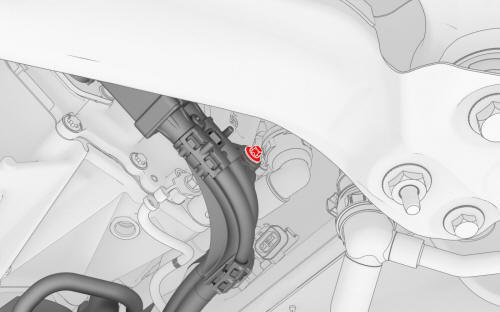
- Remove the bolt that attaches the front drive unit HV harness to the front drive unit.
- Disconnect the front drive unit HV harness connector: Release the locking tab, and then rotate the release lever up to disengage the connector. After disconnecting the front drive unit HV harness, set it ase.
Caution:
Do not use excessive force when rotating the release lever.Note: Make sure that the alignment tabs on the front drive unit header are not damaged.

- Remove the bolt that attaches the ground strap to the front drive unit.
- Release the clip that attaches the front drive unit ground strap to the front drive unit.
- Remove the bolt that attaches the ground strap bolt to the HV battery, and then remove the ground strap from the vehicle.
- Position a coolant drain under the front RH corner of the HV battery.
.png)
- Release the clip and disconnect the powertrain return hose at the RH se of the vehicle, and immediately plug the male and female fittings.
.png)
- Release the clip and disconnect the rear powertrain supply hose at the RH se of the vehicle, and immediately plug the male and female fittings.
- Position the coolant drain under the front LH corner of the HV battery.
.png)
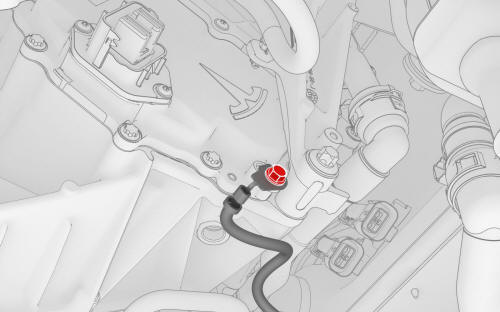
- Release the clip and disconnect the HV battery return hose at the LH se of the vehicle, and immediately plug the male and female fittings.
.png)
- Release the clips that attach the battery to chiller hose to the body.
.png)
- Release the clip and disconnect the chiller to HV battery hose from the manifold at the LH se of the vehicle, and immediately plug the male and female fittings.
- Remove the coolant drain from underneath the vehicle.
- Remove the m aero shield panel. See Panel - Aero Shield - M (Remove and Replace).
- Put the support stand to support the front portion of the rear subframe.
.png)
- Release the fir tree clips that attach the coolant hoses to the LH shear plate.
.png)
- Remove the smaller bolts that attach the LH shear plate to the body.
.png)
- Remove the larger bolt that attaches the LH shear plate and rear subframe to the body, and then remove the LH shear plate.
.jpg)
- Re-install the larger bolt, and hand-tighten the bolt to the rear subframe.
- Repeat steps 93 through 96 for the RH shear plate.
- Remove the support stand from underneath the rear subframe
- With an assistant, put the battery table in position, and then lower the vehicle to support the HV battery.
Note: Line up the battery table so that the center 4 bolts of the HV battery are accessible through the opening in the battery table.
- Remove the rear HV battery sk plate. See Sk Plate - HV Battery - Rear (Remove and Replace).
- Position the coolant drain under the rear LH se of the HV battery.
.png)
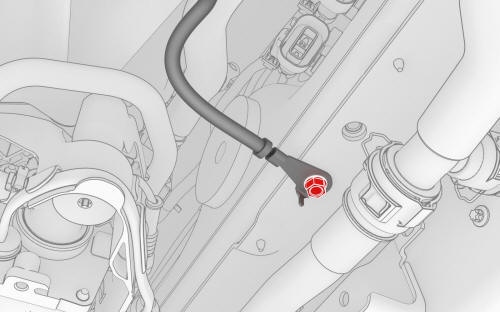
- Release the clip and disconnect the rear drive unit inverter inlet hose from the LH underse of the penthouse, and immediately plug the male and female fittings.
- Position the coolant drain under the rear RH se of the HV battery.
.png)
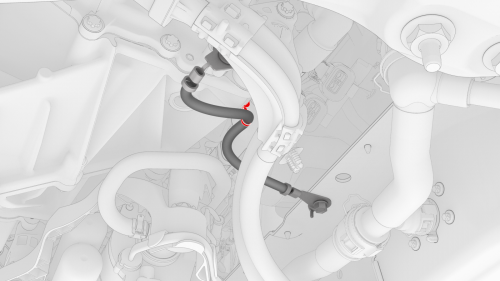
- Release the clip and disconnect the coolant outlet hose from the powertrain return hose, and immediately plug the male and female fittings.
- Remove the coolant drain from underneath the vehicle.
.png)
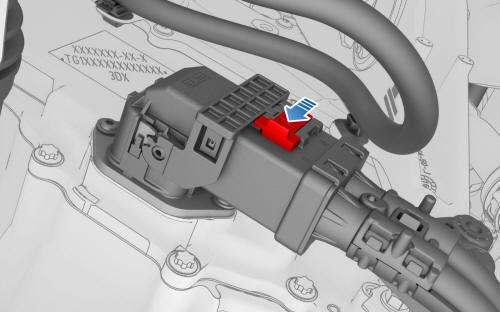
- Remove the nuts that attach the rear drive unit HV electrical harness bracket to the HV battery.
.png)
- Release the locking tab of the rear drive unit HV electrical harness.
.png)
- Raise the handle, and then disconnect the rear drive unit HV electrical harness from the HV battery connector.
.jpg)
- Remove the center bolts (x4) that attach the HV battery through the HV battery center rail ski cover.
.png)
.png)
- Remove the bolts (x8) that attach the HV battery LH and RH support brackets to the vehicle.
.jpg)
- Remove the front center bolt that attaches the HV battery to the vehicle.
.png)
- Remove the bolts (x4) that attach the front of the HV battery to the vehicle.
.png)
- Remove the bolts (x16) that attach the HV battery to the vehicle.
- With an assistant, raise the vehicle and remove the HV battery from underneath the vehicle.
- Remove the HV battery cover gasket. See Gasket - Cover - HV Battery (Remove and Replace).
READ NEXT:
 HV Battery (Dual Motor) - Install
Install
Perform step 11 through step 26 of the penthouse air
leak test on the HV battery. See Penthouse Air Leak
Test.
Hand-tighten the adjustable elements (x4) on th
SEE MORE:
Crush Can - Front - LH - Install
Install
Install the LH front crush can into the LH front inner rail.
Note: Lightly tap the crush can with a dead blow harmer to assist
with installation into the inner rail.
install the bolt that attaches the LH front fender support to the LH
front crush can.
Torque
35 Nm
Instal
Traction Control
How It Works
The traction control system constantly
monitors the speed of the front and rear
wheels. If Model 3 experiences a loss of
traction, the system minimizes wheel spin by
controlling brake pressure and motor power.
By default, the traction control system is on.
Under normal condit
