Tesla Model 3: HV Header - HV Battery- Install
Tesla Model 3 2017-2024 Service Manual / Battery System / HV Battery Electrical Components / HV Header - HV Battery (Remove and Replace) / HV Header - HV Battery- Install
Install
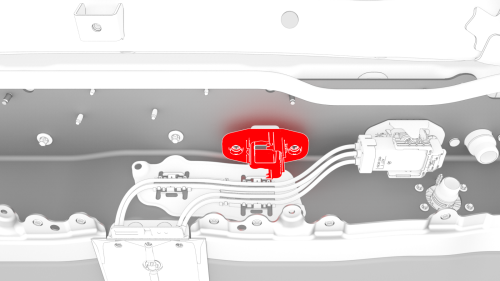
- Install the HV header onto the HV battery.
Note: Push and pull on the header to make sure it is secured.

- Install and hand-tighten the bolts that attach the HV header to the HV battery
- Tighten the bolts to proper torque.
 Torque 10 Nm
 - Fully raise the handle on the rear drive unit HV electrical harness.
.png)
- Attach the HV connector lever lock onto the back of the HV electrical harness.
- Firmly connect the HV electrical harness to the HV battery connector.
Caution: Make sure that the harness fits the connector squarely and tightly.
- While pressing the harness to the connector, remove the HV connector lever lock.
.png)
- While pressing the harness to the connector, fully lower the handle.
.png)
- Slide the release to lock the HV electrical harness.
.png)
- Install the nuts that attach the rear drive unit HV electrical harness
bracket to the HV battery.
.png) Torque 10 Nm
Torque 10 Nm
.png)
- Fasten the clips that attach the RH inner HV battery return hose to the HV battery.
- Install the rear HV battery skid plate. See Skid Plate - HV Battery - Rear (Remove and Replace).
- Perform a penthouse air leak test. See Penthouse Air Leak Test.
- Connect 12V power. See 12V Power (Disconnect and Connect).
READ NEXT:
 Insulators - HV Battery (Install)
Warning:
Only technicians who have been trained in High Voltage Awareness are
permitted to perform this procedure. Proper personal protective equipment (PPE)
and insulating HV gloves with a minimum
Passthrough - DCDC - 12V- Remove
SPECIAL TOOLS
Skt, 1/4in Dr, 5-Lobe Torx Plus External (1059330-00-B)
Resistance meter, microohm, Hioki RM 3548 (1076927-00-A)
Remove
Remove the high voltage controller. See
Controller - High Vol
SEE MORE:
Panel - Door Trim - Front - LH (Remove and Install) - Install
Install
Inspect the condition of the LH front door and the LH front door trim
panel. Replace any broken clips and repair any damage.
Bring the trim panel to the door, and rest it on the door edge.
If present, remove and discard the highlighted clip.
Attach harness to hooks (highlight
Event Data Recorder (EDR)
Model 3 is equipped with an event data
recorder (EDR). The main purpose of an EDR
is to record, in certain crash or near crash-like
situations, such as an air bag deployment or
hitting a road obstacle, data that will assist in
understanding how a vehicle's systems
performed. The EDR is des
© 2019-2024 Copyright www.tmodel3.com
