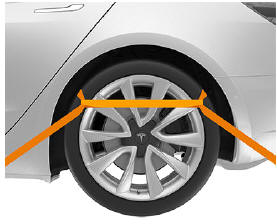
Tesla Model 3: Secure the Tires
The vehicle's tires must be secured onto the truck using the eight-point tie-down method.
- Ensure any metal parts on the tie-down straps do not contact painted surfaces or the face of the wheels.
- Do not place tie-down straps over body panels or through the wheels.
Caution: Attaching the tie-down straps to the chassis, suspension or other parts of the vehicle's body may cause damage.
If Vehicle Has No Power
If Model 3 has no 12V power, perform the following steps to open the hood or jump start the auxiliary 12V battery.
Jump Starting the 12V Battery
Caution: Model 3 cannot be used to jump start another vehicle. Doing so can result in damage.
Note: If jump starting Model 3 using another vehicle, refer to that vehicle manufacturer's instructions. The following instructions assume an external 12V power supply (such as a portable jump starter) is used.
Caution: Avoid short circuits when jump starting Model 3. Connecting cables to the wrong terminals, touching leads together, etc., can result in damage to Model 3.
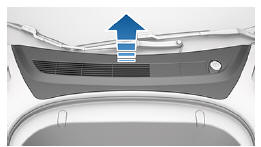
- Open the hood
- Remove the maintenance panel by pulling it upwards to release the trim clips that hold it in place.
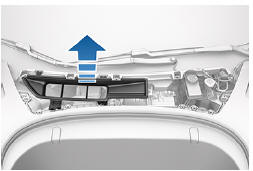
- Remove the cabin intake trim panel by pulling it upwards to release the trim clips that hold it in place.
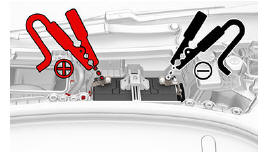
- Connect the 12V power supply's red positive (+) cable to the red positive (+) terminal on the 12V battery.
Caution: To avoid damaging Model 3, do not allow the positive cable to contact other metal components, such as the battery tie-down bracket.
- Connect the 12V power supply's black negative (-) cable to the black negative (-) terminal on the 12V battery.
- Turn on the external power supply (refer to the manufacturer's instructions). Touch the touchscreen to wake it up.
Note: It may take several minutes to receive enough power to wake up the touchscreen.
- When external 12V power is no longer required, disconnect both cables from the terminals on the 12V battery, beginning with the black negative (-) cable.
- Replace the cabin intake trim panel by placing it back in its original location and pressing down until it is secure.
- Replace the maintenance panel by placing it back in its original location and pressing down until it is secure.
- Close the hood.
READ NEXT:
 Consumer Information
There are a lot of crucial facts for owners in this area. It addresses many different subjects, all of which are meant to enhance comprehension of and enjoyment from owning a Model 3.
It starts by ex
Easter Eggs
But wait, there's more! Below is a list of the Easter Eggs that have been
discovered so far and how
to access them. Alternatively, touch the Tesla "T" (top center of the
touchscreen
About this Owner Information
Document Applicability
Owner information is updated regularly to
reflect updates to your vehicle. However, in
some cases, recently released features may
not be described. To display information ab
SEE MORE:
Tube - Input - Coolant - Power Conversion System- Install
Install
Wipe up any spilled coolant
Caution: Spilled coolant can create an
electrical path.
O-rings in good condition
Make sure that the o-rings are not damaged and that they are properly
seated in the connector groove prior to inserting the tube into the power
conversion system. R
Harness - 12V Battery Ground-Install
Install
Install the battery ground cable to the front body controller module,
and then install a new bolt to attach the cable to the module.
Torque 8.5 Nm
Visually inspect that the ground cables exit the front body controller
module neatly in their respective channels, and parallel to
