Tesla Model 3: Switch - Window - Front Passenger (Remove and Replace) - Remove
Tesla Model 3 2017-2024 Service Manual / Closures / Door Glass and Regulators / Switch - Window - Front Passenger (Remove and Replace) / Switch - Window - Front Passenger (Remove and Replace) - Remove
Remove
- Remove the RH front door trim panel. See Panel - Door Trim - Front - LH (Remove and Install).

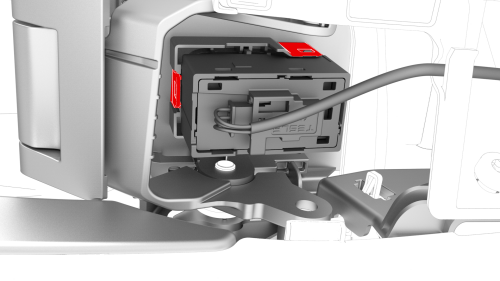
- Remove the puddle light electrical connector from the RH front door trim panel.
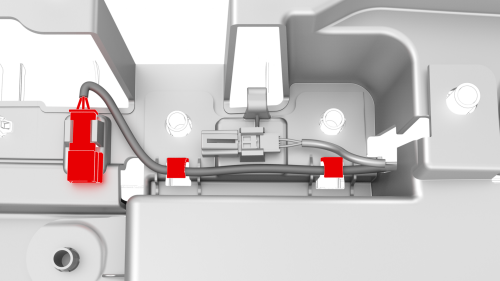
- Release the clips that attach the front passenger window switch electrical harness to the RH front door trim panel, and then disconnect the window switch electrical connector.
- Release the clips that attach the lower bolt cover to the RH front door trim panel, and then remove the lower bolt cover from the door panel.
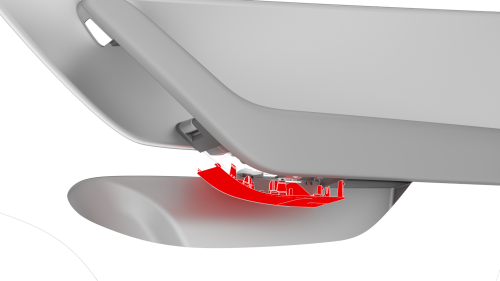
- Remove the puddle light from the RH front door trim panel.
- Release the clips (x4) that attach the front passenger window switch to the door trim panel.
Tip: Release the front clips first, and then release the outer rear clips while pushing the front passenger window switch to release it from the door trim panel.
Note: Replace any broken door panel clips
- Remove the front passenger window switch from the vehicle.
READ NEXT:
 Switch - Window - Front Passenger (Remove and Replace) - Install
Install
Install the front passenger window switch onto the RH front door trim
panel.
Install the puddle light onto the RH front door trim panel
Install the lower bolt cover onto the RH front
Switch - Window - Rear (Remove and Replace)
Remove
Remove the LH rear door trim panel. See
Panel - Door Trim - Rear - LH (Remove and Install).
Release the clips that attach the rear window switch to the door trim
panel.
Ti
Window Motor / Regulator Assembly - Front - LH (Remove and Replace)
Warning: The side impact airbag deployment depends on the front door
sensor's ability to detect a side impact from air pressure. Make sure that there
are no uncovered holes in the front door shells.
SEE MORE:
Sensor - Relative Humidity and Temperature (Remove and Replace)
Remove
Remove the lower quad camera cover. See Quad Camera Cover - Lower
(Remove and Replace).
Remove the rear view mirror. See Mirror - Rear View (Remove and
Replace).
Remove the forward facing camera. See Camera - Forward Facing (Remove
and Replace).
Disconnect the electrical co
Tire - Front - LH (Dismount and Mount)
Warning:
Always read and understand the tire equipment operator's
manual before operating the tire changer.
Note: These instructions are based on the Hunter TC3900 tire
changer. Some steps might be different for other tire
changers. Refer to the
© 2019-2024 Copyright www.tmodel3.com
