Tesla Model 3: Car Computer (Remove and Replace)
Car Computer - Remove

SPECIAL TOOLS
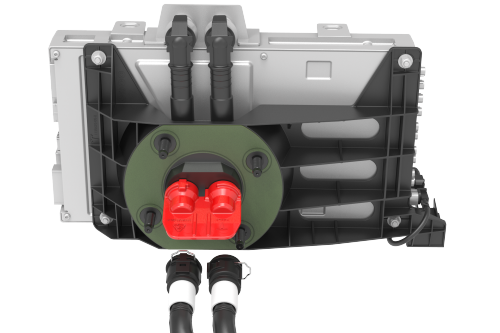
Plug,Car Computer Fluid Port (1119171-00-A)
Kit, Battery Coolant Drain & Fill (1065131-00-A)
Kit, Computer Purge Adapters, Model 3 (1473522-00-A)
Kit, Svc Plug, Cooling Hose, Model 3 (1135762-00-A)
Remove
- If "Tow Mode" is active, then disable "Tow Mode."
- If the car computer is being removed because it needs replacement, refer
to SI-18-21-001 before you begin for important information.
- Disconnect 12V power. See 12V Power (Disconnect and Connect).
- Remove the underhood storage unit. See Underhood Storage Unit (Remove
and Replace).
- Remove the outer HVAC plenum duct. See Duct - HVAC Plenum - Outer (Remove
and Replace).
- Place absorbent material below the car computer coolant hose connections
to collect any spilled coolant.
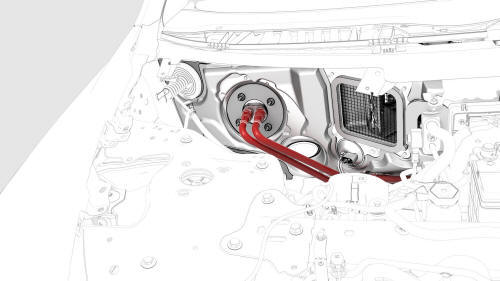
- Release the clips on the coolant hoses connected to the car computer,
and then disconnect the coolant hoses from the car computer.
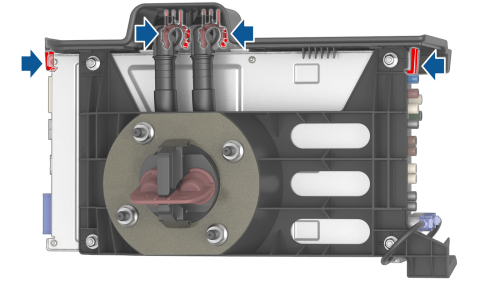
- Plug the female fittings of the coolant hoses.
- Connect the computer purge drain adapter to the left car computer
coolant fitting, and then fasten the clip.
- Connect the coolant cart drain hose to the left drain adapter.
- Connect the computer purge inlet adapter to the right car computer
coolant fitting, and then fasten the clip.
- Connect the coolant cart flush hose to the right drain adapter.
- Close the valve at the pressure regulator in the coolant cart.
- Connect supply air to the pressure regulator.
- Slowly open the valve at the pressure regulator and allow the coolant to
drain into the waste container.
- Start a 1-minute timer.
- After 1 minute, close the valve at the pressure regulator.
- Disconnect supply air from the pressure regulator
- Disconnect the coolant cart flush hose from the right drain adapter.
- Release the clip and disconnect the computer purge inlet adapter from
the right car computer coolant fitting.
- Disconnect the coolant cart drain hose from the left drain adapter.
- Release the clip and disconnect the computer purge drain adapter from
the left car computer coolant fitting.
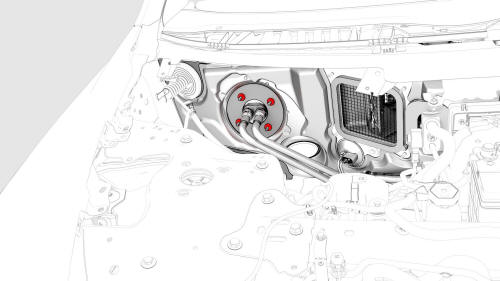
- Install the car computer fluid port plug over the car computer coolant
fittings.
- Remove and discard the nuts that attach the car computer to the body.
- Release the clips that attach the emergency footwell speaker panel to
the instrument panel.
- Disconnect the harness from the emergency footwell speaker connector,
and remove the emergency footwell speaker panel from the vehicle.
- Remove the RH lower A-pillar trim. See Trim - A-Pillar - Lower - LH (Remove
and Replace).
- Remove the RH center console side panel carpet. See Carpet - Side Panel
- Center Console - LH (Remove and Replace).
- Remove the RH footwell duct. See Duct - Footwell - RH (Remove and
Replace).
.jpg)
- Remove the clips that attach the front RH carpet to the body, and then
fold the front RH carpet rearwards.

- Remove the nuts that attach the RH carpet locator bracket to the body,
and then remove the bracket from the vehicle.
.png) Torque 2.5 Nm
Torque 2.5 Nm
- Place absorbent material beneath the car computer to catch any spilled
coolant.
- Put on an antistatic wrist strap, and connect the strap to a body ground
point.
- Move the car computer inwards to allow better access to the clips and
electrical connectors of the car computer.
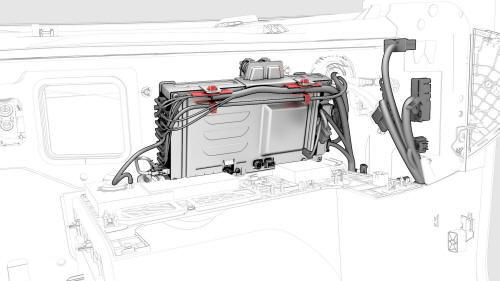
- Release the clips that attach the electrical harness to the car computer.
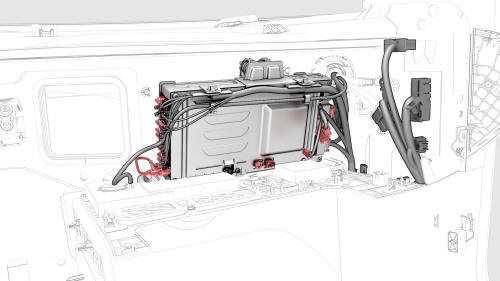
- Disconnect the electrical harness connectors (x21) from the car computer,
and then remove the computer from the vehicle.
Caution: Avoid spilling coolant on the electrical connectors.
Caution: Take care not to damage the passenger airbag harness and
connectors during removal.
- If present, release the clips (x4) that attach the car computer shroud
to the car computer, and then set the shroud aside.
- Remove the antistatic wrist strap.
- If the car computer is defective and to be returned to MRB, make sure
that:
- The car computer is fully drained of coolant.
- The coolant ports are properly and tightly plugged.
- The car computer is wrapped in several layers of paper towels before is
it packed for return shipment.
Car Computer - Install
Install
- Put on an antistatic wrist strap, and connect the strap to a body ground
point.
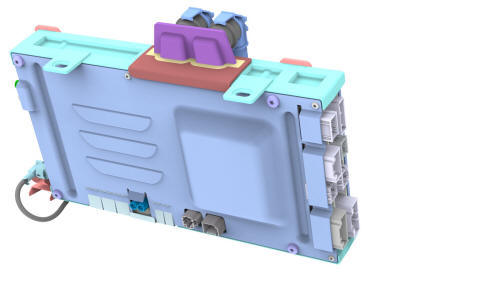
- If not already installed, position a car computer shroud on the car
computer, and then install the clips (x4) that attach the shroud to the
computer.
- Bring the car computer to where it installs into the vehicle, and then
connect the electrical harness connectors (x21) to the car computer.
Caution: Avoid spilling coolant on the electrical
connectors.
Caution: Take care not to damage the passenger airbag harness and
connectors during installation.
- Fasten the clips that attach the electrical harness to the car computer.
- Move the car computer forward so that the mounting studs pass through
the firewall.
- Remove the antistatic wrist strap.
- Remove the absorbent material from beneath the car computer.
- Install new nuts (x4) to attach the car computer to the body.
Torque 7.1 Nm
- Install the RH carpet locator bracket to the body, and then install the
nuts that attach the RH carpet locator bracket to the body.
Torque 2.5 Nm
- Unfold the front RH carpet forward, and then install the clips that
attach the front RH carpet to the body.
- Install the RH footwell duct. See Duct - Footwell - RH (Remove and
Replace).
- Install the RH center console side panel carpet. See Carpet - Side Panel
- Center Console - LH (Remove and Replace).
- Install the RH lower A-pillar trim. See Trim - A-Pillar - Lower - LH (Remove
and Replace).
- Bring the emergency footwell speaker panel to the vehicle, and then
connect the harness to the emergency footwell speaker connector.
- Install the emergency footwell speaker panel to the instrument panel,
and then fasten the clips that attach the emergency footwell speaker panel
to the instrument panel.
- Remove the car computer fluid port plug from the car computer coolant
fittings.
- Remove the plugs from the female fittings of the coolant hoses.
- Release the clips on the coolant hoses, connect the coolant hoses to the
car computer, and then fasten the clips.
- Remove the absorbent material from below the car computer coolant hose
connections.
- Connect 12V power. See 12V Power (Disconnect and Connect).
- If a new car computer is being installed, refer to SI-18-21-001 for
further instruction.
- Refill the cooling system. See Cooling System (Vacuum Refill).
- Install the outer HVAC plenum duct. See Duct - HVAC Plenum - Outer (Remove
and Replace).
- Install the underhood storage unit. See Underhood Storage Unit (Remove
and Replace).
READ NEXT:
Note: This procedure was formulated using a release candidate or
production model. Follow safety requirements and use extreme caution when
working on or near high-voltage systems and components.
R
SEE MORE:
SPECIAL TOOLS
Ratchet, 1/4" Sq Dr, HV Insulated (1057602-00-A)
Ext Bar, Wobble, 1/4" Dr, HV Insulated (1057603-00-A)
Skt, 1/4" Sq Dr, 13mm, HV Insulated (1057606-00-A)
Resistance meter, microohm, Hioki RM 3548 (1076927-00-A)
Warning: Only technicians who have been trained in High Voltage
Awarenes
Module - Steering Column Control - Remove
Remove
Remove the 2nd row lower seat cushion. See Seat
Cushion - Lower - 2nd Row (Remove and Replace).
Remove the rear underhood apron. See Underhood Apron
- Rear (Remo
 Connectivity Board - Car Computer (Remove and Replace)
