Tesla Model 3: Penthouse Coolant (Drain and Refill)
Penthouse Coolant- Drain
SPECIAL TOOLS
Drive Unit Pressure Test Fixture (1053600-00-C)
Kit, Coolant Leak Test Adapters, Model 3 (1132185-00-B)
Kit, Coolant Drain & Fill Adapters, M3 (1133843-00-A)
Kit, Svc Plug, Cooling Hose, Model 3 (1135762-00-A)
Kit, Battery Coolant Drain and Fill (GSN-TL-000564)
Drain
- Disconnect 12V power. See
12V Power (Disconnect and Connect)
- Remove the mid aero shield panel. See
Panel - Aero Shield - Mid (Remove and Replace).
- Remove the rear HV battery skid plate. See
Skid Plate - HV Battery - Rear (Remove and Replace).
- Position a coolant drain under the rear RH side of the HV battery
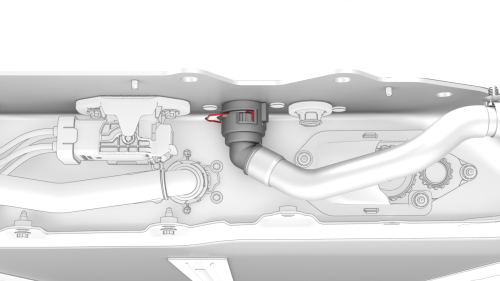
- Disconnect the rear powertrain supply hose from the RH underside of the
penthouse, plug the female fitting of the hose, and allow the battery to
drain.
- Connect the coolant pressure test adapter to the RH side male fitting
under the penthouse.
- Connect the hose from the drive unit pressure test fixture to the
coolant pressure test adapter.
- Close both valves P1 (inlet) and P2 (outlet) on the test fixture, and
connect a compressed air supply line.
- Fully close the regulator, and then open P1 (inlet valve)
- Set the pressure regulator of the test fixture to 50 psi.
- Position the coolant drain under the rear LH side of the HV battery
.png)
- Disconnect the rear drive unit inverter inlet hose from the LH underside
of the penthouse, plug the female fitting of the hose, and allow the battery
to drain.
- Connect the coolant drain adapter to the LH side male fitting under the
penthouse, and direct the tube to the coolant waste container.
- If the coolant waste container is a bottle, push a shop towel partially
into the bottle neck, to prevent coolant from splashing out.
- Slowly open P2 (outlet valve) to speed the drain.
- Wait at least 2 minutes for the coolant to fully drain.
- Close P2 (outlet valve) when no more coolant is expelled.
- Move the coolant drain under the rear RH side of the HV battery
- Interchange the coolant pressure test adapter and the coolant drain
adapter on the male fittings under the penthouse, and direct the tube to the
coolant waste container.
- Slowly open P2 (outlet valve) to speed the drain.
- Wait at least 2 minutes for the coolant to fully drain.
- Close P2 (outlet valve) when no more coolant is expelled.
Caution:
Though not visible, there is still residual coolant in the power
conversion system thermal block and input and output tubes. When servicing the
power conversion system and input and output tubes, make sure not to spill any
coolant, and to immediately wipe up any coolant that has spilled.
- Disconnect the air supply from the test fixture.
- Remove the coolant pressure test adapter and coolant drain adapter from
the HV battery
- Perform the service procedures that required the penthouse coolant to be
drained.
- After the components have been replaced, refill the coolant. See
Refill.
Penthouse Coolant- Refill
- Perform a penthouse coolant leak test. See
Penthouse Coolant Leak Test.
- Remove the plugs from the hoses.
- Connect the rear powertrain supply hose to the RH side of the HV battery,
and the rear drive unit inverter inlet hose to the LH side of the HV battery.
- Move the coolant drain to under the motor.
- Release the clip that attaches the coolant inlet hose to the heat
exchanger.
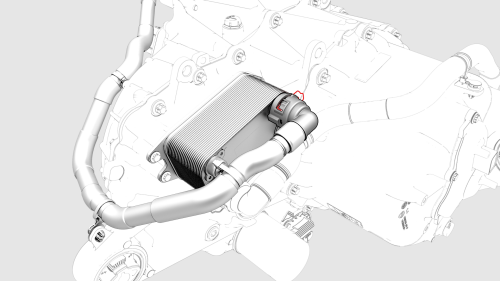
- Release the clip and disconnect the coolant inlet hose from the heat
exchanger upper fitting.
- Attach a coolant fill tube to the coolant inlet hose fitting.
- Pump coolant into the hose until back pressure is felt or coolant
overflows
- Attach the coolant fill tube to the heat exchanger upper fitting.
- Pump coolant into the heat exchanger until back pressure is felt or
coolant overflows.
- Fasten the clip that attaches the coolant inlet hose to the heat
exchanger.
- If the penthouse cover was removed as part of another procedure, inspect
the coolant input and output tubes and fittings for leaks.
- Remove the coolant drain from under the vehicle.
- Install the rear HV battery skid plate. See
Skid Plate - HV Battery - Rear (Remove and Replace).
- Install the mid aero shield panel. See
Panel - Aero Shield - Mid (Remove and Replace).
- Connect 12V power. See
12V Power (Disconnect and Connect).
- Perform a vacuum refill of the cooling system. See
Cooling System (Vacuum Refill).
READ NEXT:
DRAFT
Warning:
This procedure was derived from pre-production computer models, and
might not reflect the real-world situation. Warnings and cautions might be
missing. Follow safety requirements and
SEE MORE:
Remove
Open all doors.
Lower all windows.
Remove the 2nd row lower seat cushion. See
Seat Cushion - Lower - 2nd Row (Remove and Replace).
Remove the LH 2nd row seat side bolster. See
Bolster - Side - Seat - 2nd Row - LH (Remove and Replace).
Pull upward at the lower corner of the rea
ABS Modulator - Remove
Remove
Raise and support the vehicle. See Raise Vehicle - 2
Post Lift.
Remove the 2nd row lower seat cushion. See Seat
Cushion - Lower - 2nd Row (Remove and Replace).
Remo
 Penthouse Coolant Leak Test
