Tesla Model 3: Charging Instructions
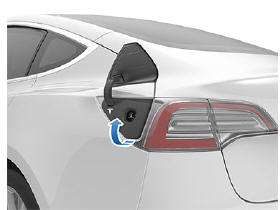
The charge port is located on the left side of
Model 3, behind a door that is part of the rear
tail light assembly. Before charging, park
Model 3 to ensure that the charge cable easily
reaches the charge port.
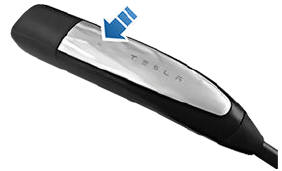
With Model 3 unlocked (or an authenticated
phone is within range) and in Park, press and
release the button on the Tesla charge cable
to open the charge port door.
You can also open the charge port door using
any of these methods: Note: The following image is provided for
demonstration purposes only. Depending on
market region, your charge port may be
slightly different.
Note: The Tesla "T" lights up white when you
open the charge port door. If you do not insert
a charge cable into the charge port within a
few minutes after opening the charge port
door, the charge port door closes. If this
happens, use the touchscreen to open the
charge port door again Caution: Do not try to force the charge
port door open. Plugging In If desired, use the touchscreen to change the
charge limit and the charging current To charge at a public charging station, plug
the appropriate adapter into the vehicle's
charging port, and then connect the station's
charging connector to the adapter. The most
commonly used adapter(s) for each market
region are provided. Depending on the
charging equipment you are using, you may
need to start and stop charging using a
control on the charging equipment.
If you are using the Mobile Connector, plug it
into the power outlet before plugging it into
Model 3.
Align the connector to the charge port and
insert fully. When the connector is properly
inserted, charging begins automatically after
Model 3: Note: Whenever Model 3 is plugged in but not
actively charging, it draws energy from the wall outlet instead of using energy
stored in
the Battery. For example, if you are sitting in
Model 3 and using the touchscreen while
parked and plugged in, Model 3 draws energy
from the wall outlet instead of the Battery. Caution: The connector end of the charge
cable can damage the paint if dropped
onto the vehicle. During charging, the charge port light (the
Tesla "T" logo) pulses green, and the
touchscreen displays the charging status. The
frequency at which the charge port light
pulses slows down as the charge level
approaches full. When charging is complete,
the light stops pulsing and is solid green. Note: If Model 3 is locked, the charge port
light does not light up. If the charge port light turns red while
charging, a fault is detected. Check the
touchscreen for a message describing the
fault. A fault can occur due to something as
common as a power outage. If a power outage
occurs, charging resumes automatically when
power is restored. Note: When charging, particularly at high
currents, the refrigerant compressor and fan
operate as needed to keep the Battery cool.
Therefore, it is normal to hear sounds during
charging. Note: Air conditioning performance is
generally not affected by charging. However,
under certain circumstances (for example, you
are charging at high currents during a
particularly warm day), the air coming from
the vents may not be as cool as expected and
a message displays on the touchscreen. This is
normal behavior and ensures that the Battery
stays within an optimum temperature range
while charging to support longevity and
optimum performance. Warning: Never spray liquid at a high
velocity (for example, if using a pressure
washer) towards the charge port while
charging. Failure to follow these
instructions can result in serious injury or
damage to the vehicle, charging
equipment, or property. Stopping Charging Stop charging at any time by disconnecting
the charge cable or touching Stop Charging
on the touchscreen. Note: To prevent unauthorized unplugging of
the charge cable, the charge cable latch
remains locked and Model 3 must be unlocked
or able to recognize your authenticated phone
before you can disconnect the charge cable.
However, in cold ambient temperatures below
41Вє F (5Вє C), the charge port remains unlocked
whenever the vehicle is not charging, even
when Model 3 is locked. To disconnect the charge cable:
Alternatively, unlock the vehicle by
opening a door, using a key card or key
fob, or touching Stop Charging on the
touchscreen. These methods unlock the
charge port as well. Note: The charge port automatically closes
within approximately 10 seconds of removing
the connector from the charge port. Caution: Tesla strongly recommends
leaving Model 3 plugged in when not in
use. This maintains the Battery at the
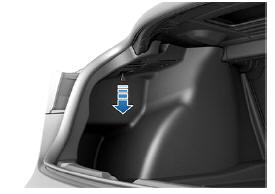
optimum level of charge. Manually Releasing Charge Cable If the usual methods for releasing a charge
cable from the charge port (using the charge
handle release button, touchscreen, or mobile
app) do not work, carefully follow these steps:
Note: The release cable may be recessed
within the opening of the trim. Caution: The release cable is designed for
use only in situations where the charge
cable cannot be released from the charge
port using the usual methods. Continuous
use may result in damage to the release
cable or charging equipment. Warning: Do not perform this procedure
while your vehicle is charging or if any
orange high voltage conductors are
exposed. Failure to follow these
instructions can result in electric shock
and serious injury or damage to the
vehicle. If you have any uncertainty as to
how to safely perform this procedure,
contact your closest Service Center. Warning: Do not attempt to remove the
charge cable while simultaneously pulling
the release cable. Always pull the release
cable before attempting to remove the
charge cable from the charge port.
Failure to follow these instructions can
result in electric shock and serious injury. Charge Port Light
Model 3 is ready to charge and the
connector is not inserted, or the charge
port latch is unlocked and the connector is
ready to be removed. Note: In cold ambient temperatures below
41Вє F (5Вє C), the charge port remains
unlocked whenever the vehicle is not
charging. In these situations, the charge
port light is white.
As Model 3 approaches a full charge, the
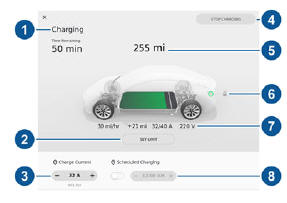
frequency of the blinking slows. The charging screen displays on the
touchscreen whenever the charge port door is
open. To display the charging screen at any
time: The charging screen displays a representative
image of the status of the Battery and
information about your charging session
including: Note: To change how energy units are
displayed, touch Controls > Display > Energy
Display. Note: The following illustration is provided for
demonstration purposes only and may vary
slightly depending on software version and
market region.
Note: If Model 3 is charging and detects
unexpected fluctuations in input power,
the charging current is automatically
reduced by 25%. For example, a 40 amp
current is reduced to 30 amps. This
automatic current reduction increases
robustness and safety in situations when
an external problem exists (for example, a
home wiring system, receptacle, adapter
or cord is unable to meet its rated current
capacity). As a precaution, when Model 3
automatically reduces current, it saves the
reduced current at the charging location.
Although you can manually increase it,
Tesla recommends charging at the lower
current until the underlying problem is
resolved and the charging location can
provide consistent power. Note: In cold ambient temperatures below
41Вє F (5Вє C), the charge cable remains
unlocked whenever the vehicle is not
charging. Note: If charging at a Tesla Supercharger, the
charging screen also displays information
about your previous or current Supercharger
session Note: To reduce congestion at high-usage
supercharger sites, you may be automatically
limited to a maximum charge of 80% when
not using Trip Planner. You can manually increase the limit
by tapping "Set Limit" on the touchscreen or
mobile app. There are two ways in which you can schedule
your vehicle's charging:
Once your specified time is set, Model 3
prepares itself by determining the best
time to start charging to optimize energy
costs, Battery longevity, and ensure
charging completes in time for your drive.
Your vehicle also preconditions the cabin
to a comfortable temperature and warms
the Battery. To set up a scheduled
departure time, go to Charging >
Scheduled Departure > Schedule and
follow the onscreen instructions to
customize your schedule. Scheduled Charging is best used to determine
when your vehicle should start charging;
Scheduled Departure is best used to
determine when charging should complete for
your drive. Note: Your vehicle aims to finish charging
before 6am (end of off-peak hours). If given
sufficient time to charge, charging may stop at
6am, even if your scheduled departure is later.
The vehicle warms the Battery and
preconditions the cabin shortly before your
scheduled departure time. If the vehicle does
not have enough time to complete charging
before 6am, it will continue to charge until it
reaches the target Battery percentage. Note: If your vehicle is not plugged into a
charger, Scheduled departure will not
precondition the cabin or battery. Supercharger Usage Fees and Idle
Fees When charging using a Tesla supercharger,
SUPERCHARGING information displays at the
bottom of the charging screen. This
information includes the location, the time
that charging started, and an estimate of how
much the session will cost. When you stop
supercharging, the estimated cost of that
session displays until a new supercharging
session begins. Note: Estimated pricing is displayed for your
convenience only and may not reflect the
actual final price you will be charged for that
supercharging session. Final pricing for
supercharging sessions can be found in your
Tesla Account. When charging at a Tesla supercharger, you
are subject to idle fees. Idle fees are designed
to encourage drivers to move their vehicle
from the Supercharger when charging is
complete. Idle fees are in effect only when half
or more of the Superchargers at a site are
occupied. The Tesla mobile app notifies you
when charging nears completion, and again
when charging is complete. Additional
notifications are sent if idle fees are incurred.
Idle fees are waived if you move your vehicle
within five minutes of charging completion.
Log into your Tesla Account to view fees and
details about Supercharger sessions, set up a
payment method, and make payments. Once a
payment method is saved, fees are
automatically paid from your account.Opening the Charge Port
During Charging
Charging Status and Settings
 Touch the charging icon on the
"Cards" area on the touchscreen.
Scheduled Charging and Scheduled
Departure
READ NEXT:
SEE MORE:
 Seal - Body - Side - Rear - Primary - LH (Remove and Replace)
Remove
Remove the LH B-pillar applique. See
Applique - B-Pillar - LH (Remove and Replace).
Release the clips (x3) that attach the rear LH primary body seal to the
mid B-pillar, the upper B-pillar, and the mid C-pillar.
Pull on the seal to remove it from the body.
Install
Loosely
Foam - Cushion - Driver Seat (Remove and Replace)
Foam - Cushion - Driver Seat (Remove and Replace) - Remove
Remove
Remove the driver seat. See
Seat - Driver (Remove and Replace).
Remove the driver headrest trim. See
Trim - Headrest - Driver (Remove and Replace).
Remove the side outer cover from the driver seat. See
Cover - Outer Side - Driv
