Tesla Model 3: External Charging Connectors
Tesla Model 3 2017-2026 Service Manual / External Charging Connectors
Mobile Connector
Firmware Update - CHAdeMO Charging Adapter
CAN Setup
Connect the USB-CAN dongle to a laptop that is equipped with Toolbox
Connect the CHAdeMO CAN programming connector to the USB-CAN dongle.
Connect the CHAdeMO CAN programming connector to an external 12V power supply.
Connect the CHAdeMO CAN programming connector to the CHAdeMO charging adapter
Firmware Update
Note: It is not necessary to connect the diagnostic cable to the vehicle.
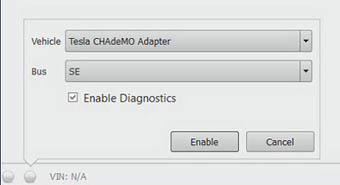
- In the bottom left corner of the screen, click the gray circle on the right. A popup box appears:
- In the Vehicle field, select Tesla CHAdeMO Adapter.
- In the Bus field, select SE.
- Ensure that the Enable Diagnostics box is checked.
- Click Enable.
- In Toolbox, select Panels → Charging → CHAdeMO Adapter Firmware Update.
Note: If the CHAdeMO Adapter Firmware Update button is not present:
- Select Options → Plugins
- Ensure that the checkbox for CHAdeMO is checked.
- In the top right corner of the window, click Enable.
- Click the Start/Play button and follow the onscreen instructions