Tesla Model 3: HV Header - HV Battery (Remove and Replace)
SPECIAL TOOLS Extractor, Battery HV Header, Model 3 (1140423-00-B) Lever Lock, HV Connector, Model 3 (1140311-00-A) Warning: Only technicians who have been trained in High Voltage Awareness are
permitted to perform this procedure. Proper personal protective equipment (PPE)
and insulating HV gloves with a minimum rating of class 0 (1000V) must be worn
at all times a high voltage cable, busbar, or fitting is handled. Refer to Tech
Note TN-15-92-003, "High Voltage Awareness Care Points" for additional safety
information. Remove
Install
Note: Push and pull on the header to make sure it is secured.
Caution: Make sure that the harness fits the connector squarely
and tightly.
HV Header - HV Battery- Remove
.png)
.png)
.png) Torque 10 Nm
Torque 10 Nm.png)
.png)

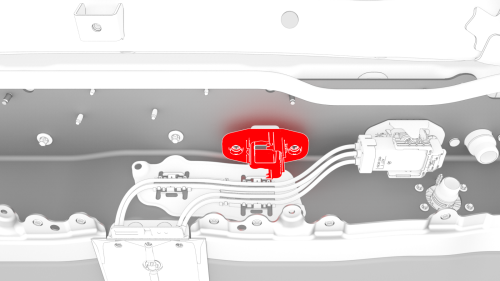
HV Header - HV Battery- Install
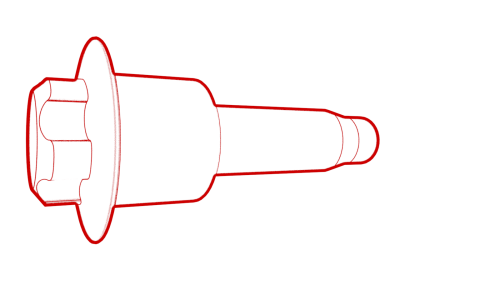 Torque 10 Nm
.png)
Torque 10 Nm
READ NEXT:
 Insulators - HV Battery (Install)
Warning:
Only technicians who have been trained in High Voltage Awareness are
permitted to perform this procedure. Proper personal protective equipment (PPE)
and insulating HV gloves with a minimum
SEE MORE:
Subframe Assembly - Front (RWD) - Install
Install
Position the subframe lifting tool against the front subframe, and then
attach the straps (x3) to the subframe.
Note: Make sure to align the two subframe lifting tool guides with
the front subframe.
Lower the front drive unit onto the front subframe
Note: Make sure not to move the r
Trim - C-Pillar - Rear - LH (Remove and Replace)
Trim - C-Pillar - Rear - LH (Remove and Replace) - Remove
Remove
Remove the 2nd row lower seat cushion. See
Seat Cushion - Lower - 2nd Row (Remove and Replace).
Remove the LH 2nd row seat side bolster. See
Bolster - Side - Seat - 2nd Row - LH (Remove and Replace).
Remove the LH side rail tr
