Tesla Model 3: Replacing Tires and Wheels
Tires degrade over time due to the effects of ultraviolet light, extreme temperatures, high loads, and environmental conditions. It is recommended that tires are replaced every six years, or sooner if required, even if tread depth is above the minimum.
Wheel and tires are matched to suit the handling characteristics of the vehicle.
Replacement tires must comply with the original specification. If tires other than those specified are used, ensure that the load and speed ratings marked on the tire equal or exceed those of the original specification.
Ideally, you should replace all four tires at the same time. If this is not possible, replace the tires in pairs, placing the new tires on the rear.
Always balance the wheel and tire after replacing a tire.
If you replace a wheel, the TPMS (Tire Pressure Monitoring System) sensors need to be reset to ensure they provide accurate warnings when tires are under- or over-inflated
For the specification of the original wheels and tires installed on Model 3
Note: Installing winter tires with aggressive compound and tread design may result in temporarily-reduced regenerative braking power. However, your vehicle is designed to continuously recalibrate itself, and after changing tires it will increasingly restore regenerative braking power after some moderate-torque straight-line accelerations.
For most drivers this occurs after a short period of normal driving, but drivers who normally accelerate lightly may need to use slightly harder accelerations while the recalibration is in progress.
Warning: For your safety, use only tires and wheels that match the original specification. Tires that do not match the original specification can affect the operation of the TPMS.
Warning: Never exceed the speed rating of your vehicle's tires. The speed rating is shown on the sidewall of your tires
Asymmetric Tires
Model 3 tires are asymmetric and must be mounted on the wheel with the correct sidewall facing outward. The sidewall of the tire is marked with the word OUTSIDE. When new tires are installed, make sure that the tires are correctly mounted on the wheels.
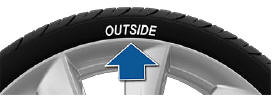
Warning: Road holding is seriously impaired if the tires are incorrectly installed on the wheels.
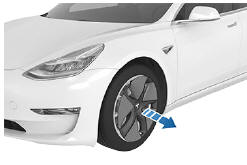
Removing and Installing Aero Covers
If your Model 3 is equipped with aero covers, you must remove them to access the lug nuts.
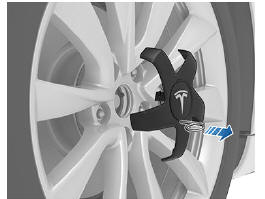
To remove an aero cover:
- Grasp the aero cover firmly with both hands.
- Pull the aero cover toward you to release the retaining clips.
To install an aero cover:
- Align the aero cover into position so that the notch at the base of the Tesla "T" is aligned with the tire's valve stem.
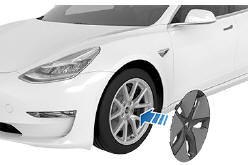
- Push firmly around the perimeter of the aero cover until it fully snaps into place.
For Gemini wheels, press on the perimeter of the cover until it aligns with the wheel surface. Press on the Tesla "T" in the center until the cap snaps into place.
Caution: Make sure the aero cover is fully secure before driving to prevent it from falling off.
Removing and Installing Lug Nut Covers
If your Model 3 is equipped with lug nut covers, you must remove them to access the lug nuts.
To remove a lug nut cover:
- Insert the curved part of the lug nut cover tool (located in the glovebox for some vehicles) into the hole at the base of the Tesla "T".
Note: The lug nut cover tool can also be purchased at an auto parts store or through online retailers.
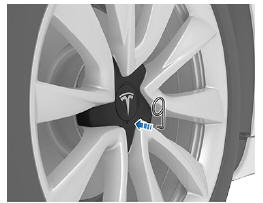
- Maneuver the lug nut cover tool so that it is fully inserted into the hole in the lug nut cover.
- Twist the lug nut cover tool so that the curved part is touching the middle of the lug nut cover.
- Firmly pull the lug nut tool away from the wheel until the lug nut cover is released.
To install the lug nut cover:
- Align the lug nut cover into position.
- Push firmly on the lug nut cover until it fully snaps into place.
Caution: Make sure the lug nut cover is fully secure before driving to prevent it from falling off.
Wheel Configuration
If you are installing new wheels or swapping them for different ones, update your vehicle's wheel configuration by touching Controls > Service > Wheel Configuration. This allows Model 3 to learn the new wheels and provide more accurate status updates on your vehicle.
Select a wheel from the drop down menu that matches the new wheels you plan to install on Model 3. Selecting new wheels in the wheel configuration also changes the wheels that appear on your vehicle's avatar on the touchscreen.
Ensure you are aware if your vehicle is equipped with staggered wheels, meaning the wheels are different sizes in the front and rear.
Check the front and rear tire sizes marked on the tire sidewall to see if they match or are different sizes. If the wheels are staggered, take extra precaution to ensure the new wheels you install are staggered in the same way as the previous wheels.
Note: Changing your vehicle's wheel configuration can impact range estimates, tire pressure warning levels, and vehicle visualization.
Warning: Only use Tesla-approved wheels when installing or swapping wheels. Using non Tesla-approved wheels can cause serious damage. Tesla is not liable for damage caused by using wheels not approved by Tesla.
READ NEXT:
 Tire Pressure Monitoring
Each tire should be checked monthly when
cold and inflated to the recommended
pressures that are printed on the Tire and
Loading Information label located on the
driver's door. If your vehicle has
Seasonal Tire Types
Summer Tires
Your vehicle may be originally equipped with
high performance summer tires or all season
tires. Tesla recommends using winter tires if
driving in cold temperatures or on roads
where
SEE MORE:
Platter Enclosure Coolant Leak Test
SPECIAL TOOLS
Drive Unit Pressure Test Fixture (1053600-00-C)
Kit, Coolant Leak Test Adapters, Model 3 (1132185-00-B)
Kit, Coolant Drain & Fill Adapters, M3 (1133843-00-A)
Kit, Svc Plug, Cooling Hose, Model 3 (1135762-00-A)
Procedure
Disconnect 12V power. See
12V Power (Disconnect and Connect
Easter Eggs
But wait, there's more! Below is a list of the Easter Eggs that have been
discovered so far and how
to access them. Alternatively, touch the Tesla "T" (top center of the
touchscreen) then drag the
About Your Tesla box downwards for one-touch access to all discovered Easter
Eggs
