Tesla Model 3: Autosteer
Note: Autosteer is a BETA feature.
Autosteer builds upon Traffic-Aware Cruise Control, intelligently keeping Model 3 in its driving lane when cruising at a set speed.
Autosteer also allows you to use the turn signals to move Model 3 into an adjacent lane. Using the vehicle's camera(s), the radar sensor, and the ultrasonic sensors, Autosteer detects lane markings and the presence of vehicles and objects to steer Model 3.
Warning: Autosteer is a hands-on feature.
You must keep your hands on the steering wheel at all times.
Warning: Autosteer is intended for use only on highways and limited-access roads with a fully attentive driver. When using Autosteer, hold the steering wheel and be mindful of road conditions and surrounding traffic. Do not use Autosteer on city streets, in construction zones, or in areas where bicyclists or pedestrians may be present. Never depend on Autosteer to determine an appropriate driving path. Always be prepared to take immediate action. Failure to follow these instructions could cause damage, serious injury or death.
Operating Autosteer
Before you can operate Autosteer, you must enable it by touching Controls > Autopilot > Autosteer (Beta).
 To indicate that Autosteer is
available (but not actively
steering Model 3), the
touchscreen displays a gray
Autosteer icon.
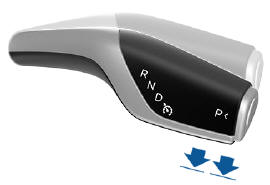
To initiate Autosteer, move the gear lever fully down twice in quick succession.
Autosteer briefly displays a message on the touchscreen reminding you to pay attention to the road and be ready to take over at any time. To indicate that Autosteer is now actively steering Model 3, the touchscreen displays the Autosteer icon in blue. When Autosteer is able to detect lane markings, it also displays the driving lane in blue.
Note: To initiate Autosteer when there is no vehicle in front of you, you must be driving at least 18 mph (30 km/h) on a roadway with visible lane markings. If a vehicle is detected ahead of you, you can initiate Autosteer at any speed under 90 mph (150 km/h), even when stationary (if you are at least 5 feet (150 cm) away from the vehicle).
The touchscreen displays a message indicating that Autosteer is temporarily unavailable if you attempted to engage Autosteer when driving at a speed that is not within the speed required for Autosteer to operate. Autosteer may also be unavailable if it is not receiving adequate data from the camera(s) or sensors.
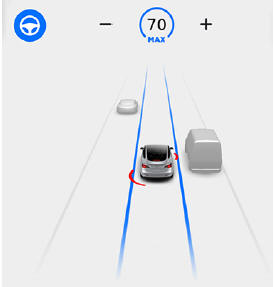
If Autosteer is unable to detect lane markings, the driving lane is determined based on the vehicle you are following.
In most cases, Autosteer attempts to center Model 3 in the driving lane. However, if the sensors detect the presence of an obstacle (such as a vehicle or guard rail), Autosteer may steer Model 3 in a driving path that is offset from the center of the lane.
Warning: Autosteer is not designed to, and will not, steer Model 3 around objects partially or completely in the driving lane.
Always watch the road in front of you and stay prepared to take appropriate action.
It is the driver's responsibility to be in control of Model 3 at all times.
Restricted Speed
Autosteer is intended for use only by a fully attentive driver on freeways and highways where access is limited by entry and exit ramps. If you choose to use Autosteer on residential roads, a road without a center divider, or a road where access is not limited, Autosteer may limit the maximum allowed cruising speed and the touchscreen displays a message indicating that speed is restricted.
The restricted speed can vary depending on whether or not you've specified a speed limit offset. Although you will be unable to increase the cruising speed, you can select a more restrictive cruising speed by reducing the speed limit offset, if applicable, or by manually reducing the set cruising speed (see
In situations where the speed limit cannot be detected when Autosteer is engaged, Autosteer reduces your driving speed and limits the set speed to 45 mph (70 km/h).
Although you can manually accelerate to exceed the limited speed, Model 3 may not brake for detected obstacles. Autosteer slows down to the limited speed when you release the accelerator pedal. When you leave the road, or disengage Autosteer by using the steering wheel, you can increase your set speed again, if desired.
Hold Steering Wheel
Autosteer uses data from the camera(s),
sensors, and GPS to determine how best to
steer Model 3. When active, Autosteer requires
you to hold the steering wheel. If it does not
detect your hands on the steering wheel for a
period of time, a flashing blue light appears at
the top of the car status section of the
touchscreen and the following message
displays: 
Autosteer detects your hands by recognizing light resistance as the steering wheel turns, or from you manually turning the steering wheel very lightly (without enough force to retake control). Autosteer also qualifies your hands as being detected if you engage a turn signal or use a button or scroll wheel on the steering wheel.
Note: When your hands are detected, the message disappears and Autosteer resumes normal operation. Note: Autosteer may also sound a chime at the same time that the message is initially displayed.
Autosteer requires that you pay attention to your surroundings and remain prepared to take control at any time. If Autosteer still does not detect your hands on the steering wheel, the request escalates by sounding chimes that increase in frequency.
If you repeatedly ignore Autosteer's prompts for having your hands on the steering wheel, Autosteer disables for the rest of the drive and displays the following message. If you don't resume manual steering, Autosteer sounds a continuous chime, turns on the warning flashers, and slows the vehicle to a complete stop.
 For the rest of the drive, you
must steer
manually. Autosteer is available again on your
next drive (after you stop and shift Model 3
into Park).
Take Over Immediately
In situations where Autosteer is unable to
steer Model 3, Autosteer sounds a warning
chime and displays the following message on
the touchscreen: 
When you see this message, TAKE OVER STEERING IMMEDIATELY.
Canceling Autosteer
Autosteer cancels when:
- You start steering manually.
- You press the brake pedal.
- The maximum speed that Autosteer supports-90 mph (150 km/h)-is exceeded.
- You move the gear lever upwards.
- A door is opened.
- An Automatic Emergency Braking event occurs
When Autosteer cancels, it sounds chimes and the Autosteer icon either turns gray to indicate that Autosteer is no longer active, or disappears to indicate that it is not currently available.
Note: If Autosteer cancels because you started steering manually, Traffic-Aware Cruise Control remains active. Disengage Traffic- Aware Cruise Control as you normally would, by moving the gear lever upward or pressing the brake pedal.
Note: If you move the gear lever upward and hold it up for more than one second, Model 3 shifts into Neutral after canceling Autosteer.
To disable Autosteer so it is no longer available, touch Controls > Autopilot > Autosteer (Beta).
Auto Lane Change
When Autosteer is active on a vehicle equipped with Auto Lane Change, you can use the turn signals to move Model 3 into an adjacent lane without moving the steering wheel (which would cancel Autosteer).
Warning: It is the driver's responsibility to determine whether a lane change is safe and appropriate. Therefore, before initiating a lane change, always check blind spots, lane markings, and the surrounding roadway to confirm it is safe and appropriate to move into the target lane.
Warning: Never depend on Auto Lane Change to determine an appropriate driving path. Drive attentively by watching the road and traffic ahead of you, checking the surrounding area, and monitoring the touchscreen for warnings.
Always be prepared to take immediate action.
Warning: Do not use Auto Lane Change on city streets or on roads where traffic conditions are constantly changing and where bicycles and pedestrians are present.
Warning: The performance of Auto Lane Change depends on the ability of the camera(s) to recognize lane markings.
Warning: Do not use Auto Lane Change on winding roads with sharp curves, on icy or slippery roads, or when weather conditions (such as heavy rain, snow, fog, etc.) may be obstructing the view from the camera(s) or sensors.
Warning: Failure to follow all warnings and instructions can result in property damage, serious injury or death.
Operating Auto Lane Change
Auto Lane Change is available whenever Autosteer is active. To change lanes using Auto Lane Change:
- Perform visual checks to make sure it is safe and appropriate to move into the target lane
- Fully engage the appropriate turn signal.
- Disengage the turn signal after you are in the target lane.
Auto Lane Change moves Model 3 into the adjacent lane in the direction indicated by the turn signal, provided the following conditions are met:
- The turn signal is fully engaged.
- The ultrasonic sensors and Autopilot cameras do not detect a vehicle or obstacle up to the center of the target lane.
- The lane markings indicate that a lane change is permitted.
- The view of the camera(s) is not obstructed.
- Your vehicle does not detect another vehicle in its blind spot.
- Midway through the lane change, Auto Lane Change can detect the outside lane marking of the target lane.
- Driving speed is at least 30 mph (45 km/h).
As the lane change is in progress, Overtake Acceleration is activated, allowing Model 3 to accelerate closer to a vehicle in front. Midway through the lane change, Auto Lane Change must detect the target lane's outside lane marking. If this lane marking cannot be detected, the lane change is aborted and Model 3 returns to its original driving lane.
Note: Auto Lane Change moves Model 3 one lane at a time. Moving into an additional lane requires you to engage the turn signal a second time after the first lane change is complete.
When using Auto Lane Change, it is important to monitor its performance by watching the driving path in front of you and the surrounding area. Stay prepared to take over steering at any time. As you are crossing over into the adjacent lane, the touchscreen displays the lane marking as a dashed blue line. Once in your new lane, lane markings are displayed as solid blue lines again.
In situations where Auto Lane Change is unable to operate at optimal performance, or cannot operate due to inadequate data, the touchscreen displays a series of warnings.
Therefore, when using Auto Lane Change, always pay attention to the touchscreen and be prepared to manually steer Model 3.
Stop Light and Stop Sign Warning (U.S. only)
Depending on market region or vehicle configuration, Stop Light and/or Stop Sign Warning may not be available on your vehicle.
While Autosteer is in use, Model 3 displays a warning on the touchscreen and sounds a chime if it detects that you are likely to run through a red stop light or stop sign. If this happens, TAKE IMMEDIATE CORRECTIVE ACTION! The visual and audible warnings cancel after a few seconds, or when you press the brake pedal, whichever comes first.
Note: Touch Controls > Autopilot > Full Self- Driving Visualization Preview to display more details about the roadway and its surroundings, such as road markings, stop signs, stop lights, objects (such as trash cans and poles), etc.
Caution: Stop Light and Stop Sign Warning require the vehicle's map to know that a particular stop light or stop sign exists in a certain location. It may be unaware of new stop lights or stop signs that are not captured in the map data.
Therefore, Stop Light and Stop Sign Warning may not detect all stop lights and stop signs due to potential map inaccuracies.
Warning: Stop Light and Stop Sign Warning do not apply the brakes or decelerate Model 3 and may not detect all stop lights and stop signs. Stop Light and Stop Sign Warning are designed for guidance purposes only and are not a substitute for attentive driving and sound judgment. Keep your eyes on the road when driving and never depend on Stop Light and Stop Sign Warning to warn you of a stop light or stop sign.
Warning: Stop Light and Stop Sign Warning are designed to only warn you when approaching a visible red stop sign, solid red or later portion of a yellow traffic light; it may not issue warnings at intersections with flashing lights and does not warn you of yield signs or temporary stop and yield signs (such as in construction areas). Additionally, Stop Light and Stop Sign Warning will not warn you of an approaching stop light or stop sign if you are pressing the accelerator pedal or brake pedal (which disables Autosteer).
Navigate on Autopilot
Note: Navigate on Autopilot is a BETA feature and is not available in all market regions.
When using Autosteer on a controlled-access road (such as a highway or freeway), Navigate on Autopilot automatically exits at off-ramps and interchanges based on your navigation route. Along the highway portion of a navigation route, Navigate on Autopilot also changes lanes to prepare for exits and to minimize the driving time to your destination.
Warning: Navigate on Autopilot does not make driving autonomous. You must pay attention to the road, keep your hands on the steering wheel at all times, and remain aware of your navigation route.
Warning: As is the case with normal driving, be extra careful around blind corners, highway interchanges, and exits because obstacles can appear quickly and at any time.
Warning: Navigate on Autopilot may not recognize or detect oncoming vehicles, stationary objects, and special-use lanes such as those used exclusively for bikes, carpools, emergency vehicles, etc.
Remain alert at all times and be prepared to take immediate action. Failure to do so can cause damage, injury or death.
Enabling and Customizing Navigate on Autopilot
To enable Navigate on Autopilot, touch Controls > Autopilot > Navigate on Autopilot (Beta). Then, to customize how you want Navigate on Autopilot to operate, touch CUSTOMIZE NAVIGATE ON AUTOPILOT:
- Enable At Start Of Every Trip: Choose whether or not you want to automatically enable Navigate on Autopilot for every navigation route. When enabled, the Navigate on Autopilot button on the turnby- turn direction list is already enabled at the start of every trip.
- Speed Based Lane Changes: Navigate on Autopilot is designed to perform both route-based and speed-based lane changes. Route-based lane changes are designed to keep you on your navigation route (for example, moving you into an adjacent lane to prepare for an upcoming off-ramp) whereas speed-based lane changes are designed to maintain a driving speed (not to exceed your cruising speed) that allows you to minimize the time it takes to reach your destination (for example, moving into an adjacent lane to pass a vehicle in front of you). Speedbased lanes changes are optional. You can use this setting to disable speed-based lane changes or to specify how aggressively you want Navigate on Autopilot to change lanes to achieve the set cruising speed. The MILD setting is more conservative about lane changes and may result in a slightly longer driving time whereas MAD MAX is designed to allow you to reach your destination in the shortest driving time possible, but will only change lanes when safe to do so.
- Require Lane Change Confirmation: By default, Navigate on Autopilot requires your confirmation before proceeding with a lane change (by engaging the appropriate turn signal). However, if you want Navigate on Autopilot to change lanes without requiring this confirmation, turn this setting off. When you turn the setting off, you can specify if or how you want to be notified of lane changes (Off, Chime, Vibrate, or Both).
Warning: If you turn off Require Lane Change Confirmation, Navigate on Autopilot notifies you of upcoming lane changes and off-ramps, but it remains your responsibility to monitor the environment and maintain control of Model 3 at all times. Lane changes can occur quickly and suddenly.
Always keep your hands on the wheel and your eyes on the driving path in front of you
Note: In addition to route-based and speedbased lane changes, Navigate on Autopilot also requests a lane change to the right as a reminder to stay out of the left-most lane when you are not passing other vehicles.
Note: The touchscreen displays route-based lane changes at the top of the map's turn-byturn direction list to notify you that an upcoming lane change is needed to stay on the navigation route.
Operating Navigate on Autopilot
Once enabled, the Navigate on Autopilot button appears on the map's turn-by-turn direction list whenever a navigation route is active and the route includes at least one controlled-access road. Touch this button to allow Navigate on Autopilot to assist you on your journey. When enabled, the Navigate on Autopilot button is blue and the turn-by-turn direction displays the Autosteer icon next to maneuvers (such as freeway exits) that Navigate on Autopilot will handle.
Navigate on Autopilot activates and deactivates as appropriate, based on the type of road you are driving on. For example, if Autosteer is active and the Navigate on Autopilot setting is turned on, Navigate on Autopilot automatically becomes active when you reach a supported controlled-access portion of your navigation route.
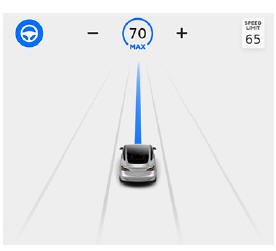
Whenever Navigate on Autopilot is active, the touchscreen displays the driving lane as a single blue line in front of Model 3:
When Navigate on Autopilot is active and you approach an off-ramp or freeway interchange along your navigation route, the appropriate turn signal engages and Autosteer maneuvers Model 3 onto the off-ramp or interchange.
Warning: Never depend on Navigate on Autopilot to determine an appropriate lane at an off-ramp. Stay alert and perform visual checks to ensure that the driving lane is safe and appropriate.
When you leave a controlled-access road (for example, you exit a freeway or you enter a section of the navigation route that is no longer supported), Navigate on Autopilot reverts back to Autosteer- a unique tripletone chime sounds and the touchscreen displays the driving lane lines in blue (instead of the single blue in front of Model 3). When you exit onto an off-ramp, the touchscreen briefly displays a countdown message warning you of the distance remaining before Navigate on Autopilot reverts back to Autosteer.
Note: The way Navigate on Autopilot determines navigation routes and maneuvers at freeway interchanges can be impacted by whether or not the navigation system is set up to use High Occupancy Vehicle (HOV) lanes.
Therefore, ensure the Use HOV Lanes setting is appropriate for your circumstances. If the setting is off, Navigate on Autopilot never uses an HOV lane, regardless of time of day. If the setting is on, Navigate on Autopilot will always include the use of the HOV lane, whenever it exists.
Warning: Even when Navigate on Autopilot deactivates at off-ramps, Autosteer remains active. Always be prepared to take appropriate actions such as stopping at red lights and stop signs, and yielding to other road users.
Warning: Navigate on Autopilot may not always attempt to exit at an off-ramp, even when the exit is determined by the navigation route. Always remain alert and be prepared to manually steer onto the off-ramp, or make a required lane change.
You can cancel Navigate on Autopilot at any time by touching the Navigate on Autopilot button on the map's turn-by-turn direction list (your vehicle reverts back to Autosteer), or by canceling Autosteer entirely
Lane Changes
Navigate on Autopilot changes lanes to either prepare Model 3 for an upcoming off-ramp, to increase your driving speed (not to exceed your set cruising speed), or to move Model 3 out of a left-most lane when you are not passing other vehicles. A message displays at the top of the map's turn-by-turn direction list to notify you when an upcoming lane change is required to stay on your navigation route.
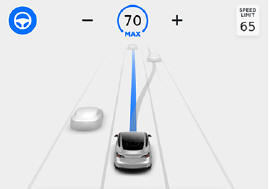
The line on the touchscreen shows the upcoming driving path:
When the touchscreen displays a message asking you to confirm the lane change, engage the appropriate turn signal. If you do not confirm the lane change within three seconds, a chime sounds to remind you that Navigate on Autopilot requires your confirmation to change lanes.
If Require Lane Change Confirmation is turned off, Navigate on Autopilot engages the appropriate turn signal, checks for vehicles and objects, and when appropriate, maneuvers Model 3 into the adjacent lane.
If Require Lane Change Confirmation is turned on, you must engage the appropriate turn signal to confirm that you want Navigate on Autopilot to make the lane change. If you do not confirm the lane change within three seconds, a chime sounds to remind you that Navigate on Autopilot requires your confirmation to change lanes.
Note: If you ignore a route-based lane change suggestion (for example, you are driving in the left lane while approaching an off-ramp on the right side of the highway), Navigate on Autopilot will be unable to maneuver onto the off-ramp and as a result, the navigation system will re-route you to your destination.
Warning: Navigate on Autopilot may not always attempt to exit at an off-ramp or change lanes, even when an exit or lane change is determined by the navigation route. Always remain alert and be prepared to manually steer onto an offramp, or make a lane change to prepare for, or to exit at, an off-ramp or interchange.
Be Ready to Assist
When attempting to change lanes or maneuver Model 3, or when approaching construction zones, Navigate on Autopilot may be unable to determine the appropriate driving lane (for example, complex clover leafs and multi-lane off-ramps) and the touchscreen displays an alert indicating that Navigate on Autopilot is trying to maneuver and may require assistance. When you see the message, be prepared to take immediate action to ensure that it is safe and appropriate to complete the lane change or maneuver.
Limitations
Autosteer and its associated functions are particularly unlikely to operate as intended when:
- Autosteer is unable to accurately determine lane markings. For example, lane markings are excessively worn, have visible previous markings, have been adjusted due to road construction, are changing quickly (lanes branching off, crossing over, or merging), objects or landscape features are casting strong shadows on the lane markings, or the road surface contains pavement seams or other high-contrast lines.
- Visibility is poor (heavy rain, snow, fog, etc.) or weather conditions are interfering with sensor operation.
- A camera(s) or sensor(s) is obstructed, covered, or damaged.
- Driving on hills.
- Approaching a toll booth.
- Driving on a road that has sharp curves or is excessively rough.
- Bright light (such as direct sunlight) is interfering with the view of the camera(s).
- The sensors are affected by other electrical equipment or devices that generate ultrasonic waves.
- A vehicle is detected in your blind spot when you engage the turn signal.
- Model 3 is being driven very close to a vehicle in front of it, which is blocking the view of the camera(s).
Warning: Many unforeseen circumstances can impair the operation of Autosteer.
Always keep this in mind and remember that as a result, Autosteer may not steer Model 3 appropriately. Always drive attentively and be prepared to take immediate action.
READ NEXT:
SEE MORE:
 Closeout - Armrest - 2nd Row (Remove and Replace)
Remove
Remove the 2nd row armrest. See
Armrest - 2nd Row (Remove and Replace).
Release the clips and tabs that attach the 2nd row armrest closeout to
the 2nd row seat, and then remove the armrest closeout.
Install
Installation procedure is the reverse of removal.
Airbag - Curtain - LH (Remove and Replace)
Airbag - Curtain - LH - Remove
DRAFT
Warning:
This procedure was derived from pre-production computer models, and
might not reflect the real-world situation. Warnings and cautions might be
missing. Follow safety requirements and use extreme caution when working on or
near high voltage systems
