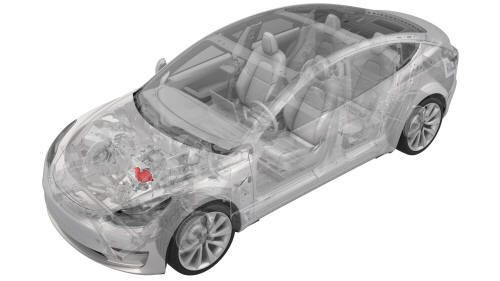
Tesla Model 3: Chiller and EXV Assembly (Remove and Replace)
Chiller and EXV Assembly- Remove
Remove
- Remove the mid aero shield panel. See
Panel - Aero Shield - Mid (Remove and Replace).
- Remove the underhood storage unit. See
Underhood Storage Unit (Remove and Replace).
- Recover the A/C refrigerant. See
A/C Refrigerant (Recovery and Recharge).
Note: Recover the refrigerant while continuing this procedure.
- Disconnect 12V power. See
12V Power (Disconnect and Connect).
.png)
- Disconnect the electrical harness from the coolant temperature sensor
connector.
- Release the clip that attaches the electrical harness to the chiller and
EXV assembly hose, and then remove the electrical harness from the hose.
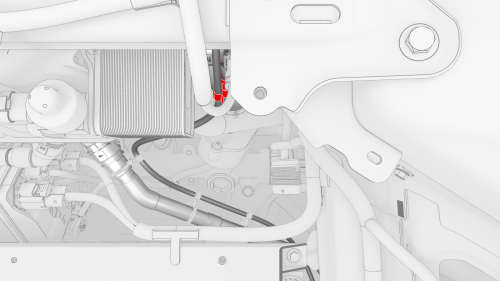
- Release the clip that attaches the battery vent hose to the chiller and
EXV assembly hose, and then remove the battery vent hose from the chiller
and EXV assembly hose.
- Place a coolant drain under the chiller and EXV assembly, and absorbent
material under the chiller and EXV assembly hose fitting.
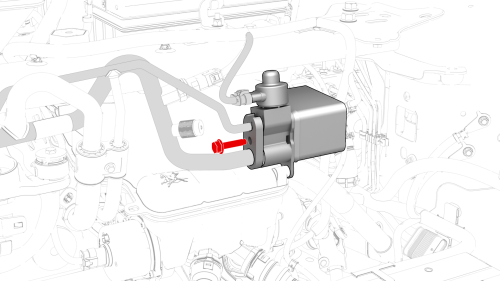
- Release the clip that attaches the coolant hose to the chiller and EXV
assembly, and then remove the hose from the chiller and EXV assembly.
- Immediately install plugs into the male and female fittings of the
chiller and EXV assembly and hose to prevent further coolant loss.
.png)
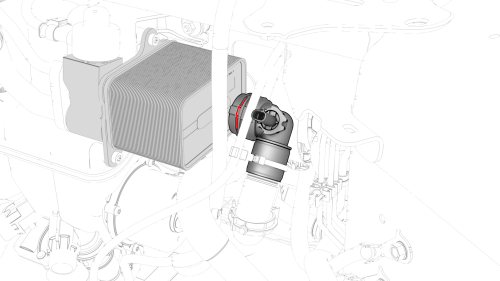
- Disconnect the electrical harness from the chiller and EXV assembly
connector.
.png)
- Disconnect the electrical harness from the low pressure transducer
connector.
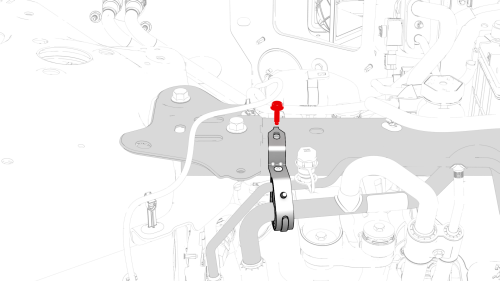
- Remove the bolt that attaches the suction/liquid line bracket to the
shock tower brace, and then separate the bracket from the brace.
Note: Make sure that the refrigerant has fully recovered before
continuing this procedure.
- Remove the bolt that attaches the suction/liquid line to the chiller and
EXV assembly, and then remove the line from the chiller and EXV assembly.
- Remove and discard the o-rings from the suction/liquid line fitting.
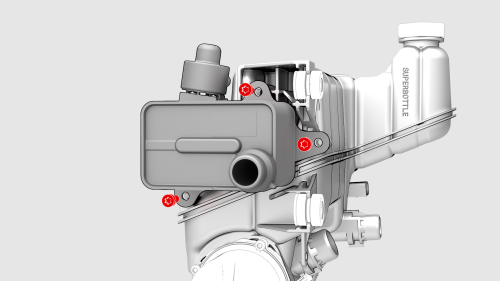
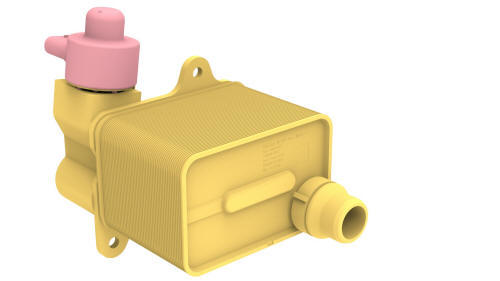
- Remove the bolts (x3) that attach the chiller and EXV assembly to the
superbottle, and then remove the chiller and EXV assembly from the
superbottle.
Chiller and EXV Assembly- Install
Installation procedure is the reverse of removal, except for the following:
- Install the chiller and EXV assembly to the superbottle, and then
install the bolts (x3) that attach the chiller and EXV assembly to the
superbottle.
 Torque 15 Nm
- Install new o-rings onto the suction/liquid line fitting.
- Install the suction/liquid line fitting into the chiller and EXV
assembly, and then install the bolt that attaches the suction/liquid line to
the chiller and EXV assembly.
 Torque 5.5 Nm
- After installing the assembly, refill the refrigerant. See
A/C Refrigerant (Recovery and Recharge).
Note: Perform installation of components removed concurrently with
refrigerant refill.
- Install the suction/liquid line bracket onto the shock tower brace, and
then install the bolt that attaches the bracket to the brace.
.png) Torque 5.5 Nm
Torque 5.5 Nm
- Connect the electrical harness to the low pressure transducer connector.
- Connect the electrical harness to the chiller and EXV assembly
connector.
- Remove the plugs from the male and female fittings of the chiller and
EXV assembly and coolant hose, install the coolant hose to the chiller, and
then fasten the clip that attaches the hose to the chiller.
- Remove the absorbent material from under the chiller and EXV assembly
hose fitting.
- Install the battery vent hose to the chiller and EXV assembly hose, and
then fasten the clip that attaches the battery vent hose to the chiller and
EXV assembly hose.
- Install the electrical harness to the chiller and EXV assembly hose, and
then fasten the clip that attaches the electrical harness to the hose.
- Connect the electrical harness to the coolant temperature sensor
connector.
- Remove the coolant drain from under the vehicle.
- Install the mid aero shield panel. See
Panel - Aero Shield - Mid (Remove and Replace).
- Connect 12V power. See
12V Power (Disconnect and Connect).
Note: Do not install the rear apron at this time.
- After the A/C refrigerant recharge has fully completed, verify the
operation of the A/C system.
- Refill the coolant to the proper level. See
Cooling System (Check and Fill)
- Install the underhood storage unit. See
Underhood Storage Unit (Remove and Replace).
READ NEXT:
Compressor- Remove
Warning:
Only technicians who have been trained in High Voltage Awareness are
permitted to perform this procedure. Proper personal protective equipment (PPE)
and insulating HV
SEE MORE:
Trunk (Remove and Replace)- Remove
Remove the rear license plate.
Remove the trunk lid trim. See Trim - Lid - Trunk (Remove and Replace).
Remove the LH and RH rear fog/reverse lights. See Light - Fog / Reverse
- Rear - LH (Remove and Replace).
Remove the trunk exterior release switch. See
Track Mode, available only on Performance
Model 3 vehicles, modifies the vehicle's
stability control, traction control, regenerative
braking, and cooling system to increase
performance and handling while driving on
closed circuit courses. Track Mode improves
cornering ability by intelligen
 Compressor (Remove and Replace)
