Tesla Model 3: Climate Controls
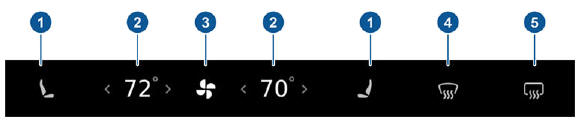
Climate controls are always available at the bottom of the touchscreen. To
turn the climate control
system on, touch the fan icon or adjust the cabin temperature. To turn it off,
touch the fan icon
and then touch the off button near the center of the popup window.
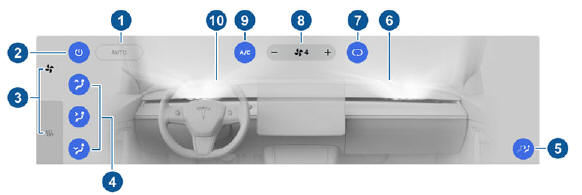
By default, climate control is set to the Auto setting, which maintains optimum
comfort in all but
the most severe weather conditions. When you adjust the cabin temperature in the
Auto setting,
the system automatically adjusts the heating, air conditioning, air distribution,
and fan speed to
maintain the cabin at your selected temperature. To override the Auto setting,
touch the fan icon,
turn off the Auto setting, then manually adjust your settings. If you've
manually adjusted individual settings, you can also revert back to
Auto at any time by touching AUTO on the climate control popup window.
Note: The following illustration is provided for demonstration purposes only.
Depending on vehicle
options, software version, market region, and settings, the information
displayed may be slightly
different.
Warning: To avoid burns resulting from prolonged use, individuals
who have peripheral
neuropathy, or whose capacity to feel pain is limited because of diabetes, age,
neurological
injury, or some other condition, should exercise caution when using the climate
control
system and seat heaters. Note: The climate control system is powered by the high voltage
battery. Therefore, prolonged use
decreases driving range. To override the Auto setting, touch the fan icon, turn off the Auto setting,
then use the buttons
that appear to manually adjust settings.
In addition to the settings shown, if Model 3 is in Park, the Keep Climate On,
Dog Mode, and Camp
Mode setting displays when you touch the fan icon when the vehicle is in Park Note: When air is directed to the foot-level vents, air continues
to flow to the windshield vents
to assist in defogging. When air is directed to the face-level vents, air does
not flow to the
windshield. Note: Adjusting the fan speed may change the selected setting for
how air is drawn into
Model 3 in order to increase or reduce air flow Note: Because Model 3 runs much quieter than a
gasoline-powered vehicle, you may notice
the sound of the air conditioning compressor as it is operating. To minimize
noise, reduce the
fan speed. Operating Seat Heaters To control the front seat heaters for the driver
and passenger, touch the corresponding
control on the main climate control area at the
bottom of the touchscreen. To control the rear
seat heaters (if equipped) or access duplicate
controls for the front seat heaters, touch the
fan icon, then touch the seat heater icon
followed by the seat for which you want to
adjust heating. Seat heaters operate at three
setting levels from 3 (highest) to 1 (lowest).
When operating, the associated seat icon
displays twisting lines that turn red to indicate
the setting level. You can touch All Off to turn
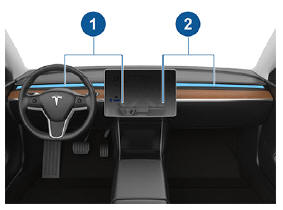
off all seat heaters simultaneously. Model 3 has a unique horizontal face-level
vent that spans the width of the dashboard.
Using the touchscreen, you can pinpoint
exactly where you want to direct the air
flowing from this vent when heating or cooling
the front cabin area.
When the face-level vent is on you can adjust
the direction of the air flow from each vent. To
adjust the direction of the air flow, simply
touch the radiating air waves from the
corresponding vent on the touchscreen. The
air flows in a single stream when centered or
splits into mirrored air streams when air is
directed outward or inward from the center of
the vent. Note: When you split a vent into two separate
air flows, the air flow in each direction is not as
strong as when all air is flowing in a single
direction. Note: Outside air is drawn into Model 3
through the grill in front of the windshield. Keep the grill clear of obstructions, such as
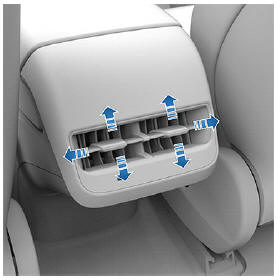
leaves and snow. Adjusting the Rear Vents Model 3 has vents located at the back of the
center console where air flows from when the
setting is turned on from the touchscreen. To
direct the flow of air in the rear cabin area,
adjust the vents at the rear of the center
console up, down, or from side to side as
necessary.
Keep Climate On, Dog Mode, and
Camp Mode The Keep Climate On, Dog, and Camp settings
allow you to keep the climate control system
running when in Park, even after you've left
Model 3 or choose to stay inside the vehicle.
These settings are useful when it is important
to maintain the cabin temperature in hot or
cold weather conditions. For example, when
leaving groceries in Model 3 on hot days, you
may want to use Keep Climate On to prevent
spoilage.
Dog mode keeps your pet comfortable while
also displaying the current cabin temperature
on the touchscreen so people nearby are
informed that your pet does not need to be
rescued.
Camp Mode allows you to power electronics
through the USB ports and 12V outlet in
addition to maintaining the cabin temperature.
The touchscreen remains on so you can play
music, browse the internet, play games in the
arcade, or watch shows in Tesla Theater. You
can also control media and climate settings
from a paired phone. Camp Mode is ideal for
remaining inside your vehicle, such as
camping or staying with a child. Note: In Camp Mode, Sentry Mode and the
vehicle alarm system are disabled. To operate Keep Climate On, Dog Mode, or
Camp Mode: Note: To initiate Keep Climate On, Dog Mode,
or Camp Mode, the Battery's charge level
must be at least 20%. The climate control system maintains your
climate settings until you shift out of Park or
manually turn it off. If the Battery's charge
level drops below 20%, the Tesla mobile app
repeatedly starts sending you notifications
reminding you to check on anything that you
have left in Model 3. The next time you drive Model 3, the climate
control system continues operating using the
previous climate settings from your most
recent trip. Note: Software updates cannot be performed
when Keep Climate On, Dog Mode, or Camp
Mode is active. Note: The intrusion sensor (if equipped)
automatically disables when Keep Climate On,
Dog Mode, or Camp Mode is active. However,
you can override this behavior and keep the
intrusion sensor enabled. To do so, touch
Controls > Safety & Security > Tilt/Intrusion
after enabling Keep Climate On, Dog mode, or
Camp mode. However, note that keeping the
intrusion sensor enabled while Keep Climate
On, Dog Mode, and Camp Mode is active can
trigger an alarm event as a result of air
movement inside the cabin. Warning: You can adjust the climate
control system remotely using the mobile
app. However, if you use the mobile app
to turn off the climate control system,
Keep Climate On, Dog Mode, and Camp
Mode stop operating. Warning: Avoid using Keep Climate On,
Dog Mode, or Camp Mode when the
battery charge is low. When leaving a dog
or pet in Model 3, you must ensure that
you have your phone with you and that
the Tesla mobile app is running. This
allows you to proactively monitor the
cabin temperature. To ensure the safety
and comfort of anyone or anything in
your vehicle, always make sure you have
adequate cellular coverage to receive
notifications and allow enough time to
return to Model 3 should the climate
control system stop operating-on hot
days, the cabin temperature can become
dangerously high within a few minutes. Warning: Check local laws for any
restrictions on leaving pets unattended in
your vehicle. Warning: Never leave a child unattended
in your vehicle. Model 3 has an air filter that prevents pollen,
industrial fallout, road dust and other particles
from entering through the vents. Tesla
recommends replacing the cabin air filter
every 2 years. Cabin Overheat Protection The climate control system can reduce the
temperature of the cabin in extremely hot
ambient conditions for a period of up to
twelve hours after you exit Model 3. Touch
Controls > Safety & Security > Cabin Overheat
Protection and choose:
This option consumes less energy but the
cabin temperature may exceed 105Вє F
(40Вє C). Note: Cabin Overheat Protection operates
only when the energy remaining in the Battery
is above 20%. Warning: Never leave children or pets in
the vehicle unattended. Due to automatic
shut-off or extreme outside conditions,
the inside of the vehicle can become
dangerously hot, even when Cabin
Overheat Protection is enabled. Climate Control Operating Tips
In cases where you cannot remove or
insert the charge cable, or the car is not
Supercharging due to the latch being
frozen in place, use your Tesla mobile app
to precondition your vehicle on HI for
approximately 30-45 minutes (you must
use your mobile app to precondition the
vehicle; setting your climate to HI using
the touchscreen is not effective). This
helps thaw ice on the charge port latch so
the charge cable can be removed or
inserted.Overview of Climate Controls
Adjusting Climate Control Settings
Adjusting the Front Vents
Cabin Air Filter
READ NEXT:
SEE MORE:
 Shield - Dust - Brake - Rear - LH and RH (Retrofit)
Shield - Dust - Brake - Rear - LH and RH (Retrofit) - Remove
SPECIAL TOOLS
Card, Magnetic Field Viewer (1062500-00-A)
Tool, Hub Puller, Hydraulic (1096075-00-A)
Tesla Badge - Front (Remove and Replace)
SPECIAL TOOLS
Kit, Badge Removal (1453028-00-A)
Fixture, Front Badge, Model 3 (1134702-00-A)
Remove
Prepare the badge removal tool with approximately 60 centimeters of
monofilament line.
With the hood closed, position the badge removal tool so that the
monofilament line cuts under a corner
