Tesla Model 3: Using the Touchscreen
 A thorough tutorial on using and navigating the center touchscreen display is given in this chapter. It includes all the necessary features, including media control, climate control, energy monitoring, customizable vehicle settings, navigation and maps, software update management, and touchscreen gestures for easy interface interaction.
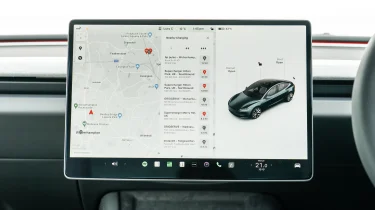
Additionally, the chapter offers instructions on how to use the touchscreen for maps and navigation. It provides guidance on how to plan routes, establish destinations, monitor real-time traffic updates, and adjust map display settings to personalize the experience.
The chapter provides guidance on managing media and entertainment, including how to choose audio sources, adjust volume levels, manage media playing, use streaming services (if available), and tweak audio settings for the best possible listening experience.
- Controls
- Climate Controls
- Maps and Navigation
- Media and Audio
- Phone
- Calendar
- Using Voice Commands
- Security Settings
- HomeLink Universal Transceiver
- Connecting to Wi-Fi
- Software Updates
READ NEXT:
 Controls
Overview
Touch Controls on the bottom
corner of the touchscreen to control features and
customize Model 3 to suit your preferences. The Controls window appears over the
map. Touch an option on th
SEE MORE:
Harness - HV Battery to Rear Drive Unit (Remove and Replace)
Harness - HV Battery to Rear Drive Unit - Remove
SPECIAL TOOLS
Lever Lock, HV Connector, Model 3 (1140311-00-A)
Remove
Remove the rear subframe assembly. See Subframe
Assembly - Rear
Quad Camera Cover - Lower (Remove and Replace)
Remove
Use a trim tool to remove the lower quad camera cover.
Remove the tether from the lower quad camera cover, and then remove the
lower quad camera cover.
Install
Installation procedure is the reverse of removal.
