Tesla Model 3: Controls
Overview
 Touch Controls on the bottom
corner of the touchscreen to control features and
customize Model 3 to suit your preferences. The Controls window appears over the
map. Touch an option on the left side of the window to display the associated
controls and settings. By default, Quick Controls displays for quicker access to
commonly used settings.
 To close the Controls window,
touch the X in the top left corner, touch Controls
again, or swipe down on the window.
 When an information icon displays
beside a specific setting, touch it to display a
popup that provides helpful details about the associated setting.
Note: The following illustrations are for demonstration purposes only. Depending on vehicle options, software version and market region, the options available may be different.
Summary of Controls
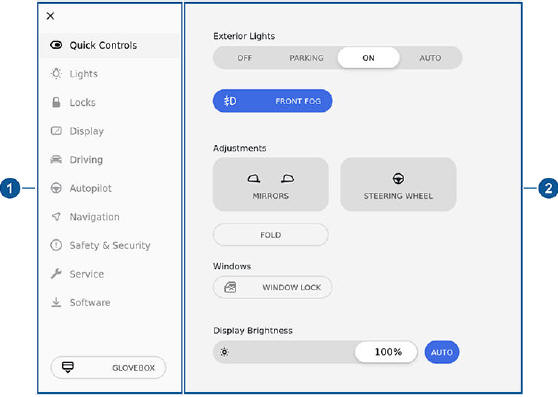
- Control tabs and open glovebox. When you select an item from the list of tabs, its associated controls and options display in the main viewing area.
- Main viewing area. The options available for your chosen controls
category display here.
Note: Depending on vehicle configuration and market region, some settings may not be available for your vehicle.
Quick Controls provides easy access to the following commonly-used features:
Exterior lights
OFF - Exterior lights are off until you manually turn them back on.
The exterior lights are set to AUTO by default at the start of every drive.
PARKING- The exterior side marker lights, parking lights, tail lights, and license plates lights turn on.
ON- Exterior lights are on.
AUTO -Exterior lights automatically turn on if Model 3 detects low lighting conditions.
Note: For more information on exterior lights
- Front Fog: Activates the front fog lights (only available in some regions).
- Rear Fog: If equipped (only available in some regions).
- Adjust the mirrors
- Adjust the steering wheel (premium package)
- Fold the mirrors
- Window Lock: Lock the rear window switches
- Display Brightness: Adjust the brightness of the display.
Lights
- Exterior Lights: Described previously in Quick Controls
- Front Fog: (Only available in some regions).
- Rear Fog: (Only available in some regions).
- Interior Lights
Dome Lights: Turn the overhead lights to OFF, ON, or AUTO. When set to AUTO, the dome lights automatically turn on when you unlock the vehicle, open a door upon exiting, or shift into Park.
Ambient Lights: If turned on, the interior lights turn on whenever the headlights are on (if equipped).
- Auto High Beam: If on, the high beam headlights can automatically switch to low beam when there is light (for example, from an oncoming vehicle) detected in front of Model 3.
- Headlights after Exit: If on, the headlights remain on when you stop driving and park Model 3 in low lighting conditions. They automatically turn off after one minute or when you lock Model 3.
- Steering Wheel Lights: If on, the arrows associated with the scroll buttons on the steering wheel are backlit when the headlights are turned on.
Locks
- Keys: You can see all the keys used for Model 3 and their associated driver profiles. You can add, delete, and change the driver profile associated with each key
- Window Lock: Lock the rear window switches
- Child-Protection Lock: If on, safety locks prevent the rear doors from being opened from inside the vehicle
- Unlock on Park: If on, doors automatically unlock when you engage the Park gear
- Lock Confirmation Sound: If on, an audible tone sounds when you lock or unlock Model 3.
- Walk-Away Door Lock: If on, doors automatically lock when you walk away from the vehicle while carrying your authenticated phone with you
Display
- Display Mode: Customize the DAY (light background) or NIGHT (dark background) setting of the touchscreen. When set to AUTO, the brightness changes automatically between day and night brightness based on ambient lighting conditions.
- Brightness: Drag the slider to manually control the brightness level of
the touchscreen.
When the AUTO brightness is on, the touchscreen is further adjusted based on both the surroundings and by learning your preferences (for example, it remembers the type of manual adjustments you make).
- Screen Clean Mode: When enabled, your touchscreen darkens and is temporarily disabled to facilitate cleaning. Follow the onscreen instructions to exit Screen Clean Mode.
Customize how the units and languages are displayed:
- Language: Choose the language that is displayed on the touchscreen.
Note: Model 3 must be in Park to change the language. When you change the language, you experience a brief delay as the vehicle shuts down and restarts the touchscreen.
- Time Format: Choose if time is displayed in 12 or 24 hour format.
- Energy Display: Display remaining energy and charging units as either a percentage of battery energy remaining, or as an estimate of the distance you can drive.
- Distance: Choose if miles or kilometers are used when displaying range, speed, energy, trip meters, map searches and navigation routes.
- Temperature: Choose if temperature is displayed in ВєC or ВєF.
- Tire Pressure: Choose if tire pressures are displayed in BAR or PSI.
Driving
- Acceleration: Adjust the amount of acceleration. Chill limits acceleration for a slightly smoother and gentler ride, whereas Standard or Sport (depending on vehicle configuration) provides the normal level of acceleration.
Note: When Chill is selected, Chill displays on the touchscreen above the driving speed. Note: If equipped with the Acceleration Upgrade package, the modes of acceleration are Chill and Sport.
- Steering Mode: Adjust the amount of effort required to turn the steering wheel. Sport feels more responsive whereas Comfort feels easier to drive and park
- Regenerative Braking: When you release the accelerator when driving, regenerative braking slows Model 3 and feeds any surplus energy back to the Battery. If set to LOW, Model 3 does not slow down as quickly, but also feeds less energy back to the Battery
Note: Regardless of the setting selected, the energy gained by regenerative braking is reduced if the Battery is full, or is extremely cold or hot (in which case, surplus energy is used to heat or cool it).
- Stopping Mode: Choose how you want Model 3 to behave once regenerative braking has reduced the driving speed to a very low speed, a driving gear is still engaged, and both the accelerator and brake pedals are released.
- Track Mode: (available on Performance vehicles only) when enabled, this mode modifies the vehicle's stability control, traction control, regenerative braking, and cooling system to increase performance and handling while driving on closed circuit courses
- Slip Start: Turn Slip Start ON to disable traction control and allow wheels to spin to make it easier to dislodge the vehicle when stuck in mud, snow, ice, etc
Autopilot Control features that provide a safer and more convenient driving experience. Some Autopilot features are not controlled through Controls.
- Autosteer (Beta): Enable the auto steering feature (available only if your vehicle is equipped with an Autopilot package)
- Navigate on Autopilot (Beta): Navigate on Autopilot automatically exits at off-ramps and interchanges based on your navigation route and can also make lane changes designed to prepare for exits and minimize the driving time to your destination (available only if your vehicle is equipped with an Autopilot package)
Customize Navigate on Autopilot: Specify how Navigate on Autopilot performs lane changes and whether you want it to automatically enable at the start of every trip.
Note: Navigate on Autopilot is not available in all market regions.
- Summon (Beta): Automatically park and retrieve Model 3 from outside the vehicle (available only if your vehicle is equipped with an Autopilot package)
Customize Summon: Determine the bumper clearance, distance, amount of side clearance, and whether Summon requires continuous press when active.
- Full Self-Driving Visualization Preview: If equipped, turn on to display more details about the roadway and its surroundings, such as road markings, stop signs, stop lights, objects (such as trash cans and poles), etc.
- Speed Limit Warning: Select the type of warnings, if any, you receive when you exceed the detected speed limit
- Speed Limit: Specify if you want Speed Assist to use a relative (with offset) or an absolute speed limit
Offset: If relative speed limit is selected, set a speed limit offset if you want to be alerted only when you exceed the offset speed limit by a specified amount.
- Forward Collision Warning: Choose if and when you want to receive visual and audible warnings in situations where there is a high risk of a frontal collision
- Lane Departure Avoidance: Specify if you want the steering wheel to vibrate slightly if a front wheel passes over a lane marking and the associated turn signal is off
- Emergency Lane Departure Avoidance: In emergency situations, Model 3 attempts to prevent a potential collision with an object in an adjacent lane by steering the vehicle back into your driving lane
- Blind Spot Collision Warning Chime: Choose if you want a chime to sound when a vehicle is in your blind spot and a possible collision is detected
- Automatic Emergency Braking: When toggled on, Model 3 automatically applies braking when a frontal collision is imminent
- Obstacle-Aware Acceleration: When toggled on, your vehicle automatically reduces acceleration when an obstacle is detected in front of your vehicle while driving at low speeds
Note: Depending on market regions, options purchased, and software version, your vehicle may not be equipped with all Autopilot features.
Navigation
Customize how the navigation system works by adjusting these settings:
- Volume Control: Increase or decrease the volume of spoken navigation instructions by touching - or +, respectively. Decreasing all the way to the left mutes the instructions. You can also mute navigation instructions when a navigation route is active by touching the volume icon on the turn-by-turn direction list.
Note: The volume setting applies only to the navigation system's spoken instructions.
Volume for Media Player and Phone remains unchanged.
- Automatic Navigation: Provided your phone's calendar is synced to Model 3, you are automatically routed to an event if you get into your vehicle within two hours of an event's start time (if the event on your calendar includes a valid address). Automatically navigate to Home and Work on weekdays
- Trip Planner: (If available in your market region) Use Trip Planner to plan your driving and charging routes
- Online Routing: When toggled on, you may be automatically rerouted to avoid heavy traffic
- Avoid Ferries: When toggled on, navigation routes avoid the use of ferries.
- Avoid Tolls: When toggled on, navigation routes avoid the use of tolls.
- Use HOV Lanes: When toggled on, navigation routes include the use of High Occupancy Vehicle (HOV) lanes. This is particularly useful when using Navigate on Autopilot, if equipped
Note: You can also display navigation settings by touching the settings icon on the map
Service
- Wiper Service Mode: Make wiper blades easy to access
- Adjust Headlights: Make adjustments to the level of the headlights
Caution: Headlights should only be adjusted by Tesla Service.
- Towing: Prepare Model 3 for transporting by keeping it in Neutral (which disengages the parking brake and prevents damage to the rear motor that is caused by wheels turning as Model 3 is pulled onto a flatbed truck).
- Reset TPMS Sensors: Reset the TPMS sensors after replacing a wheel
- Factory Reset: Erase all personal data (saved addresses, music favorites, etc.) and restore all customized settings to their factory defaults.
- Wheel Configuration: Update your vehicle's wheel configuration if you are installing new wheels or swapping them for different ones. This also changes the wheels of your vehicle's avatar on the touchscreen.
Note: Changing your vehicle's wheel configuration can impact range estimates, tire pressure warning levels, and vehicle visualization.
Warning: Only use Tesla-approved wheels when installing or swapping wheels. Using non Tesla-approved wheels can cause serious damage. Tesla is not liable for damage caused by using wheels not approved by Tesla.
- Owner's Manual: Display this manual. You can also display this manual by touching the Tesla "T" at the top of the touchscreen.
Software
Learn more about your vehicle and the status of software updates.
- Get more information about your vehicle such as the VIN, vehicle name,
and odometer.
Touch Additional vehicle information to display a list of the various options your vehicle is equipped with.
Note: You can also display some of the vehicle information by touching the Tesla "T" at the top center of your touchscreen.
- View your current software version, map version, and release notes.
- See new updates that are available. Your vehicle must be connected to Wi-Fi to start the update
- Observe your software's download progress.
The yellow clock icon at the top of the touchscreen is replaced by a green download icon when a software update is available, your vehicle is connected to Wi-Fi, and the update is downloading. A yellow download icon appears when a software update is available, but the vehicle is not connected to Wi-Fi. Ensure your vehicle is connected to Wi-Fi to start the download.
- Customize how often you want to receive software updates by touching Software Update Preferences.
Glovebox Touch to open the glovebox
Naming Your Vehicle
To further personalize Model 3, you can name it. The name of your Model 3 appears in the mobile app. To name your vehicle, touch the Tesla "T" at the top center of the touchscreen, then touch Name Your Vehicle (or touch the vehicle's existing name). Enter the new name in the popup, then touch Save.
Speed Limit Mode
Speed Limit Mode allows you to limit the acceleration and maximum speed - between 50 and 90 mph (80 and 145 km/h) - of your Model 3. This feature is protected by a 4-digit PIN that you create when enabling it for the first time, and which must be entered whenever you want to disable and enable it.
If your Model 3 comes within approximately 3 mph (5 km/h) of the selected maximum speed, a chime sounds and text appears on the touchscreen above the driving speed. Additionally, your mobile app sends you a notification.
To enable Speed Limit Mode:
- Ensure the vehicle is in Park.
- Touch Controls > Safety & Security > Speed Limit Mode on the touchscreen or CONTROLS in your mobile app.
- Select the maximum driving speed that you would like to limit the vehicle to.
- Drag the slider to the ON position.
- Enter the 4-digit PIN that you want to use to disable and enable Speed Limit Mode.
Note: If you forget the PIN, you can disable Speed Limit Mode by entering the login credentials for your Tesla Account.
Note: When Speed Limit Mode is enabled, the acceleration setting (Controls > Driving > Acceleration) is automatically set to Chill.
Warning: Driving downhill can increase driving speed, causing the vehicle to exceed your chosen maximum speed.
Warning: Speed Limit Mode is not a replacement for good judgment, driver training, and the need to closely monitor roadway speed limits and driving conditions. Accidents can occur at any speed.
Erasing Personal Data
You can erase all personal data (saved addresses, music favorites, HomeLink programming, etc.) and restore all customized settings to their factory defaults. This is useful when transferring ownership of Model 3. Touch Controls > Service > FACTORY RESET. Before erasing, Model 3 verifies your credentials by prompting you to enter the user name and password associated with your Tesla Account.
READ NEXT:
SEE MORE:
 Motor Assembly - Rear (Remove and Replace)
Remove
Remove the rear drive unit. See Drive Unit - Rear
(Remove and Replace).
Remove the rear drive unit inverter. See Inverter -
Rear Drive Unit (Remove and Install).
Position
Receiver Dryer and Desiccant (Remove and Replace)
Receiver Dryer and Desiccant- Remove
SPECIAL TOOLS
Remove
Perform the A/C refrigerant recovery. See A/C Refrigerant (Recovery and
Recharge).
Remove the bolts (x2) that attach the underhood reinforcement bracket to
the body, and then remove the bracket from the cooling fan module.
R
