Tesla Model 3: Cold Weather Best Practices
The following best practices can help ensure
that you have the best ownership experience
possible in harsh cold weather conditions. Before Driving Warm the cabin and Battery ahead of
departure for maximum range and
performance. There are several ways to
precondition your vehicle: Note: Tesla recommends activating the
climate settings at least 30-45 minutes
before departu. Preconditioning times depend
on outside temperature and other factors. When snow and ice accumulate on your
vehicle, moving parts, such as the door
handles, windows, mirrors, and wipers can
freeze in place. Door Handles Windows Mirrors If ice buildup is expected when parking, turn
off Auto-Fold Mirrors by navigating to
Controls > Mirrors > Auto-Fold > ON. Ice can
prevent exterior side mirrors from folding or
unfolding. Note: If equipped with heated side mirrors,
they automatically heat as needed during
preconditioning or if the rear defroster is
activated. Wipers If snow or ice buildup is expected when
parking, navigate to Controls > Service >
Wiper Service Mode > ON. This raises your
wipers so they are against the windshield and
they can defrost while the windshield defrosts Winter Tires and Tire Chains
Check your local regulations to see if tire
chains are recommended or required
during winter months. Cold weather can increase energy
consumption because more power is required
for driving, cabin and Battery heating. Follow
these suggestions to reduce energy
consumption:
Lowering the cabin temperature and using
seat heaters will reduce energy
consumption Regenerative Braking Regenerative braking may be limited if the
Battery is too cold. As you continue to drive,
the Battery warms up and regenerative power
increases Note: Limited regenerative braking can be
avoided if you allow enough time to
precondition your vehicle or use scheduled
departure before your drive, as mentioned
previously. Note: Installing winter tires may result in
temporarily reduced regenerative braking
power but Model 3 will recalibrate itself to
correct this after a short period of driving. Blue Snowflake Icon
Regenerative braking,
acceleration, and charging rates
may be limited. The snowflake
icon no longer displays when the
Battery is sufficiently warmed. Warming the Battery Before Supercharging If you are using Trip Planner and navigate to a Supercharger
station, your vehicle will allocate energy to
pre-heat the Battery in cold weather. This
ensures you arrive at the Supercharger with an
optimal Battery temperature, reducing the
amount of time it takes to charge. Autopilot To ensure optimal Autopilot performance,
keep the sensors and radar free of snow, ice,
mud, and dirt After Driving Leave Model 3 plugged in when not in use.
This uses the charging system, rather than the
Battery itself, to keep your Battery warm Scheduled Departure When parked, plug in Model 3 and set a time
at which you want your vehicle to be ready to
drive. Your vehicle determines the appropriate
time to begin charging so that charging is
complete and the cabin and Battery are warm
by your set departure time Charge Port Note: If your charge port latch is frozen in
place, it may not lock the charging cable in
place when inserted, but it is still able to AC
charge at a slower rate even if the latch is not
engaged. Storage If you leave Model 3 parked for an extended
period of time, plug it into a charger to
prevent normal range loss and maintain the
Battery at an optimal temperature. Your
vehicle is safe to say plugged in for any length
of time.
When not in use, Model 3 automatically enters
a sleep mode to conserve range and energy.
Reduce the number of times you check your
vehicle's status on the mobile app, as this
automatically wakes up your vehicle and starts
normal energy consumption. Note: See Wipers and Mirrors on
page 80 for more information on preventing
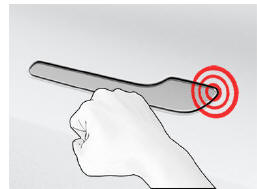
ice buildup when parking your vehicle. In severe winter conditions, ice buildup within
the door handle can prevent the door handle
from opening. The process for freeing a Model
3 door handle is slightly different than other
door handles; you can usually remove the ice
with a few forceful bumps to the door handle
using the bottom of your fist. Caution: Remove any jewelry or objects
that can damage the paint prior to performing the procedure, and do not
attempt to use tools or excessive force. Note: Preemptively applying WD-40 to the
door handle pivot pins can help prevent ice
buildup inside your door handle. Perform the following to remove ice from the
door handle: Caution: Never bump the vehicle so
hard as to cause a dent; the force
used should be similar to knocking on
your neighbor's front door.
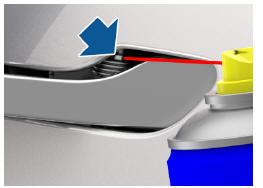
Applying WD-40 to Door Handle Pivot Pins In severe winter conditions, applying WD-40
to door handle pivot pins can help prevent ice
buildup that might immobilize the handle.
Consider applying WD-40 to the door handle
pivot pins if you are expecting freezing rain,
heavy snow, or icy conditions. Reapply as
needed. Caution: Read and observe the
instructions and warnings provided by
WD-40 prior to performing this
procedure. Note: Rest the end of the straw on the top
of the spring around the pivot pin to
better aim the spray. Warning: Make sure eye protection is
worn when performing this step.
Note: Rest the end of the straw on the top
of the spring around the pivot pin to
better aim the spray.Before Driving
While Driving
 A blue snowflake icon appears on
your touchscreen when some of
the stored energy in the Battery
may not be available due to cold
Battery temperature. This portion
of unavailable energy displays in
blue on the Battery meter.
Removing Ice From Door Handle
READ NEXT:
SEE MORE:
 Window Regulator - Front - LH (Recalibrate)
Connect a laptop with Toolbox to the vehicle.
In Toolbox, select the connection status icon at the top right corner,
and then select Connect Locally.
Get into the driver seat, and then close the door.
In Toolbox, type window in the search field.
Note: Make sure that "Actions" is selected, if
IP Carrier (Remove and Replace)
Remove
Remove the IP carrier. See
IP Carrier (Remove and Install).
Remove the upper gap hider nuts from the IP carrier.
Remove the screws that attach the LH and RH side window defroster ducts
to the IP carrier, and then remove the ducts from the IP carrier
Release the clips that attach th
