Tesla Model 3: Keys
Model 3 supports three types of keys: Model 3 supports a total of 19 keys, which can
include authenticated phones, key cards, and
up to four key fobs. Caution: Remember to bring a key with
you when you drive. Although you can
drive Model 3 away from its key, you will
be unable to power it back on after it
powers off. Authenticated Phone Using your phone is a convenient way to
access your Model 3. As you approach, your
phone's Bluetooth signal is detected and
doors unlock when you press a door handle.
Likewise, when you exit and walk away with
the phone, doors automatically lock (provided
the Walk-Away Door Lock feature is turned
on, as described in Walk-Away Door Lock) Before you can use a phone to access Model 3,
follow these steps to authenticate it: Note: You must remain logged in to your
Tesla Account to use your phone to access
Model 3. Note: Model 3 communicates with your
phone using Bluetooth. To authenticate
your phone or use it as a key, the phone
must be powered on and Bluetooth must
be enabled. Keep in mind that your phone
must have enough battery power to run
Bluetooth and that many phones disable
Bluetooth when the battery is low. When Model 3 detects your key card, the
mobile app confirms that your phone has been
successfully authenticated. Touch DONE.
If the key card is not successfully scanned
within approximately 30 seconds, the mobile
app displays an error message. Touch PHONE
KEY on the app again to retry.
To view a list of keys that can currently access
Model 3, or to remove a phone, touch
Controls > Locks (see Managing Keys) Note: Authenticating your phone allows you to
use it as a key to access Model 3. To use the
phone hands-free, access your phone's
contacts, play media from it, etc., you must
also pair and connect to it using the Bluetooth
settings Note: Model 3 can connect to three phones
simultaneously. Therefore, if more than one
phone is detected and you want to use, or
authenticate, a different phone, move the
other connected phone(s) out of range or turn
off its Bluetooth setting. Note: Unlike the mobile app, once a phone has
been authenticated, it no longer requires an
internet connection to communicate with
Model 3. Authenticated phones communicate
with Model 3 using Bluetooth. Note: Although Bluetooth typically
communicates over distances of up to
approximately 30 feet (9 meters),
performance can vary based on the phone you
are using, environmental interference, etc. Note: If multiple vehicles are linked to the
Tesla Account, you must switch the mobile
app to the vehicle that you want to access
before you can use the phone as a key. Tesla provides you with two Model 3 key
cards, designed to fit in your wallet. Tap your
Model 3 key card on one of its card readers,
located on the driver's side door pillar and on
the center console.
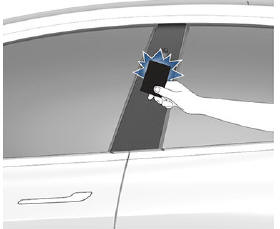
To use a key card to unlock or lock Model 3,
position the card as shown and tap it against
the card reader located just below the
Autopilot camera on the driver's side door
pillar. When Model 3 detects the key card, the
exterior lights flash, the mirrors unfold or fold
(if equipped with the premium package and
Fold Mirrors is on), the horn sounds (if Lock
Sound Confirmation is on), and the doors
unlock or lock. Note: You may need to physically touch the
center console or driver's side door pillar with
the key card, and you may need to hold it
against the transmitter for one or two
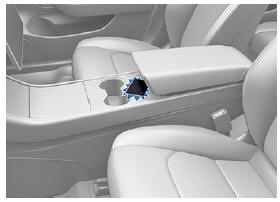
seconds. Once inside, power up Model 3 by pressing the
brake pedal within thirty seconds of scanning
the key card (see Starting and Powering Off) If you wait longer
than thirty
seconds, you must re-authenticate by placing
the key card near the card reader located
behind the cup holders on the center console.
When your key card is detected, your 30
second authentication period restarts. Note: Walk-Away Door Lock operates only
when using an authenticated phone or passive
key fob. When you walk away from Model 3
carrying your key card, Model 3 does not
automatically unlock/lock, even if this feature
is turned on (see Walk-Away Door Lock) Caution: Always carry your key card with
you in your purse or wallet to use as a
backup in case your authenticated phone
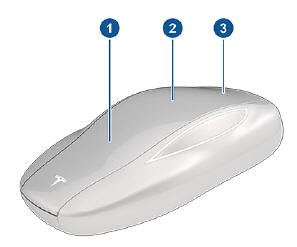
has a dead battery, or is lost or stolen. Key fob If you have purchased the key fob accessory
(available for purchase from Tesla stores or
online, you can
quickly familiarize yourself with this key by
thinking of it as a miniature version of Model 3,
with the Tesla badge representing the front.
The key has three buttons that feel like softer
areas on the surface. Once inside, power up Model 3 by pressing the
brake pedal within two minutes of pressing
the unlock button on the key fob (see Starting
and Powering Off) If you wait
longer than two minutes, you must press the
unlock button again, or place the key fob near
the card reader located behind the cup
holders on the center console. When your key
fob is detected, the two minute authentication
period restarts.
When approaching or leaving Model 3
carrying the key fob, you do not need to point
the key fob at Model 3 as you press a button,
but you must be within operating range.
Radio equipment on a similar frequency can
affect the key. If this happens, move the key at
least one foot (30 cm) away from other
electronic devices (phone, laptop, etc.).
If the key fob does not work (for example, its
battery is dead), you can touch its flat side
against the card reader on the driver's side
door pillar (like the key card). Instructions for
changing the battery are provided in
Replacing the Key Fob Battery Note: You can use the same key fob with
multiple Model 3 vehicles provided you
authenticate it (see Managing Keys). However, key fob works with only one
Model 3 at a time. Therefore, to use a key fob
for a different Model 3, touch its flat side against the card reader on the
driver's side
door pillar. Note: Model 3 supports up to four different
key fobs. Caution: Protect the key from impact,
high temperatures, and damage from
liquids. Avoid contact with solvents,
waxes and abrasive cleaners. Passive Key Fob Due market region or vehicle configuration,
Passive Key Fob may not be available for your
vehicle.
Locking and unlocking Model 3 with your key
fob is conveniently hands-free. Although you
must be carrying a paired key fob, there is no
need to use it. Model 3 has sensors around the
vehicle that can recognize the presence of a
key fob within a range of approximately three
feet (one meter). Therefore, you can keep your
key fob in your pocket or purse and simply
pull on the door handle to unlock. When
carrying your key fob with you, you can also
open the trunk without having to use the key
by pressing the trunk's exterior door handle. If
Walk-Away Lock is on, your vehicle
automatically locks when you exit and senses
that the key fob is no longer in range (see
Walk-Away Door Lock). Passive
key fob is automatically enabled when you
pair your key fob to your vehicle. The key fob can only be paired to one vehicle
at a time. If you want your key fob to passively
lock and unlock for a different vehicle, touch
the flat side of the key fob onto the driver's
side door pillar or center console card reader.
You only need to do this once to pair it to your
desired vehicle. You must pair your key fob
every time you use it with a different vehicle. Note: Only key fobs with the TESLA logo
printed on the flat side have the passive
locking and unlocking functionality. Key fobs
with the MODEL 3 logo printed on the flat side
cannot passively lock and unlock your vehicle. Note: For increased security, your key fob
disables itself after five minutes of being
stationary while in range but the vehicle is not
in use. The vehicle will not lock or unlock
passively when this occurs. Shake or press a
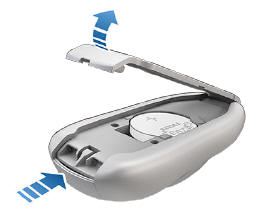
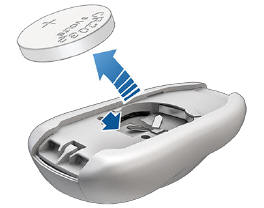
button on your key fob to wake it up. Replacing the Key Fob Battery Under normal use, the accessory key fob has a
battery that lasts for up to five years,
depending on key fob version and selected
vehicle settings. When the battery is low, a
message displays on the touchscreen. To replace the key fob battery:
Note: CR2032 batteries can be purchased
through online retailers, local
supermarkets, and drug stores. Attaching a Lanyard To attach a lanyard, release the bottom cover
as described above. Place the lanyard over the
pin located between the slots on the widest
side of the key fob. Re-align the cover and
snap into place. To display a list of all keys (phones, key cards,
and key fobs) that can access your Model 3,
touch Controls > Locks. An icon displays next
to each key to indicate whether the key is a
phone, key card, or key fob. Use this list to
manage keys that have access to your vehicle.
To add or delete keys Note: You can use the same key for more than
one Model 3. This prevents you from having to
deal with multiple keys when you switch
vehicles. If you customize the name of an
authenticated key card or key fob on one
Model 3 (by touching the pencil icon), any
other Model 3 to which the key card or key fob
is authenticated also displays the same
customized name. Note: Model 3 supports up to 19 keys. When
you reach this limit, you must delete a key
before adding a new one. Adding and Removing Keys Adding a new key card or key fob: Note: If adding a key fob, ensure the key fob is
at room temperature. Pairing may be
unsuccessful if the key fob is cold. Adding a new phone key: Note: To add a new phone key, Bluetooth must
be enabled and the phone must have the Tesla mobile app installed and connected
to the
vehicle's Tesla account. Removing a key: When you no longer want a key to access your
vehicle (for example, you lost your phone or
key card, etc.), you can remove the key. Note: Your vehicle requires at least one
authenticated key card or key fob at all times.
If only one key card is included on the key list,
this key cannot be deleted. Mobile App In addition to using it to authenticate a phone
as your Model 3 key, you can use the mobile
app to communicate with Model 3 remotely
using your iPhone or Android phone. With
this app, you can: Note: When Supercharging, additional
notifications alert you when you will be
charged idle fees for parking at a
supercharger after charging is complete.
The idle fees are waived if your vehicle is
moved within five minutes of when the
vehicle finishes charging. Note: It is possible that your charge port
latch may freeze in place in extremely cold
weather or icy conditions. In cases where
you cannot remove or insert the charge
cable, or the car is not Supercharging due
to the latch being frozen in place, use your
Tesla mobile app to precondition your
vehicle on HI for approximately 30-45
minutes (you must use your mobile app to
precondition the vehicle; setting your
climate to HI using the touchscreen will
not be effective). This helps thaw ice on
the charge port latch so the charge cable
can be removed or inserted. Note: Keyless Driving can be used to
bypass PIN to Drive in cases where you
forgot your PIN or your touchscreen is
unresponsive. Note: Some of these features require
installation of the latest version of the mobile
app. Note: Do not rely on the unlock and start
(keyless driving) functions of your mobile app,
especially if parking in an area with limited or
absent cellular service, such as an indoor
parking garage. Tesla recommends that you
always have a functional key (key fob, key
card, connected phone key) readily available.
In the event that you require lockout
assistance from Tesla due to a non-warranty
issue, such as having limited cellular
connectivity and having no secondary key
available, your expenses are not covered
under the Roadside Assistance policy. Note: To allow the mobile app to communicate
with Model 3, the phone must be connected to
the internet and mobile access must be
enabled (touch Controls > Safety & Security >
Allow Mobile Access on the touchscreen). Note: If multiple vehicles are linked to the
Tesla Account, you must switch to the Model 3
that you want to access in the mobile app
before the phone can be used as a key Note: To take advantage of new and improved
features, download updated versions of the
mobile app as they become available. Caution: Tesla does not support the use
of third party applications to contact
Model 3. Note: The above list may not represent an
exhaustive list of the functions available on the Tesla mobile app. To ensure
access to new and
improved features, download updated
versions of the mobile app as they become
available.Three Types of Keys
Key Card
Managing Keys
READ NEXT:
SEE MORE:
 Beam - 12V Battery (Dual Motor) (Remove and Replace)
Remove
Remove the 2nd row lower seat cushion. See
Seat Cushion - Lower - 2nd Row (Remove and Replace).
Remove the rear underhood apron. See
Underhood Apron - Rear (Remove and Replace).
Remove the cabin intake duct. See
Duct - Cabin Intake (Remove and Replace).
Remove the underhood storage
Sensor - Temperature - RH (Remove and Replace)
Remove
Remove the RH center console side panel carpet. See
Carpet - Side Panel - Center Console - LH (Remove and Replace).
Disconnect the electrical wiring harness conector from the RH
temperature sensor.
Release the tabs that attach the RH temperature sensor to the HVAC
module,
