Tesla Model 3: Penthouse Coolant- Refill
Tesla Model 3 2017-2024 Service Manual / Battery System / HV Battery Cooling System / Penthouse Coolant (Drain and Refill) / Penthouse Coolant- Refill
- Perform a penthouse coolant leak test. See Penthouse Coolant Leak Test.
- Remove the plugs from the hoses.
- Connect the rear powertrain supply hose to the RH side of the HV battery, and the rear drive unit inverter inlet hose to the LH side of the HV battery.
- Move the coolant drain to under the motor.
- Release the clip that attaches the coolant inlet hose to the heat exchanger.
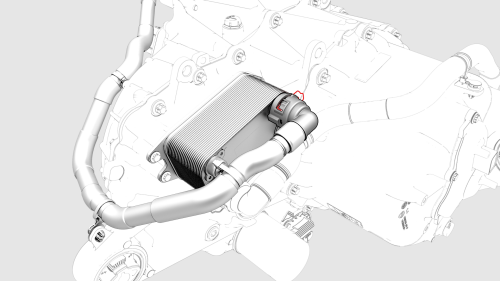
- Release the clip and disconnect the coolant inlet hose from the heat exchanger upper fitting.
- Attach a coolant fill tube to the coolant inlet hose fitting.
- Pump coolant into the hose until back pressure is felt or coolant overflows
- Attach the coolant fill tube to the heat exchanger upper fitting.
- Pump coolant into the heat exchanger until back pressure is felt or coolant overflows.
- Fasten the clip that attaches the coolant inlet hose to the heat exchanger.
- If the penthouse cover was removed as part of another procedure, inspect the coolant input and output tubes and fittings for leaks.
- Remove the coolant drain from under the vehicle.
- Install the rear HV battery skid plate. See Skid Plate - HV Battery - Rear (Remove and Replace).
- Install the mid aero shield panel. See Panel - Aero Shield - Mid (Remove and Replace).
- Connect 12V power. See 12V Power (Disconnect and Connect).
- Perform a vacuum refill of the cooling system. See Cooling System (Vacuum Refill).
READ NEXT:
 Penthouse Coolant Leak Test
DRAFT
Warning:
This procedure was derived from pre-production computer models, and
might not reflect the real-world situation. Warnings and cautions might be
missing. Follow safety requirements and
Platter Enclosure Coolant (Drain and Refill)
SPECIAL TOOLS
Drive Unit Pressure Test Fixture (1053600-00-C)
Kit, Coolant Leak Test Adapters, Model 3 (1132185-00-B)
Kit, Coolant Drain & Fill Adapters, M3 (1133843-00-A)
Kit, Svc Plug, Cooling H
Platter Enclosure Coolant Leak Test
SPECIAL TOOLS
Drive Unit Pressure Test Fixture (1053600-00-C)
Kit, Coolant Leak Test Adapters, Model 3 (1132185-00-B)
Kit, Coolant Drain & Fill Adapters, M3 (1133843-00-A)
Kit, Svc Plug, Cooling H
SEE MORE:
Module - Cooling Fan (Remove and Replace)
Remove
Remove the cooling fan module. See Module - Cooling Fan (Remove and
Install).
Release the clips (x14) that attach the active grille shutter to the
cooling fan module, and then remove the active grille shutter from the
module.
Remove the screws (x2) that attach the radiat
Harness - Body - LH- Remove
Remove
Remove the sill rear trunk trim. See
Trim - Sill - Trunk (Remove and Replace).
Remove the 2nd row LH seat back assembly. See
Seat Back - 2nd Row - LH (Remove and Install).
Remove the 2nd row RH seat back assembly. See
Seat Back - 2nd Row - RH (Remove and Install).
Release the tr
© 2019-2024 Copyright www.tmodel3.com
