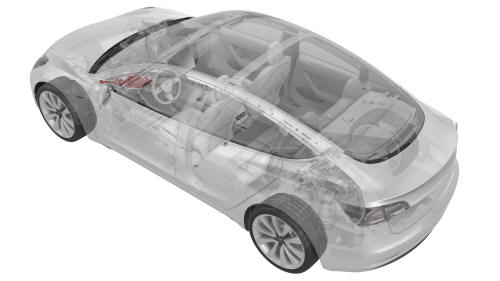
Tesla Model 3: Steering Column - Remove
Tesla Model 3 2017-2024 Service Manual / Steering / Upper Column Steering Wheel Steering Lock / Steering Column (Remove and Replace) / Steering Column - Remove
This procedure was formulated using a release candidate or production model. Follow safety requirements and use extreme caution when working on or near high-voltage systems and components.
Remove
- Remove the 2nd row lower seat cushion. See Seat Cushion - Lower - 2nd Row (Remove and Replace).
- Remove the rear underhood apron. See Underhood Apron - Rear (Remove and Replace).
- Remove the cabin intake duct. See Duct - Cabin Intake (Remove and Replace).
- Remove the hood latch cover. See Cover - Hood Latch (Remove and Replace).
- Remove the underhood storage unit. See Underhood Storage Unit (Remove and Replace).
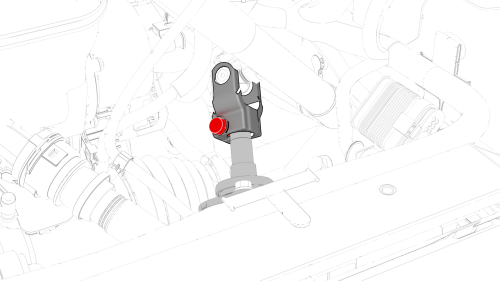
- Remove the bolt that attaches the intermediate shaft to the steering rack assembly, and then slide the intermediate shaft upwards.
- Remove the LH and RH instrument panel end caps. See End Cap - Instrument Panel - LH (Remove and Replace).
- Remove the LH and RH middle A-pillar trims. See Trim - A-Pillar - Middle - LH (Remove and Replace).
- Remove the LH and RH lower A-pillar trims. See Trim - A-Pillar - Lower - LH (Remove and Replace).
- Remove the LH and RH upper A-pillar trims. See Trim - A-Pillar - Upper - LH (Remove and Replace).
- Remove the driver footwell cover. See Cover - Footwell - Driver (Remove and Replace).
- Remove front passenger footwell cover. See Cover - Footwell - Passenger (LHD) (Remove and Replace).
- Remove the driver seat and front passenger seat. See Seat - Driver (Remove and Replace).
- Disconnect 12V power. See 12V Power (Disconnect and Connect).
- Remove the driver knee airbag. See Airbag - Knee - Driver (Remove and Install).
- Remove the LH footwell duct. See Duct - Footwell - LH (Remove and Replace).
- Remove the center console. See Center Console (Remove and Install).
- Remove the front passenger knee airbag. See Airbag - Knee - Front Passenger (Remove and Replace).
- Remove the LH and RH end caps. See End Cap - Air Wave - LH (Remove and Replace).
- Remove the main instrument panel decor trim. See Decor Trim - Instrument Panel - Main (Remove and Replace).
- Remove the glove box. See Glove Box (LHD) (Remove and Replace).
- Remove the RH footwell duct. See Duct - Footwell - LH (Remove and Replace).
- Remove the driver airbag. See Airbag - Driver (Remove and Replace).
- Remove the steering wheel. See Steering Wheel (Remove and Install).
- Remove the restraint control module. See Module - Restraint Control (Remove and Replace).
- Remove the touchscreen. See Touchscreen (Remove and Replace).
- Remove the vent finisher. See Finisher - Vent (Remove and Replace).
- Remove the LH and RH air wave ducts. See Duct - Air Wave - RH (Remove and Replace) and Duct - Air Wave - LH (Remove and Replace).
- Remove the instrument panel speaker grille. See Grille - Speaker - Instrument Panel (Remove and Replace).
- Remove the LH, center, and RH dash speakers. See Speaker - Dash - LH (Remove and Replace) and Speaker - Dash - Center (Remove and Replace).
- Remove the front passenger airbag. See Airbag - Front Passenger (Remove and Install).
- Remove the IP carrier. See IP Carrier (Remove and Install).
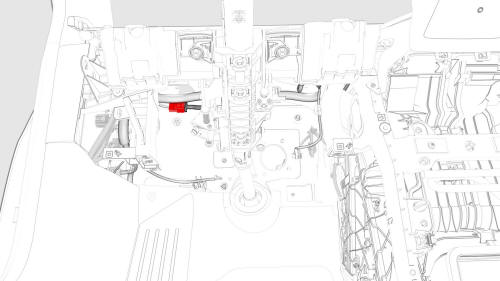
- Disconnect the electrical harness from the steering column connector.
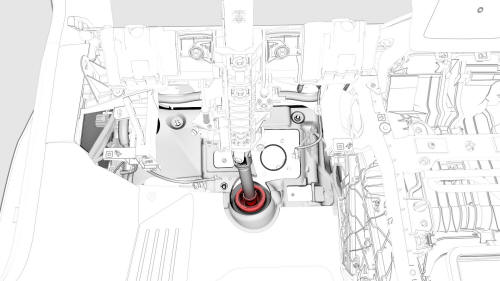
- Release the steering shaft boot from the bulkhead, and then pull it up from the bulkhead.
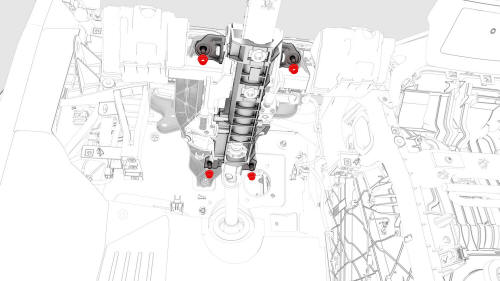
- Remove the nuts that attach the steering column to the cross car beam.
- Lower the steering column, and then remove the steering
column from the vehicle.

READ NEXT:
 Steering Column
- Install
Steering Column
- Install
Install
Put the steering column in the vehicle for installation.
Steering Wheel (Remove and Install)
Remove
Set the vehicle's front
wheels straight and the
steering wheel centered.
Remove the 2nd row lower
Steering Wheel (Remove and Replace)
Remove
Remove the steering wheel.
See
Steering Wheel (Remove and
Install).
Install
In
SEE MORE:
Controls
Overview
Touch Controls on the bottom
corner of the touchscreen to control features and
customize Model 3 to suit your preferences. The Controls window appears over the
map. Touch an option on the left side of the window to display the associated
controls and settings. By default, Quick Contro
Receiver Dryer and Desiccant- Remove
SPECIAL TOOLS
Remove
Perform the A/C refrigerant recovery. See A/C Refrigerant (Recovery and
Recharge).
Remove the bolts (x2) that attach the underhood reinforcement bracket to
the body, and then remove the bracket from the cooling fan module.
Remove the cap from the LH side of the
© 2019-2024 Copyright www.tmodel3.com
