Tesla Model 3: Tie Rod End - LH (Remove and Replace)
Tesla Model 3 2017-2026 Service Manual / Steering / Steering Rack and Lower Column / Tie Rod End - LH (Remove and Replace)
- Raise and support the vehicle. See Raise Vehicle - 2 Post Lift.
- Remove the LH front wheel. See Wheel (Remove and Install).
.jpg)
- Loosen the jamb nut at the LH tie rod end.
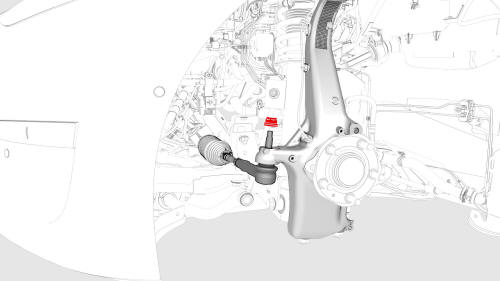
- Remove and discard the nut that attaches the tie rod to the knuckle.
- Remove the LH tie rod end from the knuckle using a rubber hammer.
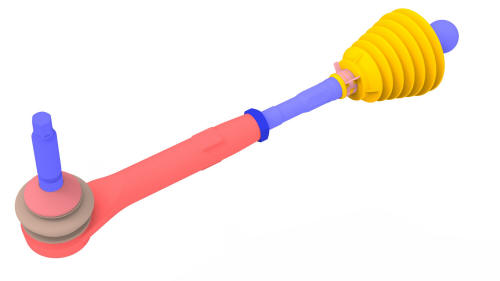
- Remove the tie rod from the steering linkage by
turning the tie rod counter-clockwise.
Note: Record the number of rotations for
separation of the tie rod from the steering
linkage.
Install
- Install the tie rod end to the steering linkage by turning the tie rod clockwise using the exact number of turns recorded during removal.
- Install the new nut that attaches the tie rod end to the knuckle. Torque 180 Nm
- Tighten the jamb nut at the LH tie rod end. Torque 80 Nm
- Install the LH front wheel. See Wheel (Remove and Install).
- Perform the four wheel alignment. See Four Wheel Alignment (Check and Adjust).
READ NEXT:
 Steering Column (Remove and Replace)
Steering Column - Remove
Note:
This procedure was formulated using a release candidate or
production model. Follow safety
SEE MORE:
Hose - Heat Exchanger to Superbottle - Front Drive Unit (Remove and Replace)
Remove
Remove the superbottle. See
Superbottle (Dual Motor) (Remove and Replace).
Install
Installation procedure is the reverse of removal.
Caution:
Perform a push-pull test to verify that the hose is fully seated
Forward Facing (Remove and Replace)
Remove
Remove the rear view mirror. See Mirror - Rear View (Remove and Replace).
Release the clips that attach the mirror front cover to the windshield
bracket, and then separate the cover from the bracket.
Disconnect the electrical harness from the occupant camera, and then
remove the
© 2019-2026 Copyright www.tmodel3.com
