Tesla Model 3: Cover - Rear - Seat Track - 1st Row Seat (Remove and Replace)
Tesla Model 3 2017-2026 Service Manual / Seats / Front Seat Tracks and Motors / Cover - Rear - Seat Track - 1st Row Seat (Remove and Replace)
Correction code 13011822
Remove
- Move the seat fully forward.
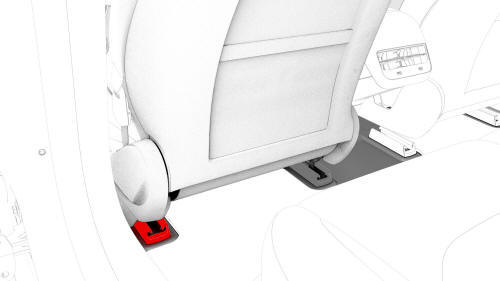
- Release the clips at the front of the seat track rear cover that attach the cover to the seat track, and then slide the cover rearward off the track.
Install
- Slide the seat track rear cover forward over the seat track, and then fasten the clips that attach the cover to the seat track.
- Return the seat to the original position.
READ NEXT:
 Motor - Recliner - Backrest - Driver Seat (Remove and Replace)
Remove
Remove the lumbar support assembly from the driver's seat back. See
Lumbar Support - Backrest - Driver Seat (Remove and Replace).
Remove and discard the clip that attaches the recli
Motor - Seat Height - Driver Seat (Remove and Replace)
Remove
Remove the 2nd row lower seat cushion. See
Seat Cushion - Lower - 2nd Row (Remove and Replace).
Remove the rear underhood apron. See
Underhood Apron - Rear (Remove and Replace).
Remove
Motor - Seat Tilt - Driver Seat (Remove and Replace)
Remove
Remove the driver seat. See
Seat - Driver (Remove and Replace).
Remove the driver seat outer side cover. See
Cover - Outer Side - Driver Seat (Remove and Install).
Disconnect the
SEE MORE:
Light - License Plate (Remove and Replace)
Remove
Remove the trunk lid trim. See Trim - Lid - Trunk (Remove and Replace).
Disconnect the electrical connector from the license plate light.
Push the license plate light towards the RH of the vehicle to compress
the clip, and then compress the clip on the other side of the light
Abbreviations and Symbols
Abbreviation
Term
A/C
Air Conditioning
ABS
Anti-Lock Brake System
AC
Alternating Current
ACC
Accessory
Amp (A)
Ampere
AUX
Auxiliary
BLE
© 2019-2026 Copyright www.tmodel3.com
