Tesla Model 3: A/C Refrigerant- Recovery
Tesla Model 3 2017-2024 Service Manual / Thermal Management / Refrigerant System / A/C Refrigerant (Recovery and Recharge) / A/C Refrigerant- Recovery
- Prepare the AC service machine. See Preparation.
- Turn off the vehicle's climate control.
- Connect a laptop with Toolbox to the vehicle.
- Remove the underhood storage unit. See Underhood Storage Unit (Remove and Replace).
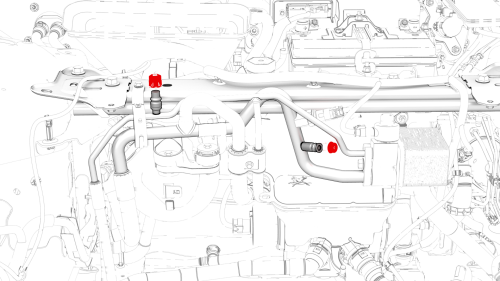
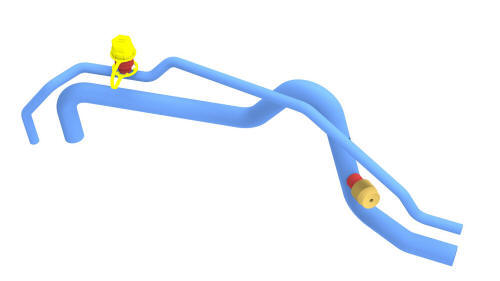
- Remove the caps from the A/C high pressure and low pressure ports.
- Connect the red high pressure hose to the vehicle's high pressure port, and the blue low pressure hose to the vehicle's low pressure port.
Note: The high pressure and low pressure ports are of different sizes, and match the hose couplers accordingly.
- Verify that the oil recovery tank is empty, or mark the existing level with tape as a starting point for later comparison.
- In Toolbox, search for Thermal Fluid Fill/Drain, and select it.
- Click RUN. The evaporator and chiller solenoids are opened.
- Follow the A/C machine instructions for recovering refrigerant from the vehicle.
Note: In order to fully purge refrigerant and remove air, moisture, and contaminants, it is important to apply the appropriate vacuum for 30-45 minutes.
- Perform service procedures that can be concurrent with refrigerant recovery.
Caution: Wait until recovery has finished before performing steps that open the A/C system to ambient air.
- After recovery has finished, in Toolbox, click STOP. The evaporator and chiller solenoids are closed.
- Measure the quantity of refrigerant recovered from the system. It is should be approximately 640 - 680 g. Record the quantity recovered in the notes section of the Repair Order.
- Measure the quantity of oil recovered from the vehicle's A/C system by comparing the level change in the oil recovery tank. The difference is the quantity of oil to add to the A/C system during recharge, assuming that no components are being replaced.
- If the recovery procedure is being performed in order to replace a defective A/C component, measure the quantity of oil recovered from the defective component.
- If the A/C compressor is defective: The new A/C compressor is shipped pre-filled with the total amount of oil used in the A/C system. Oil might need to be removed so that the quantity of oil in the new A/C compressor equals the amount of oil in the old one. Use a digital scale to weigh both the old and new compressors. Turn the new compressor upside down to drain a small amount of oil into a clean, dry collection container, and then re-weigh the new A/C compressor. Repeat this process until the new A/C compressor weighs the same as the old one. If necessary, the collected oil can be reused later for A/C system recharge.
- If parts other than the A/C compressor are defective: Drain all oil from defective components and measure how much is recovered.
- Add the quantity of oil recovered in step 14 to the quantity of oil recovered in step 15, and record this value in the notes section of the Repair Order. This value is the quantity of oil to add during A/C system recharge.
- Consider your next step:
- f servicing an A/C system component, disconnect the red and blue hoses from the high and low pressure ports, and perform the service procedures that required refrigerant recovery.
- If recharging the vehicle's A/C system, see Recharge.
Recharge
- Consider your first step:
- If you have installed A/C system components, perform steps that close the A/C system from ambient air, and then reconnect the red and blue hoses to the high and low pressure ports.
- Otherwise, go to step 2.
- In Toolbox, search for Thermal Fluid Fill/Drain, and select it.
- Click RUN. The evaporator and chiller solenoids are opened.
- Follow the A/C machine instructions to pull a vacuum into the vehicle's A/C system.
Note: In order to fully purge refrigerant and remove air, moisture, and contaminants, it is important to apply the appropriate vacuum for 30-45 minutes.
- Set the refrigerant charge to 660 g.
- Fill the oil supply bottle with the quantity of ND-11 spec POE oil as determined in Recovery.
- If necessary, select the "UV Dye" option to inject leak detection dye during recharge (Robinair AC1234-7 A/C machines).
- Initiate the recharge procedure through the high pressure hose.
- Perform service procedures that can be concurrent with refrigerant recharge.
- After recharge has finished, in Toolbox, click STOP. The evaporator and chiller solenoids are closed.
- Disconnect the red and blue hoses from the high and low pressure ports and return them to the A/C machine.
- Install the caps on the A/C high pressure and low pressure ports.
- Perform any pending service procedures.
- Turn on the cabin A/C and verify operation.
- Disconnect the laptop from the vehicle.
- Install the underhood storage unit. See
Underhood Storage Unit (Remove and Replace).
READ NEXT:
 Chiller and EXV Assembly- Remove
Remove
Remove the mid aero shield panel. See
Panel - Aero Shield - Mid (Remove and Replace).
Remove the underhood storage unit. See
Underhood Storage Unit (Remove and Replace).
Recover the A/C
Chiller and EXV Assembly- Install
Installation procedure is the reverse of removal, except for the following:
Install the chiller and EXV assembly to the superbottle, and then
install the bolts (x3) that attach the chiller and E
SEE MORE:
Coolant Pump - HV Battery - Remove
Remove
Remove the underhood storage unit. See Underhood Storage Unit (Remove
and Replace).
Disconnect 12V power. See 12V Power (Disconnect and Connect).
Remove the front aero shield panel. See Panel - Aero Shield - Front
(Remove and Replace).
Position a coolant drain under the superbottle
Wiper Motor- Install
Install
Install the bolts that attach the wiper motor to the vehicle.
Torque 7 Nm
Connect the electrical connector to the wiper motor.
Warning: Do not place limbs within the motor linkage area as the
wiper arms will automatically transition to Parking Mode.
Connect the clips that
© 2019-2024 Copyright www.tmodel3.com
