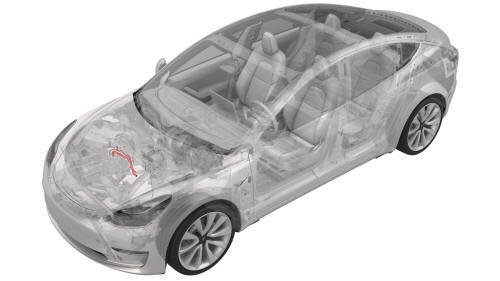
Tesla Model 3: A/C Refrigerant (Recovery and Recharge)
Warning: This procedure was derived from pre-production computer models, and
might not reflect the real-world situation. Warnings and cautions might be
missing. Follow safety requirements and use extreme caution when working on or
near high voltage systems and components. SPECIAL TOOLS AC Service Machine (1120026-0x-A) Warning: Only personnel familiar with both vehicle A/C systems and
the A/C machine are permitted to service the systems. Always read and understand
the A/C machine operator's manual before operating the A/C machine. Warning: Refrigerants R134a and R1234yf are hazardous liquids and,
if handled incorrectly, can cause serious injury. Suitable Personal Protective
Equipment (PPE), consisting of face protection, heat-proof gloves, rubber boots,
and apron or waterproof overalls, must be worn when performing recovery or
recharge on the air conditioning system. Warning: Do not breathe refrigerant and lubricant vapor or mist.
Exposure might cause personal injury, especially to the eyes, nose, throat, and
lungs. Perform service and repairs in a well-ventilated area. If accidental
discharge occurs, ventilate the work area before returning to work. Additional
health and safety information is available from equipment, refrigerant, and
lubricant manufacturers. Refer to manufacturer's instruction manuals and
Material Safety Data Sheets. Warning: Avoid using an extension cord on the A/C machine whenever
possible. If an extension cord is used, it might overheat and cause a fire. If
you must use an extension cord, use the shortest extension cord possible with a
minimum 14AWG wire rating. Warning: Do not use compressed air to pressure test or leak test the
A/C machine or the vehicle A/C system. Some mixtures of air and refrigerant are
combustible at elevated pressures. These mixtures are potentially dangerous and
might result in fire or explosion, causing personal injury or property damage Warning: Be aware of fire hazards. Do not use the A/C machine in the
vicinity of spilled or open containers of flammable liquid. Warning: If you are operating the A/C machine in an environment
where temperatures exceed 120 degrees Fahrenheit / 49 degrees Celsius, you must
wait 10 minutes between tasks Warning: Never transfer refrigerants to a cylinder or tank unless it
is Department of Transportation approved for refilling. DOT approval is
indicated by the designation "DOT 4BA" or "DOT 4BW" stamped on a tank's collar
(handle). If a refrigerant tank is overfilled, it might explode. Be aware that
when transferring refrigerant into a tank, the safe filling level must be
controlled by weight, and must not exceed 60% of the tank's gross weight rating. Caution: Only use Tesla-specified refrigerant in the vehicle A/C system and the
A/C machine. The A/C machine is designed to recover, recycle, and recharge only
Tesla-specified refrigerant. Do not attempt to adapt the unit for another
refrigerant. Do not mix refrigerant types within a vehicle A/C system or in the
same container. Mixing refrigerants can severely damage the A/C machine and the
vehicle A/C system. Caution: Do not mix different types of A/C
system oil. Model S, Model X, and Model 3 use ND-11 spec POE oil, while Roadster
1.5 and 2.0 use different oils (PVE for 1.5 cars and POE for 2.0/2.5 vehicles).
If the A/C machine is not solely dedicated to Model S, Model X, and Model 3 use,
flush the A/C lines of the machine before every service to prevent
cross-contamination. See
Preparation for instruction to flush the A/C lines. Caution: Do not allow refrigerant oil to
come in contact with any surfaces of the vehicle as it might cause damage to the
paint, trim, or finish of the vehicle. Caution: Always keep refrigerant oil in its original container, tightly
sealed, and clearly marked so as to prevent contamination of any kind. Caution: Do not over-fill the vehicle's A/C system with oil. Replace
only the exact amount that is removed. Always measure the amount of oil
extracted and refill it with that exact amount. Caution: Always maintain different oil canisters for different types of
oil. These canisters should be clearly marked to avoid any cross-contamination
between the oils. Caution: The refrigerant cylinders currently in use as source tanks are
disposable cylinders. Before they are discarded, connect the disposable
refrigerant cylinder to the recovery equipment and bring to a vacuum to ensure
that all of the refrigerant has been removed. Then mark the cylinder "Empty". Caution: Always reference the information label to determine the
refrigerant capacity of the vehicle. Do not over-fill or under-fill the A/C
system with refrigerant. Preparation
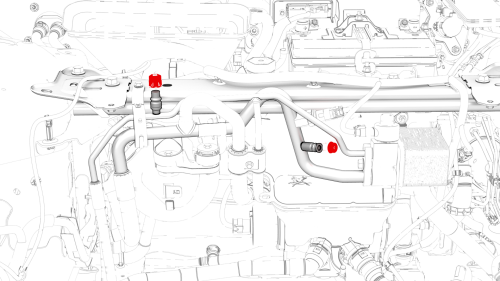
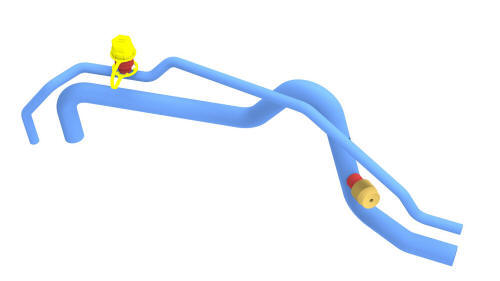
Note: The high pressure and low pressure ports are of different
sizes, and match the hose couplers accordingly. Note: In order to fully purge refrigerant and remove air,
moisture, and contaminants, it is important to apply the appropriate vacuum for
30-45 minutes. Caution: Wait until recovery has finished before
performing steps that open the A/C system to ambient air. Recharge Note: In order to fully purge refrigerant and remove air, moisture,
and contaminants, it is important to apply the appropriate vacuum for 30-45
minutes. A/C Refrigerant- DRAFT
A/C Refrigerant- Recovery
READ NEXT:
 Chiller and EXV Assembly (Remove and Replace)
Chiller and EXV Assembly- Remove
Remove
Remove the mid aero shield panel. See
Panel - Aero Shield - Mid (Remove and Replace).
Remove the underhood storage unit. See
Underhood Storage Unit (Remo
SEE MORE:
Penthouse Coolant Leak Test
DRAFT
Warning:
This procedure was derived from pre-production computer models, and
might not reflect the real-world situation. Warnings and cautions might be
missing. Follow safety requirements and use extreme caution when working on or
near high voltage systems and components.
SPECIAL TOOLS
Dri
Harness - Drive Unit - Front (Remove and Replace)
Remove
Partially raise the vehicle to a comfortable working height. See Raise
Vehicle - 2 Post Lift.
Remove the 2nd row lower seat cushion. See Seat Cushion - Lower - 2nd
Row (Remove and Replace).
Remove the rear underhood apron. See Underhood Apron - Rear (Remove and
Replace).
Disconne
