Tesla Model 3: Adjusting Climate Control Settings
To override the Auto setting, touch the fan icon, turn off the Auto setting, then use the buttons that appear to manually adjust settings.
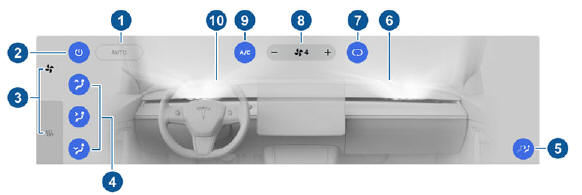
In addition to the settings shown, if Model 3 is in Park, the Keep Climate On, Dog Mode, and Camp Mode setting displays when you touch the fan icon when the vehicle is in Park
- Touch AUTO to turn the Auto setting on or off.
- Touch to turn the climate control system off
- If equipped with the premium package, the climate control settings window has two tabs. The general settings tab displays by default and is represented by the fan icon. Touch the seat heater icon to access controls for both the front and rear seat heaters
- Choose where air flows into the cabin (windshield, face-level, or foot-level vents). You can choose more than one location.
Note: When air is directed to the foot-level vents, air continues to flow to the windshield vents to assist in defogging. When air is directed to the face-level vents, air does not flow to the windshield.
- Touch to turn air flow to the rear cabin area on or off. When on, air flows from the vents located at the back of the center console.
- Touch to adjust air flow from the front passenger vent.
- Touch to choose how air is drawn into Model 3. If on, air inside Model 3 is recirculated. If off, outside air is drawn into Model 3.
- Touch + or - to increase or decrease the fan speed.
Note: Adjusting the fan speed may change the selected setting for how air is drawn into Model 3 in order to increase or reduce air flow
- Touch to turn the air conditioning system on or off. Turning it off reduces cooling, but saves energy.
Note: Because Model 3 runs much quieter than a gasoline-powered vehicle, you may notice the sound of the air conditioning compressor as it is operating. To minimize noise, reduce the fan speed.
- Touch to adjust air flow from the driver's vent.
Operating Seat Heaters
To control the front seat heaters for the driver and passenger, touch the corresponding control on the main climate control area at the bottom of the touchscreen. To control the rear seat heaters (if equipped) or access duplicate controls for the front seat heaters, touch the fan icon, then touch the seat heater icon followed by the seat for which you want to adjust heating. Seat heaters operate at three setting levels from 3 (highest) to 1 (lowest).
When operating, the associated seat icon displays twisting lines that turn red to indicate the setting level. You can touch All Off to turn off all seat heaters simultaneously.
READ NEXT:
 Adjusting the Front Vents
Model 3 has a unique horizontal face-level
vent that spans the width of the dashboard.
Using the touchscreen, you can pinpoint
exactly where you want to direct the air
flowing from this vent whe
Cabin Air Filter
Model 3 has an air filter that prevents pollen,
industrial fallout, road dust and other particles
from entering through the vents. Tesla
recommends replacing the cabin air filter
every 2 years.
C
SEE MORE:
Serial Numbers
Tesla labels or engraves serial numbers on its parts. Tesla serial numbers
are 14 digits and alphanumeric. Tesla serial numbers are encoded.
Use this system to decode a Tesla serial number:
Digits 1-3
Build
Site Code
***
= Unique 3 character code assigned by Tesla to
Penthouse Coolant Leak Test
DRAFT
Warning:
This procedure was derived from pre-production computer models, and
might not reflect the real-world situation. Warnings and cautions might be
missing. Follow safety requirements and use extreme caution when working on or
near high voltage systems and components.
SPECIAL TOOLS
Dri
