Tesla Model 3 Owners & Service Manuals

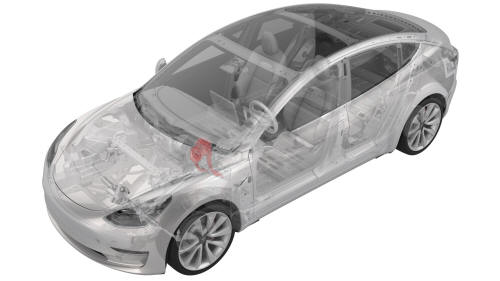
Tesla Model 3: Brake Pedal (Remove and Replace)

Tesla Model 3 2017-2025 Service Manual / Brakes / Brake Pedal / Brake Pedal (Remove and Replace)

Brake Pedal - Remove

 Brake Pedal (Remove and Replace)

Remove

  1. Remove the 2nd row lower seat cushion. See Seat Cushion - Lower - 2nd Row (Remove and Replace).
  2. Remove the rear underhood apron. See Underhood Apron - Rear (Remove and Replace).
  3. Disconnect 12V power. See 12V Power (Disconnect and Connect).
  4. Remove the driver footwell cover. See Cover - Footwell - Driver (Remove and Replace).
  5. Remove the driver knee airbag. See Airbag - Knee - Driver (Remove and Install).
  6. Remove the LH footwell duct. See Duct - Footwell - LH (Remove and Replace)

  Brake Pedal - Remove

  1. Disconnect the brake pedal and the accelerator pedal electrical connectors.
  2. Remove the brake light switch. See Switch - Brake Light (Remove and Replace).

  Brake Pedal - Remove

  1. Remove the brake clevis pin cotter pin.

  Brake Pedal - Remove

  1. Remove the brake clevis pin that attaches the brake pedal to the electromechanical brake booster.

  Brake Pedal - Remove

  1. Release the clips that attach the electrical harness to the brake pedal assembly.

  Brake Pedal - Remove

  1. Remove and discard the nuts (x4) that attach the brake pedal assembly to the vehicle.
  2. Remove the brake pedal and the accelerator pedal as an assembly from the vehicle.

Brake Pedal - Install

Install

  1. If a new brake pedal assembly is to be installed, install a new brake switch clip into the assembly.
  2. Install the brake pedal assembly onto the studs (x4) of the body.

  Brake Pedal - Install

  1. Install new nuts (x4) to attach the brake pedal assembly to the vehicle.  Torque 16.5 Nm

  Brake Pedal - Install

  1. Fasten the clips that attach the electrical harness to the brake pedal assembly.

  Brake Pedal - Install

  1. Install the brake clevis pin that attaches the brake pedal to the electromechanical brake booster.

  Brake Pedal - Install

  1. Install the brake clevis pin cotter pin.
  2. Install the brake light switch. See Switch - Brake Light (Remove and Replace).

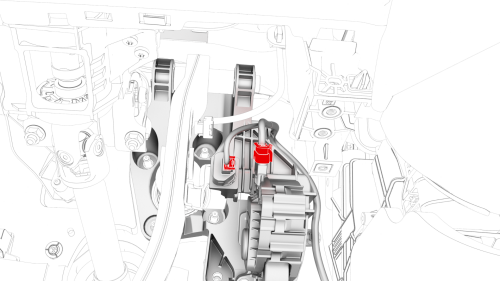
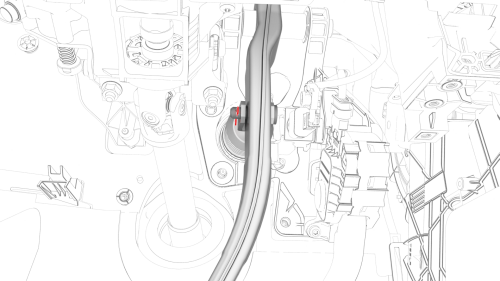
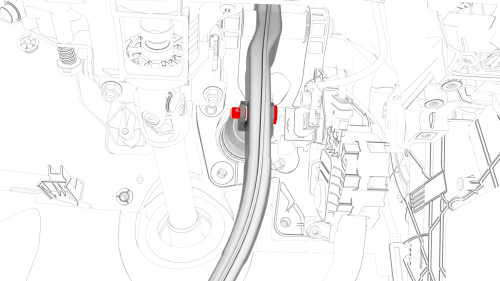
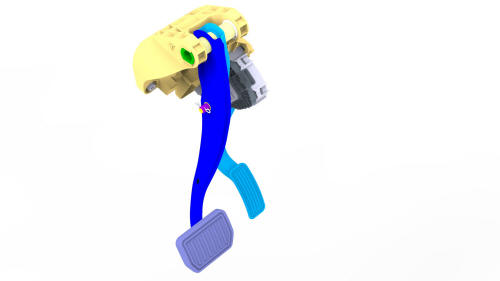
Note: Confirm that the brake pedal is in the home position: Push the new brake pedal switch into the clip until it stops, and then twist the brake switch clockwise 45 degrees to set the brake switch in position. Do not push the brake pedal switch too hard as to move the brake pedal.

  Brake Pedal - Install

  1. Connect the brake pedal and the accelerator pedal electrical connectors.
  2. Install the LH footwell duct. See Duct - Footwell - LH (Remove and Replace)
  3. Install the driver knee airbag. See Airbag - Knee - Driver (Remove and Install).
  4. Install the driver footwell cover. See Cover - Footwell - Driver (Remove and Replace).
  5. Connect 12V power. See 12V Power (Disconnect and Connect).
  6. Install the rear underhood apron. See Underhood Apron - Rear (Remove and Replace).
  7. Install the 2nd row lower seat cushion. See Seat Cushion - Lower - 2nd Row (Remove and Replace).
  8. Connect a laptop with Toolbox to the vehicle.
  9. Click on "Actions" and type "Brake Switch" into the search field.
  10. Click the play button next to "TEST_BRAKE-DI_X_STIFFNESS-TEST-PRESSURE-UNBURNISHED-AND-DI-BRAKE-SWITCH", and then select Run.
  • If the test fails, refer to Toolbox article #52544 for additional information.
  • If the test passes, disconnect the laptop from the vehicle.

    READ NEXT:

     Switch - Brake Light (Remove and Replace)

        Remove Remove the LH center console side panel carpet. See Carpet - Side Panel - Center C

    SEE MORE:

     DC Input Assembly - HV Battery (Remove and Replace)

    DC Input Assembly - HV Battery- Remove SPECIAL TOOLS Ratchet, 1/4" Sq Dr, HV Insulated (1057602-00-A) Skt, 1/4" Sq Dr, 13mm, HV Insulated (1057606-00-A) Magnet, Flexible, HV Insulated, 18" (1057607-00-A) Skt, 1/4in Dr, 5-Lobe Torx Plus External (1059330-00-B) Resistance meter, microohm, Hioki RM 354

     Dashcam

    About Dashcam Note: Dashcam is a BETA feature. In addition to supporting Autopilot features, the cameras can record and store video footage on a USB flash drive. This can be convenient in situations where you want a video recording of a particular incident, such as a collision. You can pause, resum

    © 2019-2025 Copyright www.tmodel3.com