Tesla Model 3: Gasket - Cover - HV Battery (Remove and Replace)
Tesla Model 3 2017-2026 Service Manual / Battery System / HV Battery Enclosure / Gasket - Cover - HV Battery (Remove and Replace)
Remove
Note: There are two types of HV battery cover gaskets: an older platter perimeter gasket, and a newer penthouse perimeter gasket. These are referred to as platter type and penthouse type. This procedure removes both types, but installs only the penthouse type gasket.
- Remove the HV battery. See HV Battery (RWD) (Remove and Install).
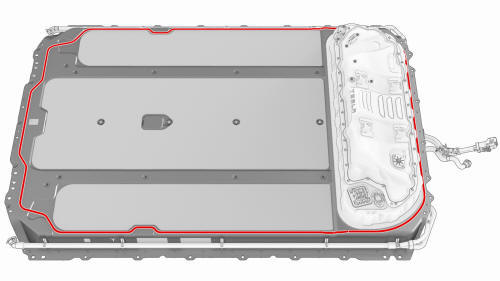 Platter Type
- Remove and discard the HV battery cover gasket.
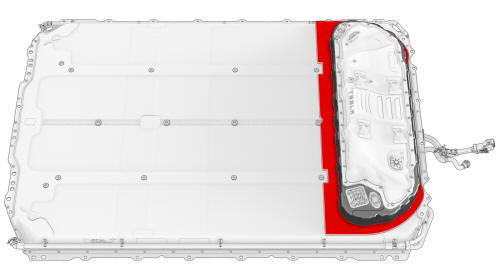 Penthouse Type
- Use IPA wipes to clean the adhesive and residue from the HV battery cover surface.
.png) Use
a drill fitted with an adhesive eraser wheel to speed clean up.
Use
a drill fitted with an adhesive eraser wheel to speed clean up.
Install
- Peel the backing off a new HV battery cover gasket, position the long straight edge to the front of the HV battery, and then install the gasket onto the HV battery surface around the penthouse
- Install the HV battery. See HV Battery (RWD) (Remove and Install).
READ NEXT:
 HV Battery Air Leak Test
Pack Enclosure Leak Tester, HV Battery (1026636-00-A)
Pack Kit, Enclosure, Leak Test, HV Battery, Complete (1140501-00-A)
Kit, Encl Leak Test Adapters, HV Battery (1144879-00-A)
Procedure
Perform th
Penthouse Air Leak Test
SPECIAL TOOLS
Pack Enclosure Leak Tester, HV Battery (1026636-00-A)
Pack Kit, Enclosure, Leak Test, HV Battery, Complete (1140501-00-A)
Kit, Encl Leak Test Adapters, HV Battery (1144879-00-A)
Kit, D
Platter Enclosure Air Leak Test
DRAFT
Warning:
This procedure was derived from pre-production computer models, and
might not reflect the real-world situation. Warnings and cautions might be
missing. Follow safety requirements and
SEE MORE:
Fluids and Capacities
Fluids
Component / System
Description
Air Conditioning
Depending on its intended
sales region, the air conditioning system is filled with R134a or
R1234yf refrigerant.
1012403-00-B, REFRIGERANT, R134a
2006643-00-A, REFRIGERANT, R1234yf
If
Trim - Sill Panel - Rear - LH (Remove and Replace)
Remove
Open all doors.
Lower all windows.
Remove the 2nd row lower seat cushion. See
Seat Cushion - Lower - 2nd Row (Remove and Replace).
Remove the LH 2nd row seat side bolster. See
Bolster - Side - Seat - 2nd Row - LH (Remove and Replace).
Pull upward at the lower corner of the rea
© 2019-2026 Copyright www.tmodel3.com
