Tesla Model 3: HV Battery Air Leak Test
Tesla Model 3 2017-2026 Service Manual / Battery System / HV Battery Enclosure / HV Battery Air Leak Test
Pack Enclosure Leak Tester, HV Battery (1026636-00-A)
Pack Kit, Enclosure, Leak Test, HV Battery, Complete (1140501-00-A)
Kit, Encl Leak Test Adapters, HV Battery (1144879-00-A)
Procedure
- Perform the vehicle electrical isolation procedure. See Vehicle Electrical Isolation Procedure.
- Remove the penthouse HV and penthouse 12V caps.
- Remove the LH rear sill panel trim. See Trim - Sill Panel - Rear - LH (Remove and Replace).
.png)
- Release the clips that attach the low voltage electrical harness to the charge port to HV battery harness bracket at the penthouse.
.jpg)
- Remove the bolts that attach the charge port to HV battery harness
bracket at the penthouse, and then remove the bracket from the vehicle.
.jpg) Torque 10 Nm
Torque 10 Nm
.jpg)
- Release the clip that attaches the wiring harness to the LH lower C-pillar.
.jpg)
- Raise the handle to disconnect the wiring harness from the DC input assembly.
- Install the dummy plug to the DC input assembly.
- Install the dummy plug into the HVC connector.
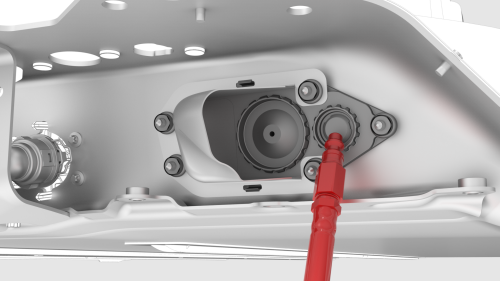
- Remove and discard the breather from the penthouse probe lid cover.
- Install the leak test adapter plug into the penthouse probe lid cover.
- Remove the mid aero shield panel. See Panel - Aero Shield - Mid (Remove and Replace).
.png)
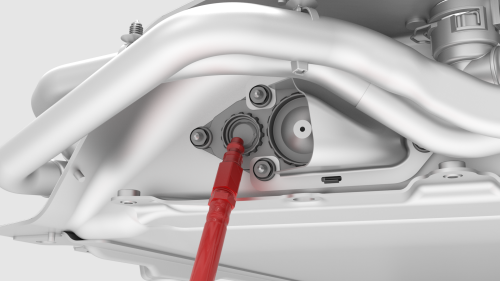
- Remove and discard the breather from the RH HV battery vent shroud assembly.
- Install the second leak test adapter plug into the RH shroud assembly.
.png)
- Remove and discard the breather from the LH HV battery vent shroud assembly.
- Install the leak test adapter into the LH shroud assembly.
- Connect the pack enclosure leak tester to the leak test adapter in the LH HV battery shroud assembly.
- Close both valves on the pack enclosure leak tester, and then connect a compressed air supply line.
- Fully close the regulator, and then open the inlet valve.
- Set the regulator to 0.15 psi.
- Open the outlet valve, and allow at least 45 seconds for the pressure to stabilize to 0.15 psi.
- Close the inlet valve, record the starting pressure displayed, and then start a 60-second timer.
- After 60 seconds record the ending pressure displayed.
- Subtract the ending pressure from the starting pressure, and if:
- The difference is greater than 0.0054 psi, check the hose, adapter, and plug fittings, close the outlet valve and open the inlet valve, check the regulator pressure, and then retest from step 21. If the difference is still greater than 0.0054 psi, escalate a Toolbox session.
- The difference is 0.0054 psi or less, continue the procedure.
- Disconnect the air supply from the pack enclosure leak tester.
- Open the inlet valve, and then disconnect the pack enclosure leak tester from the leak test adapter in the LH HV battery shroud assembly.
- Remove the leak test adapter from the LH HV battery shroud assembly, and then install a new breather into the LH shroud assembly.
- Remove the leak test adapter plug from the RH HV battery shroud assembly, and then install a new breather into the RH shroud assembly.
- Install the mid aero shield panel. See Panel - Aero Shield - Mid (Remove and Replace).
- Remove the leak test adapter from the penthouse probe lid cover.
- Install a new breather into the penthouse probe lid cover.
- Remove the logic connector cap and dummy plug from the high voltage controller connector and the DC input assembly.
- Connect the charge port to HV battery wiring harness to the DC input assembly and lower the handle.
- Fasten the clip that attaches the charge port to HV battery wiring harness to the LH lower C-pillar.
- Install the charge port to HV battery wiring harness bracket to the
penthouse, and then install the bolts that attach the bracket to the
penthouse.
Torque 10 Nm
- Fasten the clips that attach the low voltage electrical harness to the charge port to HV battery harness bracket at the penthouse.
- Install the LH rear sill panel trim. See Trim - Sill Panel - Rear - LH (Remove and Replace).
- Install the penthouse HV and penthouse 12v caps.
- Connect 12 V power. See 12V Power (Disconnect and Connect).
READ NEXT:
 Penthouse Air Leak Test
SPECIAL TOOLS
Pack Enclosure Leak Tester, HV Battery (1026636-00-A)
Pack Kit, Enclosure, Leak Test, HV Battery, Complete (1140501-00-A)
Kit, Encl Leak Test Adapters, HV Battery (1144879-00-A)
Kit, D
Platter Enclosure Air Leak Test
DRAFT
Warning:
This procedure was derived from pre-production computer models, and
might not reflect the real-world situation. Warnings and cautions might be
missing. Follow safety requirements and
Ski - Center Rail - HV Battery (RWD) (Remove and Replace)
Ski - Center Rail - HV Battery (RWD) - Remove
SPECIAL TOOLS
Lever Lock, HV Connector, Model 3 (1140311-00-A)
Warning:
Only technicians who have been trained in High Voltage Awareness are
permitted
SEE MORE:
Airbag - Driver (Remove and Replace)
Remove
Remove the 2nd row lower seat cushion. See Seat Cushion - Lower - 2nd
Row (Remove and Replace).
Remove the rear underhood apron. See Underhood Apron - Rear (Remove and
Replace).
Disconnect 12V power. See 12V Power (Disconnect and Connect).
Insert two small flat-blade screwdri
Closeout Panel - Door - Front - LH (Remove and Install)
SPECIAL TOOLS
Rivnut Install Kit, for NA (Optional special tool if the thread for the
closeout panel becomes stripped) (1054712-00-A )
Rivnut Install Kit, for EMEA (Optional special tool if the thread for the
closeout panel becomes stripped) (1054712-01-A )
Service Rivnut (Optional special tool
© 2019-2026 Copyright www.tmodel3.com
