Tesla Model 3: Airbag - Driver (Remove and Replace)
Tesla Model 3 2017-2026 Service Manual / Safety and Restraint / Airbags / Airbag - Driver (Remove and Replace)
Remove
- Remove the 2nd row lower seat cushion. See Seat Cushion - Lower - 2nd Row (Remove and Replace).
- Remove the rear underhood apron. See Underhood Apron - Rear (Remove and Replace).
- Disconnect 12V power. See 12V Power (Disconnect and Connect).
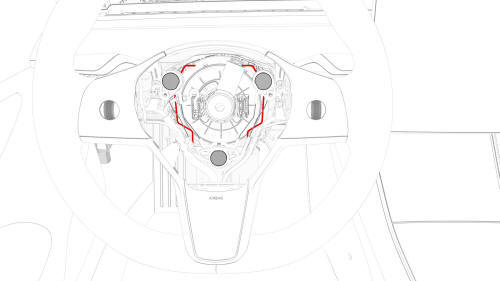
- Insert two small flat-blade screwdrivers into the holes at the back of the steering wheel to compress the spring clip simultaneously, and then remove the driver airbag from the steering wheel.
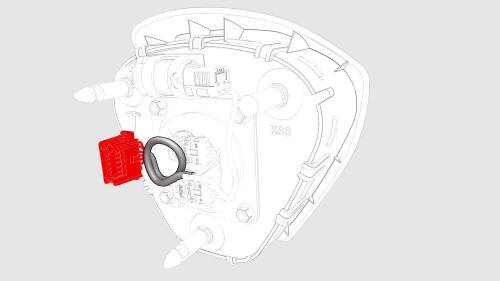
- Disconnect the driver airbag electrical connector from the steering
wheel, and then remove the airbag from the vehicle.
Install
- Make sure that the lower horn bracket is properly secured to the steering wheel.
- Connect the driver airbag electrical connector to the steering wheel.
- Fully press the driver airbag into the steering wheel so that the spring clip attaches the airbag to the steering wheel.
- Connect 12v power. See 12V Power (Disconnect and Connect).
- Connect a laptop with Toolbox to the vehicle.
- Use Toolbox to update the vehicle firmware.
- In Toolbox, type "VCLEFT" in the search field.
- In Toolbox, click "TEST-SELF_VCLEFT_X_SWC", and then select Run.
- In Toolbox, click "TEST-PYRO_RCM_X_DAB-STAGE- 1", and then select Run.
- In Toolbox, click "TEST-PYRO_RCM_X_DAB-STAGE- 2", and then select Run.
- Disconnect the laptop from the vehicle.
- Install the rear underhood apron. See Underhood Apron - Rear (Remove and Replace).
- Install the 2nd row lower seat cushion. See Seat Cushion - Lower - 2nd Row (Remove and Replace).
READ NEXT:
 Airbag - Front Passenger (Remove and Install)
DRAFT
Warning: This procedure was derived from pre-production
computer models, and might not reflect the real-world situation. Warnings and
cautions might be missing. Follow safety requireme
Airbag - Front Passenger (Remove and Replace)
DRAFT
Warning:
This procedure was derived from pre-production computer models, and
might not reflect the real-world situation. Warnings and cautions might be
missing. Follow safety requirements a
Airbag - Knee - Driver (Remove and Install)
Remove
Remove the LH center console side panel carpet. See Carpet - Side Panel
- Center Console - LH (Remove and Replace).
Disconnect 12V power. See 12V Power (Disconnect and Connect).
Remove
SEE MORE:
Cover - Airbag - Knee - Driver (Remove and Replace)
Note:
This procedure was formulated using a release candidate or production
model. Follow safety requirements and use extreme caution when working on or
near high-voltage systems and components.
Remove
Remove the driver knee airbag.
Use a flat head screwdriver to apply pressure along t
Collision Avoidance Assist
The following collision avoidance features are
designed to increase the safety of you and
your passengers:
Forward Collision Warning - provides
visual and audible warnings in situations
when Model 3 detects that there is a high
risk of a frontal collision
Automatic Emergency Braking -
© 2019-2026 Copyright www.tmodel3.com
