Tesla Model 3: Hose - Inverter Inlet - Front Drive Unit - Install
Install
.png)
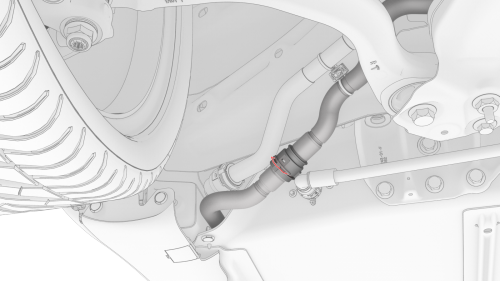
- Position the front drive unit inverter inlet hose to the vehicle, and then install the clip that connects the hose to the front drive unit inverter coolant inlet.
Caution: Perform a push-pull test to verify that the hose is fully seated.
.png)
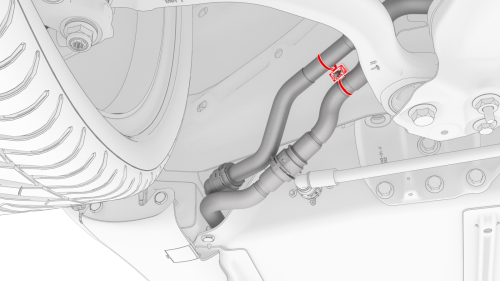
Other assemblies hidden for clarity
- Install the clip that attaches the front drive unit inverter inlet hose to the exterior of the front drive unit gearbox.
- Install the clip that attaches the front drive unit inverter inlet hose to the front subframe.
- Remove the plug, and then install the clip to reconnect the front drive unit inverter inlet hose.
Caution: Perform a push-pull test to verify that the hose is fully seated.
- Install the clip that attaches the front drive unit inverter inlet hose the vehicle.
- Remove the coolant drain container from underneath the vehicle.
- Install the RH front wheel arch liner. See Wheel Arch Liner - Front - LH (Remove and Replace).
- Position the RH front wheel on the vehicle, and then hand-tighten the wheel lug nuts.
- Install the front aero shield panel. See Panel - Aero Shield - Front (Remove and Replace).
- Lower the vehicle, and then tighten the RH front wheel lug nuts. See Wheel (Remove and Install).
Note: Use only hand tools to remove or install the fasteners. Do not use impact or power tools.
Note: Use a 6 point socket. Do not use a 12 point socket or a specialty socket.
- If equipped, install the RH front wheel center cap. See Cap - Wheel (Remove and Replace).
- Connect 12V power. See 12V Power (Disconnect and Connect).
- Refill the cooling system. See Cooling System (Vacuum Refill).
- Install the cabin intake duct. See Duct - Cabin Intake (Remove and Replace).
- Install the rear underhood apron. See Underhood Apron - Rear (Remove and Replace).
- Install the 2nd row lower seat cushion. See Seat Cushion - Lower - 2nd Row (Remove and Replace).
READ NEXT:
 Hose - Inverter to Heat Exchanger - Front Drive Unit (Remove and Replace)
Remove
Remove the front subframe assembly from the vehicle.
See Subframe Assembly - Front (Dual Motor) (Remove and
Install).
Breather - Front Drive Unit (Remove and Replace)
Remove
Remove the front subframe assembly. See
Subframe Assembly - Front (Dual Motor) (Remove and Install).
Remove the front drive unit breather.
Torque 5 Nm
Install
Installation pro
SEE MORE:
Drive to Calibrate Cameras
Model 3 must maneuver with a great deal of
precision when Autopilot features are being
used. Therefore, before some features (for
example, Traffic-Aware Cruise Control or
Autosteer) can be used for the first time or
after certain Service repairs, the cameras must
complete a self-calibration pr
Power Conversion System- Install
Install
Consider your first step.
If the removed power conversion system is to be reinstalled, go to step
5.
If a replacement power conversion system is to be installed, continue to the
next step.
Remove the shipping plugs from the replacement power conversion system.
Tilt the power
