Tesla Model 3: HV Battery (RWD) - Install
Install
- Use the gantry and H-frame hoist to lift the HV battery out of the shipping container.
- If the replacement HV battery has an HV battery center rail ski, go to step 8.
- With an assistant, install the center rail ski to the HV battery.
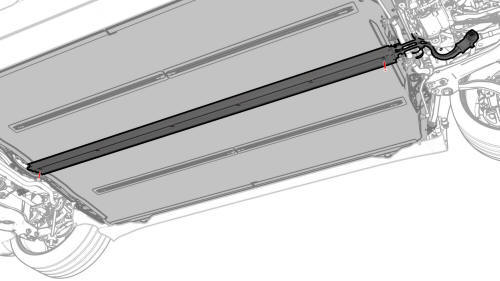
- Install the bolts that attach the center rail ski to the HV battery.
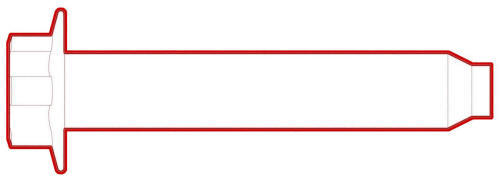 Torque 38 Nm
.jpg)
- Fasten the clips that attach the PTC heater and A/C compressor electrical harness cover to the rear of the HV battery.
.jpg)
- Connect the PTC heater and A/C compressor electrical harness to the HV battery connector, lower the handle, and attach the locking tab.
.png)
- Install the PTC heater and A/C compressor electrical harness bracket to the front of the HV battery, and then fasten the clips that attach the bracket to the HV battery.
- Use the gantry and H-frame hoist to set the HV battery onto the manual lift battery table.
.png)
- Install the powertrain supply hose to the upper clips on the RH side of the HV battery, and then fasten the clips (x5) to attach the hose to the HV battery.
.png)
- Connect the powertrain supply hose fitting to the RH rear underside of the penthouse, and then fasten the clip.
.png)
- Install the powertrain return hose to the lower clips on the RH side of the HV battery, and then fasten the clips (x5) to attach the hose to the HV battery.
.png)
- Install the HV battery return hose to the clips on the LH side of the HV battery, and then fasten the clips (x5) to attach the hose to the HV battery.
.png)
- Connect the LH inner HV battery return hose fitting to the LH rear of the HV battery platter enclosure, and then fasten the clip.
.png)
- Fasten the clips that attach the RH inner HV battery return hose to the HV battery.
.png)
- Connect the RH inner HV battery return hose fitting to the RH rear of the HV battery platter enclosure, and then fasten the clip.
.png)
- Install the HV battery supply hose assembly to the HV battery, connect the RH outer HV battery supply hose fitting to the RH front of the HV battery platter enclosure, and then fasten the clip.
.png)
- Connect the RH inner HV battery supply hose fitting to the RH front of the HV battery platter enclosure, and then fasten the clip.
.png)
- Connect the LH inner HV battery supply hose fitting to the LH front of the HV battery platter enclosure, and then fasten the clip.
.png)
- Connect the LH outer HV battery supply hose fitting to the LH front of the HV battery platter enclosure, and then fasten the clip.
- Perform step 11 through step 26 of the penthouse air leak test on the HV battery. See Penthouse Air Leak Test.
.jpg)
- Install and hand-tighten the adjustable elements (x4) on the penthouse cover counter-clockwise so that they are fully engaged.
Caution: Hand-tighten only.
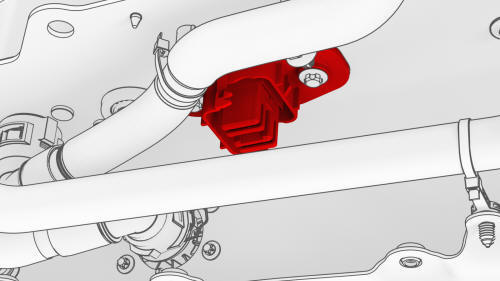
- If the replacement HV battery has a front drive unit HV connector, continue to the next step. Otherwise, go to step .
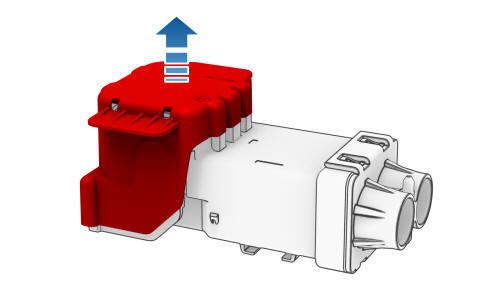
- Acquire a dummy plug (1455410-00-A or 1459652-00-A) and remove and discard the cover, if present.
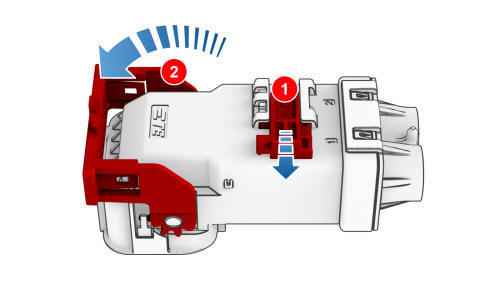
- Move the red tab to the unlock position (1), and then carefully swing the black locking arm to the unlock position until it makes a click (2).
Caution:
Be careful not to damage the dummy plug when releasing the black locking arm from the dummy plug body.
Note: Make sure that the black locking arm makes a clicking sound after it moves to the unlock position (2).
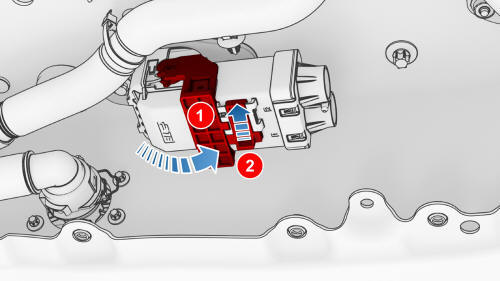
- Install the dummy plug onto the front drive unit electrical connector of the HV battery, then swing the black locking tab to the lock position (1), and then move the red tab into the lock position (2).
- Install a new HV battery cover gasket. See Gasket - Cover - HV Battery (Remove and Replace).
- Install the HV battery alignment rods; 2 at the front of the vehicle and 2 at the HV battery near the penthouse.
- With an assistant, position the HV battery underneath the vehicle.
- Lower the vehicle to the HV battery, and with an assistant, align the holes with the alignment rods.
Note: Do not fully lower the vehicle onto the HV battery. The battery will still need to slightly move to install the bolts in the following steps.
Caution: Make sure that the coolant hoses and HV harnesses are not caught on the alignment rods or sandwiched between the HV battery and the vehicle.
.png)
- Hand-tighten the LH and RH bolts (x16) that attach the HV battery to the body.
Note: Install the washers to the locations recorded earlier during removal.
.png)
- Hand-tighten the bolts (x4) that attach the front of the HV battery to the vehicle.
.jpg)
- Hand-tighten the front center bolt that attaches the HV battery to the vehicle.
- Remove the HV battery alignment rods.
.png)
- Hand-tighten the bolts (x8) that attach the HV battery LH and RH support brackets to the vehicle.
.png)
.jpg)
- Hand-tighten the bolts (x4) that attach the center portion of the HV battery through the HV battery center rail ski cover.
.png)
- Install and hand-tighten the smaller bolts that would attach the LH and RH shear plates to the body.
Note: Do not install the shear plates at this time.
- Fully raise the handle on the rear drive unit HV electrical harness.
.png)
- Attach the HV connector lever lock onto the back of the HV electrical harness.
- Firmly connect the HV electrical harness to the HV battery connector.
Caution:
Make sure that the harness fits the connector squarely and tightly.
- While pressing the harness to the connector, remove the HV connector lever lock.
.png)
- While pressing the harness to the connector, fully lower the handle.
.png)
- Slide the release to lock the HV electrical harness.
.png)
- Install the nuts that attach the rear drive unit HV electrical harness
bracket to the HV battery.
.png) Torque 10 Nm
Torque 10 Nm - Position the coolant drain under the rear RH side of the HV battery.
.png)
- Remove the plugs from the coolant outlet hose and the powertrain return hose, immediately connect the male and female fittings, and then fasten the clip.
Note: Perform a push-pull-push test on the fittings to make sure that they are secure.
- Position the coolant drain under the rear LH side of the HV battery.
.png)
- Remove the plugs from the rear drive unit inverter inlet hose and the LH underside of the penthouse, immediately connect the male and female fittings, and then fasten the clip.
Note: Perform a push-pull-push test on the fittings to make sure that they are secure.
- Remove the coolant drain container from underneath the vehicle.
- Install the rear HV battery skid plate, but only hand-tighten the fasteners. See Skid Plate - HV Battery - Rear (Remove and Replace).
- Open the LH rear door.
Caution: Do not damage any components while working around this area.
.png)
- Hand-tighten the 5th LH rear inner bolt that attaches the HV battery to the body.
Note: Lift up the rear main carpet for access.
.jpg)
- Hand-tighten the 4th LH inner bolt that attaches the HV battery to the body.
- Partially close, but do not latch, the LH rear door.
- Open the LH front door.
Caution:
Do not damage any components while working around this area.
.jpg)
- Hand-tighten the 3rd LH inner bolt that attaches the HV battery to the body.
.png)
- Hand-tighten the LH front inner bolts (x2) that attach the HV battery to the body.
- Partially close, but do not latch, the LH front door.
- Open the RH rear door.
Caution: Do not damage any components while working around this area.
.png)
- Hand-tighten the 5th RH rear inner bolt that attaches the HV battery to the body.
.png)
- Hand-tighten the 4th RH inner bolt that attaches the HV battery to the body, if equipped.
- Partially close, but do not latch, the RH rear door.
- Open the RH front door.
Caution: Do not damage any components while working around this area.
.png)
- Hand-tighten the 3rd RH inner bolt that attaches the HV battery to the body, if equipped.
.png)
- Hand-tighten the RH front inner bolts (x2) that attach the HV battery to the body.
- Partially close, but do not latch, the RH front door.
- With an assistant, lower the vehicle onto the HV battery completely.
.png)
- Torque the LH and RH bolts (x16) that attach the HV battery to the
vehicle.
.png) Torque 30 Nm
Torque 30 Nm
.png)
- Torque the bolts (x4) that attach the front of the HV battery to the
vehicle.
.png) Torque
30 Nm
Torque
30 Nm
.jpg)
- Torque the front center bolt that attaches the HV battery to the
vehicle.
.png) Torque
10 Nm
Torque
10 Nm
.png)
- Torque the bolts (x8) that attach the HV battery LH and RH support
brackets to the vehicle.
.png) Torque 110 Nm
Torque 110 Nm
.png)
.jpg)
- Tighten the bolts (x4) that attach the center portion of the HV battery
through the center ski cover.
.png) Torque 34 Nm
Torque 34 Nm - Torque the fasteners that attach the rear skid plate to the vehicle. See Skid Plate - HV Battery - Rear (Remove and Replace).
- With an assistant, raise the vehicle, and then remove the battery table from underneath the vehicle. Set the vehicle to a comfortable working height.
- Put the support stand to support the front portion of the rear subframe.
.jpg)
LH shown, RH similar
- Remove the smaller bolts (x2) and the larger bolt that are used to attach the LH shear plate to the vehicle.
.png)
LH shown, RH similar
- Install the LH shear plate, and then install the smaller bolts (x2) that
attach the shear plate to the HV battery.
.png) Torque 30 Nm
Torque 30 Nm
.png)
- Install the larger bolt that attaches the shear plate to the vehicle,
and then mark the bolt with a paint pen.
.png) Torque 128 Nm
Torque 128 Nm
.png)
LH shown, RH similar
- Fasten the fir tree clips that attach the coolant hoses to the LH shear plate.
- Repeat steps 75 through 78 for the RH shear plate.
- Remove the support stand from underneath the rear subframe
- Install the mid aero shield panel. See Panel - Aero Shield - Mid (Remove and Replace).
- Position the coolant drain under the front LH side of the HV battery.
.png)
- Remove the plugs from the chiller to HV battery hose and the manifold at the LH side of the vehicle, immediately connect the male and female fittings, and then fasten the clip.
Note: Perform a push-pull-push test on the fittings to make sure that they are secure.
.png)
- Fasten the clips that attach the chiller to HV battery hose to the body.
.png)
- Remove the plugs from the HV battery return hose at the LH side of the vehicle, immediately connect the male and female fittings, and then fasten the clip.
Note: Perform a push-pull-push test on the fittings to make sure that they are secure.
- Position the coolant drain under the front RH side of the HV battery.
.png)
- Remove the plugs from the rear powertrain supply hose at the RH side of the vehicle, immediately connect the male and female fittings, and then fasten the clip.
Note: Perform a push-pull-push test on the fittings to make sure that they are secure.
.png)
- Remove the plugs from the powertrain return hose at the RH side of the vehicle, immediately connect the male and female fittings, and then fasten the clip.
Note: Perform a push-pull-push test on the fittings to make sure that they are secure.
- Remove the coolant drain from underneath the vehicle.
.jpg)
- Connect the A/C HV connector.
.jpg)
- Connect the PTC HV electrical connector, and then install the harnesses to the bracket.
- Install the front HV battery skid plate. See Skid Plate - HV Battery - Front (Remove and Replace).
- Remove the bungee straps from the LH and RH wheel arch liners.
.png)
.png)
- Fasten the clips along the bottom edge of the LH and RH wheel arch liners.
- Install the front aero shield panel. See Panel - Aero Shield - Front (Remove and Replace).
- Lower the vehicle fully, and chock a wheel.
- Remove the lift adaptors from the body, and then install the body plugs.
- Remove the chock, and with an assistant, push the vehicle away from the lift to a stall, and then re-chock the wheel.
Caution:
Push the vehicle for a very short distance and at less than 1 MPH.
- Open all doors.
.png)
- Connect the positive 12V output cable to the DCDC passthrough, install a
new nut to attach the cable, and mark the nut with a green paint pen after
torque.
.jpg) Torque 9 Nm
Torque 9 Nm
Caution: Make sure that the rubber boot is not trapped under the cable lug or pinched between the cable lug and nut.
- Replace the cover on the positive 12V output cable at the DCDC passthrough, and then press down to attach the cover.
- Install the DCDC ground busbar. See Busbar - DCDC Ground (Remove and Replace).
.png)
- Install the bolts that attach the LH and RH inner 2nd row rails to the
penthouse cover.
.png) Torque 24 Nm
Torque 24 Nm
.jpg)
- Connect the charge port HV harness connector to the penthouse; use one hand to support the harness connector while the other hand latches the locking tab.
Note: Verify that the charge port HV harness connector latch is not damaged and fully secured in the latched position.
.jpg)
- Install the clip that attaches the charge port to HV harness connector to the LH lower C-pillar.
.jpg)
- Install the harness clips, and then the bolts that attach the
charge port to HV battery harness bracket at the penthouse.
.jpg) Torque 10 Nm
Torque 10 Nm
.png)
- Install the HV cap that covers the HV harness located on the LH side of the penthouse.
- Connect 12V power. See 12V Power (Disconnect and Connect).
- Shift into Park to release the Electronic Parking Brake service mode, and then remove the wheel chock.
- Connect a laptop with Toolbox to the vehicle.
- Perform a cooling system vacuum refill. See Cooling System (Vacuum Refill).
- Disconnect the laptop from the vehicle.
.png)
- Tighten the 5th LH rear inner bolt that attaches the HV battery to the
body.
.png) Torque 66
Nm
Torque 66
Nm
Note: Lift up the rear main carpet for access.
.jpg)
- Tighten the 4th LH inner bolt that attaches the HV battery to the body.
.png) Torque 66 Nm
Torque 66 Nm - Unfold the carpet back to its original position.
- Move the driver seat fully rearwards.
.jpg)
- Tighten the 3rd LH inner HV battery bolt.
.png) Torque 66 Nm
Torque 66 Nm
.png)
- Tighten the LH front inner HV battery bolts (x2) that attach the HV
battery to the body.
.png) Torque 136 Nm
Torque 136 Nm
.jpg)
- Unfold the LH front main carpet back to its original position; move the front edge down and slide back the section up to ease positioning. Install the seat electrical harness into the clip.
.png)
- Install the clips (x3) that attach the LH front carpet to the vehicle.
- Move the driver seat fully forwards.
.png)
- Tighten the 5th RH rear inner bolt that attaches the HV battery to the
body.
.png) Torque 66
Nm
Torque 66
Nm
.png)
- Tighten the 4th RH inner bolt that attaches the HV battery to the body,
if equipped.
.png) Torque
66 Nm
Torque
66 Nm - Unfold the RH side of the rear carpet back to its original position.
- Move the front passenger seat fully rearward.
.png)
- Tighten the bolt that attaches the 3rd RH inner HV battery bolt to the body, if equipped.
.png)
- Tighten the RH front inner bolts (x2) that attach the HV battery to the
body.
.png) Torque 136
Nm
Torque 136
Nm
.jpg)
- Unfold the RH front main carpet back to its original position; move the front edge down and slide back the section up to ease positioning. Install the seat electrical harness into the clip.
.jpg)
- Install the clips (x4) that attach the RH front carpet to the vehicle.
- Move the front passenger seat fully forward.
.png)
- Install the clips (x4) and hook-and-loop strips that attach the rear carpet to the vehicle.
Note: The number of clips on newer vehicles might vary.
- Install the LH lower B-pillar trim. See Trim - B-Pillar - Lower - LH (Remove and Replace).
- Install the LH upper B-pillar trim. See Trim - B-Pillar - Upper - LH (Remove and Replace).
- Install the LH rear sill panel trim. See Trim - Sill Panel - Rear - LH (Remove and Replace).
- Install the LH 2nd row seat side bolster. See Bolster - Side - Seat - 2nd Row - LH (Remove and Replace).
- Repeat step 132 through step 135 for the RH side of the vehicle.
- Install the 2nd row lower seat cushion. See Seat Cushion - Lower - 2nd Row (Remove and Replace).
- Install the 2nd row floor mat inside the vehicle.
- Install the RH center console side panel carpet. See Carpet - Side Panel - Center Console - LH (Remove and Replace).
- Install the RH front floor mat.
- Install the front passenger footwell cover. See Cover - Footwell - Passenger (LHD) (Remove and Replace).
- Install the RH lower A-pillar trim. See Trim - A-Pillar - Lower - LH (Remove and Replace).
- Install the RH middle A-pillar trim. See Trim - A-Pillar - Middle - LH (Remove and Replace).
- Install the RH instrument panel end cap. See End Cap - Instrument Panel - LH (Remove and Replace).
- Install the LH center console side panel carpet. See Carpet - Side Panel - Center Console - LH (Remove and Replace).
- Install the LH front floor mat.
- Install the driver footwell cover. See Cover - Footwell - Driver (Remove and Replace).
- Install the LH lower A-pillar trim. See Trim - A-Pillar - Lower - LH (Remove and Replace).
- Install the LH middle A-pillar trim. See Trim - A-Pillar - Middle - LH (Remove and Replace).
- Install the LH instrument panel end cap. See End Cap - Instrument Panel - LH (Remove and Replace).
- Restore the driver and front passenger seats back to their original position.
- Install the cabin intake duct. See Duct - Cabin Intake (Remove and Replace).
- Install the rear underhood apron. See Underhood Apron - Rear (Remove and Replace).
- Close the hood and all four doors.
- Install the LH and RH lower rocker panel covers. See Cover - Rocker Panel - Lower - LH (Remove and Replace).

