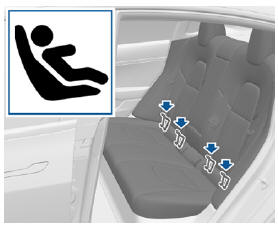
Tesla Model 3: Installing Seat Belt Retained Child Seats
First, make sure that the child safety seat is appropriate for the weight, height, and age of the child.
Avoid dressing the child in bulky clothing and do not place any objects between the child and the restraint system.
Adjust harnesses for every child, every trip.
To securely hold child safety seats, all passenger seating positions are equipped with an automatic locking retractor (ALR) that, by pulling the seat belt beyond the length needed for a typical adult occupant, locks the belt into place until the seat belt is unbuckled and the webbing is fully retracted. The ALR mechanism operates as a ratchet, winding in slack and preventing the seat belt from extending any further until it has been completely rewound. When installing a child safety seat, engage the belt's automatic locking retractor by pulling the seat belt webbing until it is fully extended. The ALR system engages only when the seat belt is at its maximum extension point.
Note: An automatic locking retractor disengages only when the seat belt is unbuckled and fully retracted. The belt can then be worn as a normal belt, sliding freely in and out and locking tight only in an emergency. Once disengaged, the belt must be fully extended to re-engage the locking mechanism whenever you install a child safety seat.
Always follow the detailed instructions provided by the child safety seat manufacturer. General guidelines are provided below.
- Place the child safety seat in Model 3, and fully extend the seat belt. Route and buckle the seat belt in accordance with the child safety seat manufacturer's instructions.
- Allow the seat belt to retract, and remove all slack in the seat belt while firmly pushing the child safety seat into the Model 3 seat.
- If the seat belt retained child safety seat has an upper tether, attach it to the back of the seat
Installing LATCH (ISOFIX) Child Seats
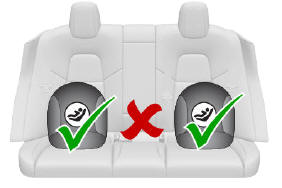
Lower LATCH anchors are provided in the second row outboard seats. The anchors are located between the seat's back rest and rear cushion. The exact location of each anchor is identified by a child safety seat identification button, illustrated below. The button is located on the seat back, directly above its associated anchor.
In the second row, install LATCH child safety seats in the outboard seating positions only.
Use only a seat belt retained seat in the center position.
To install a LATCH child safety seat, slide the safety seat latches onto the anchor bars until they click into place. Carefully read and follow the instructions provided by the child safety seat manufacturer.
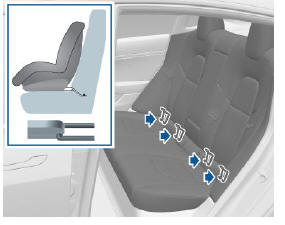
Once installed, test the security of the installation before seating a child. Attempt to twist the child safety seat from side to side and try to pull it away from the seat, then check to ensure the anchors remain securely in place.
Note: Lower LATCH anchors should not be used with child seats or booster seats that have an integrated safety belt in situations where the combined weight of the child plus the child restraint is more than 65 lbs (29.5 kg). In these situations, use the safety belt instead.
READ NEXT:
 Attaching Upper Tether Straps
If an upper tether strap is provided, attach its
hook to the anchor point located on the shelf
behind the rear seats.
Note: The location of anchor points may not
be readily visible but can be foun
Child Safety Seat Warnings
Warning: Extreme hazard! Do not seat a
child on the front passenger seat even if
you are using a child safety seat. This seat
has an airbag in front of it. Although this
airbag is disabled when Mo
SEE MORE:
Roadside Assistance
This is crucial information for owners who have breakdowns or emergencies while driving. It gives a summary of the services and contact details available for Tesla's roadside assistance program.
This section describes what an emergency is—such as a flat tire, malfunctioning car, issue with th
Harness - Drive Unit - Front (Remove and Replace)
Remove
Partially raise the vehicle to a comfortable working height. See Raise
Vehicle - 2 Post Lift.
Remove the 2nd row lower seat cushion. See Seat Cushion - Lower - 2nd
Row (Remove and Replace).
Remove the rear underhood apron. See Underhood Apron - Rear (Remove and
Replace).
Disconne
