Tesla Model 3: Interior Storage and Electronics
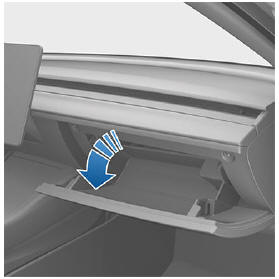
To open the glovebox, touch Controls >
Glovebox on the bottom corner of the
touchscreen. The glovebox automatically
opens and its light turns on. To close the glovebox, push it upward until it
clicks into its closed position. Note: If you leave the glovebox open, its light
eventually turns off. Note: The glovebox locks whenever closed
and you lock Model 3 using the mobile app,
key card, you leave Model 3 carrying your
authenticated phone (if Walk-Away Door Lock
is turned on), or if Valet mode is activ . It does not lock
when Model 3 is locked by touching the lock
icon on the touchscreen. Warning: When driving, keep the
glovebox closed to prevent injury to a
passenger if a collision or sudden stop
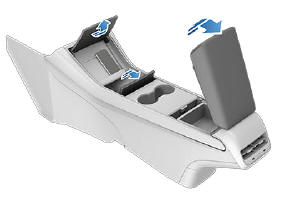
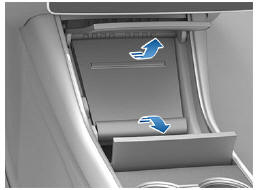
occurs. Center Console - Premium Package In addition to housing an RFID transmitter that
reads key fobs and key cards (see Key Card ), the center console includes cup
holders, two storage compartments, and a
phone dock for two phones (or other devices).
To open the main storage compartment, pull
its cover upward.
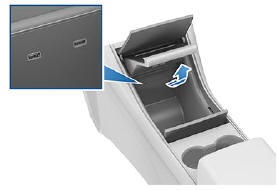
Open the other storage compartment or
access the phone dock by pressing firmly near
the cover's opening edge. To close a storage
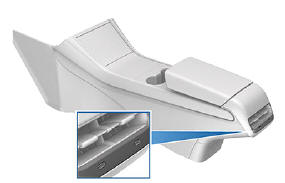
compartment, push its cover down gently. USB Ports - Premium Package Model 3 has two USB 2.0 ports located in the
front compartment of the center console.
These ports can be used to connect and
charge your phone (see Installing Phone
Charging Cable). save videos
when using features such as Sentry Mode or
Dashcam, or play audio files stored on a
phone or USB device (see Playing Media from
Devices Open the center console door below the
touchscreen and lift the phone dock upward
to access the front USB ports.
Two additional USB ports are located in the
rear of the center console. Passengers in the
rear seats can use these ports to charge their
USB-connected devices. Devices connected to
the rear USB ports do not communicate with
the vehicle.
Note: Power is available whenever the vehicle
is considered "awake". The vehicle may be
awake for many reasons. For example, when
using features such as Summon, or when
features such as Cabin Overheat Protection,
Keep Climate On, Dog Mode, Sentry Mode,
etc. are enabled. The vehicle is also awake
whenever the 12V battery is being charged or
is in use, during HV charging, when the vehicle
is communicating with the mobile app, etc.
Leaving an accessory plugged in does not
deplete the 12V battery. Note: Always use USB 2.0 compliant cables
when connecting devices to the USB ports.
Using non-compliant cables can result in
slower charging and, if plugged into either of
the front two ports, can result in potential
connection problems or degraded
performance when trying to access media files
on the device. Note: Do not connect multiple devices using a
USB hub. This can prevent connected devices
from charging or from being recognized by
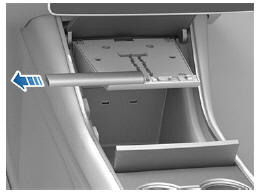
Media Player, Sentry Mode, Dashcam, etc. To make it easy to connect your phone while
keeping the console free of clutter, you can
install a phone charging cable in Model 3.
Note: The phone dock supports two phones
side-by-side.
To install a phone charging cable:
12V Power Socket Your Model 3 has a power socket located in
the center console's rear compartment.
The power socket is suitable for accessories
requiring up to 12A continuous draw (16A
peak). Note: Power is available whenever the vehicle
is considered "awake". The vehicle may be
awake for many reasons. For example, when
using features such as Summon, or when
features such as Cabin Overheat Protection,
Keep Climate On, Dog Mode, Sentry Mode,
etc. are enabled. The vehicle is also awake
whenever the 12V battery is being charged or
is in use, during HV charging, when the vehicle
is communicating with the mobile app, etc.
Leaving an accessory plugged in does not
deplete the 12V battery. Warning: The power socket and an
accessory's connector can become hot. Warning: To prevent excessive
interference with the vehicle's electronics,
Tesla recommends that you do not plug
any non-Tesla accessories, including
power inverters, into the 12V power
socket. However, if you do use a non-Tesla
accessory and notice any malfunctions or
unexpected behavior, such as indicator
lights, alert messages, or excessive heat
from the accessory, unplug the accessory
from the 12V power socket immediately. Caution: Do not attempt to jump start
Model 3 using the 12V power socket.
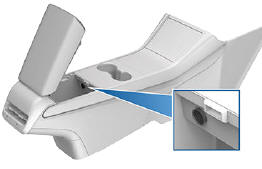
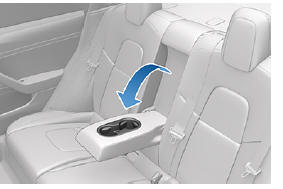
Doing so can result in damage. Your Model 3 has a rear console integrated in
the center of the second row seat back. Pull
the console down to access the rear cup
holders, or use it as an armrest.
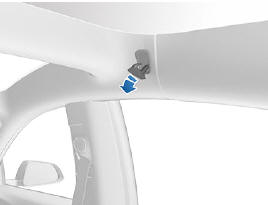
Coat Hangers Your Model 3 has a coat hanger on each side
of the vehicle in the second row. Push the coat
hanger to release it. Push it again to retract it.
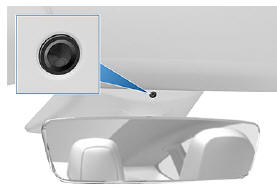
Cabin Camera Model 3 is equipped with a camera in the
cabin. The camera is not currently active, but
might be used in potential future features
which could be added to Model 3 with
software releases.
Keep the camera lens clean, and free of
obstructions. Remove any buildup of dirt or
dust by occasionally wiping the camera lens
with a soft damp cloth. Caution: Do not use chemical-based or
abrasive cleaners. Doing so can damage
the surface of the camera lens.Glovebox
Installing Phone Charging Cable
Rear Console
READ NEXT:
SEE MORE:
 Heater - PTC (Remove and Replace)
Heater - PTC- Remove
Remove
Raise and support the vehicle on a 2 post lift. See
Raise Vehicle - 2 Post Lift.
Remove the rear underhood apron. See
Underhood Apron - Rear (Remove and Replace).
Remove the 2nd row lower seat cushion. See
Seat Cushion - Lower - 2nd Row (Remove and Replace).
Rem
Overview
This section provides the main information about the Tesla Model 3 car, describing its key characteristics, technologies and capabilities.
Here is a general description of the interior and exterior, including details about the interior design, materials used, seating configuration, storage space an
