Tesla Model 3: Jacking and Lifting
Tesla Model 3 2017-2026 Owner's Manual / Maintenance / Jacking and Lifting
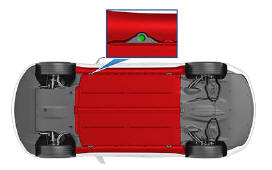
Follow the steps below to lift Model 3. Ensure that any non-Tesla repair facility is aware of these lifting points.
- Position Model 3 centrally between the lift posts.
- Position the lift arm pads under the designated body lift points at the locations shown.
Warning: DO NOT position the lift arm pads under the Battery or side rails, as shown in red.
- Adjust the height and position of the lift arm pads to ensure that they are correctly located.
- With assistance, raise the lift to the desired height, ensuring the lift arm pads remain in their correct positions.
- Engage any lift safety locks. Follow the lift manufacturer's instructions.
Warning: Never raise Model 3 when the charge cable is connected, even if charging is not in progress.
Warning: Do not work on an incorrectly supported vehicle. Doing so can cause serious damage, bodily injury, or death.
Caution: DO NOT lift from under the Battery or side rails. Place the lift arm pads under the designated body lift points only. The locations shown are the only approved lifting points for Model 3.
Lifting at any other points can cause damage. Damage caused by incorrectly lifting Model 3 is not covered by the warranty.
READ NEXT:
 Parts and Accessories
Parts, Accessories, and
Modifications
Use only genuine Tesla parts and accessories.
Tesla performs rigorous testing on parts to
ensure their suitability, safety, and reliability.
Purchase thes
SEE MORE:
Four Wheel Alignment (Check and Adjust)
Prepare for Adjustment
SPECIAL TOOLS
SEAT COVER (1096767-00-A)
Ballast Bag, 25lb (1145158-00-A)
CHASSIS HEIGHT MEASURING TOOL (1071271-00-A)
STEERING WHEEL LEVEL (1049463-00-A)
Prepare for Adjustment
Make sure the tire pressures are to specification.
Note: Use the tire sticker values displayed on
Lights
Controlling Lights
Touch Controls > Lights on the touchscreen to
control the lights.
In addition to the lights that you can control
from the touchscreen, Model 3 has
convenience lights that operate automatically
based on what you are doing. For example, in
low ambient lighting conditions,
© 2019-2026 Copyright www.tmodel3.com
