Tesla Model 3: Overview of Climate Controls
Climate controls are always available at the bottom of the touchscreen. To turn the climate control system on, touch the fan icon or adjust the cabin temperature. To turn it off, touch the fan icon and then touch the off button near the center of the popup window.
By default, climate control is set to the Auto setting, which maintains optimum comfort in all but the most severe weather conditions. When you adjust the cabin temperature in the Auto setting, the system automatically adjusts the heating, air conditioning, air distribution, and fan speed to maintain the cabin at your selected temperature. To override the Auto setting, touch the fan icon, turn off the Auto setting, then manually adjust your settings. If you've manually adjusted individual settings, you can also revert back to Auto at any time by touching AUTO on the climate control popup window.
Note: The following illustration is provided for demonstration purposes only. Depending on vehicle options, software version, market region, and settings, the information displayed may be slightly different.
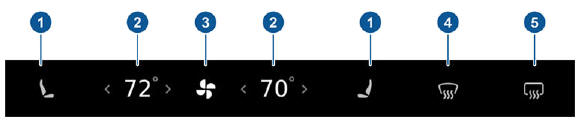
- Seat heaters operate at three setting levels from 3 (highest) to 1 (lowest). When operating, the associated seat icon displays twisting lines that turn red to indicate the setting level. If equipped with the premium package, rear seats are also equipped with seat heaters
- Touch an up or down arrow to change the cabin temperature. To apply a temperature setting to both the driver and passenger side, touch SYNC on the popup that appears when you touch an arrow. When you apply the same temperature to both sides, only one temperature setting displays. Touch SYNC again to display separate temperature settings for the driver and passenger.
- Touch the fan icon to turn on climate control and to manually customize settings to suit your preferences. Touch and hold the fan icon to quickly turn off climate control. If your vehicle is equipped with the premium package, touch this icon to access controls for the rear seat heaters.
- The windshield defroster distributes air flow to the windshield. Touch once to defog the windshield (the icon turns blue). Touch a second time to defrost the windshield (the icon turns red and the heating and fan operate at maximum levels). Touch a third time to turn off and restore the air distribution, heating, and fan to their previous setting
- Touch to warm up the rear window. When operating, the icon turns red. After 15 minutes, the rear window defroster automatically turns off. If equipped with the premium package, the exterior side mirrors are also heated whenever the rear window defroster is operating.
Warning: To avoid burns resulting from prolonged use, individuals who have peripheral neuropathy, or whose capacity to feel pain is limited because of diabetes, age, neurological injury, or some other condition, should exercise caution when using the climate control system and seat heaters.
Note: The climate control system is powered by the high voltage battery. Therefore, prolonged use decreases driving range.
READ NEXT:
 Adjusting Climate Control Settings
To override the Auto setting, touch the fan icon, turn off the Auto setting,
then use the buttons
that appear to manually adjust settings.
In addition to the settings shown, if Model 3 is in P
Adjusting the Front Vents
Model 3 has a unique horizontal face-level
vent that spans the width of the dashboard.
Using the touchscreen, you can pinpoint
exactly where you want to direct the air
flowing from this vent whe
Cabin Air Filter
Model 3 has an air filter that prevents pollen,
industrial fallout, road dust and other particles
from entering through the vents. Tesla
recommends replacing the cabin air filter
every 2 years.
C
SEE MORE:
Service Intervals
Your vehicle should generally be serviced on
an as-needed basis. However, Tesla
recommends the following maintenance items
and intervals, as applicable to your vehicle, to
ensure continued reliability and efficiency of
your Model 3.
Brake fluid health check every 2 years
(replace if neces
Flood Ports - 2nd Generation (Remove and Replace) - Remove
Remove
Connect a laptop with Toolbox 3 to the vehicle.
In Toolbox, click in the Search field, and then click Tools.
From the Tools menu, click Active Alerts.
Click Read Alerts and check for a BMS_a123, BMS_a151, or a BMS_a035
alert
If:
Any of the alerts are present - Investigate and cor
