Tesla Model 3: Speaker - Parcel Shelf - LH (Remove and Replace)
Tesla Model 3 2017-2026 Service Manual / Infotainment / Audio System - Speakers Subwoofer Amplifier / Speaker - Parcel Shelf - LH (Remove and Replace)
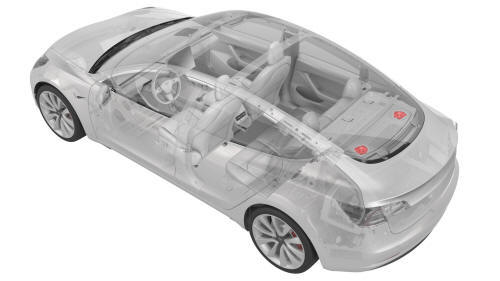
This procedure was formulated using a release candidate or production model. Follow safety requirements and use extreme caution when working on or near high-voltage systems and components.
Remove
- Remove the 2nd row lower seat cushion. See Seat Cushion - Lower - 2nd Row (Remove and Replace).
- Remove the LH and RH 2nd row seat side bolsters. See Bolster - Side - Seat - 2nd Row - LH (Remove and Replace).
- Remove the LH and RH side rail trims. See Trim - Side Rail - LH (Remove and Replace).
- Remove the LH and RH upper C-pillar trims. See Trim - C-Pillar - Upper - LH (Remove and Replace).
- Remove the package tray trim. See Trim - Package Tray (Remove and Install).
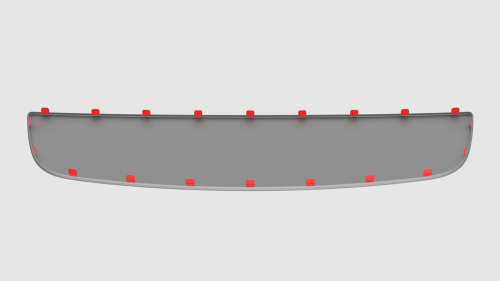
- Release the tabs that attach the parcel shelf speaker grille to the vehicle.
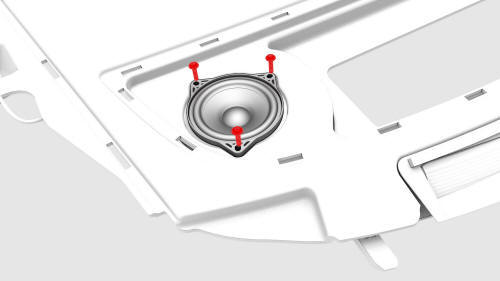
- Remove the screws that attach the LH parcel shelf speaker to the vehicle.
 Torque 2.3 Nm
Note: Support and then remove the speaker bracket underneath.
- Lift the LH parcel shelf speaker from the vehicle, and then disconnect the electrical connector from the speaker.
- Remove the LH parcel shelf speaker from the vehicle.
Install
Installation procedure is the reverse of removal.
READ NEXT:
 Subwoofer (Remove and Replace)
Remove
Disconnect 12V power. See 12V Power (Disconnect and Connect).
Remove the RH trunk side trim. See Trim - Side - Trunk - RH (Remove and
Replace).
Disconnect the electrical harness fro
Tweeter - Dash (Remove and Replace)
Remove
Remove the LH and RH instrument panel end caps. See End Cap - Instrument
Panel - LH (Remove and Replace).
Remove the LH and RH mid A-pillar trims. See Trim - A-Pillar - Middle -
LH (Re
Tweeter - Front Door - LH (Remove and Replace)
Remove
Pull straight up to release the clips that attach the LH front door
tweeter assembly to the door.
Caution: Do not pull the tweeter assembly too far from the door panel,
as the tweeter
SEE MORE:
Trunk (Remove and Install)
Trunk (Remove and Install)- Remove
Remove
Remove the trunk lid trim. See Trim - Lid - Trunk (Remove and Replace).
Disconnect the LH and RH rear fog/reverse light electrical connectors.
Disconnect the rear facing camera electrical connector.
Disconnect the trunk exterior re
Latch - Seat Back - 2nd Row - LH (Remove and Replace)
Remove
Remove the 2nd row center seatbelt assembly. See
Seatbelt - 2nd Row - Center (Remove and Replace).
Release the cable clip that attaches the latch bracket to the seat back.
Release the clip that attaches the bracket stud to the seat back.
Remove the bolts that attach th
© 2019-2026 Copyright www.tmodel3.com
