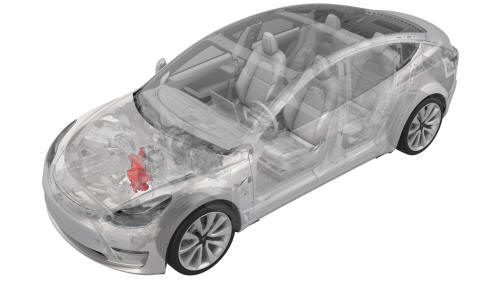
Tesla Model 3: Superbottle (RWD) (Remove and Replace)
Superbottle (RWD) - Remove
SPECIAL TOOLS
Kit, Svc Plug, Cooling Hose, Model 3 (1135762-00-A)
Remove
- Disconnect 12V power. See 12V Power (Disconnect and Connect).
- Remove the underhood storage unit. See Underhood Storage Unit (Remove
and Replace).
- Recover the A/C refrigerant. See A/C Refrigerant (Recovery and
Recharge).
Note: Recover the refrigerant while continuing this procedure.
.png)
- Remove the superbottle cap.
- Remove the front aero shield. See Panel - Aero Shield - Front (Remove
and Replace).
- Position a coolant drain under the superbottle.
- Release the clip and disconnect the powertrain supply hose at the lower
LH side of the superbottle.
Note: Allow the coolant to drain from the superbottle.
.jpg)
.png)
- Release the clip and disconnect the battery return hose from the rear
left of the superbottle.
.png)
- Release the clip that attaches the battery return hose to the
superbottle.
.jpg)
- Disconnect the electrical harness from the powertrain pump to sill hose
coolant temperature sensor connector.
.png)
- Release the clip and disconnect the powertrain pump to sill connector
hose from the rear right of the superbottle.
.jpg)
- Disconnect the electrical harness from the superbottle level sensor
connector.
.png)
- Disconnect the electrical harness from the 5-way valve actuator
connector.
.png)
- Release the clip that attaches the electrical harness to the
lower LH side of the superbottle.
.png)
- Disconnect the electrical harness from the chiller and EXV assembly hose
coolant temperature sensor connector.
.jpg)
- Release the clip that attaches the electrical harness to the chiller and
EXV assembly hose, and then remove the electrical harness from the hose.
.png)
- Release the clip that attaches the battery vent hose to the chiller and
EXV assembly hose, and then remove the battery vent hose from the chiller
and EXV assembly hose.
.png)
- Release the clip and disconnect the coolant hose from the chiller and
EXV assembly.
.png)
- Release the clip and disconnect the radiator inlet hose from the front
left of the superbottle.
.png)
- Release the clip and disconnect the radiator outlet hose from the front
right of the superbottle.
- Disconnect the electrical harness from the HV battery coolant pump
connector.
.jpg)
.png)
- Release the clip that attaches the electrical harness to the suction
liquid line.
.png)
- Disconnect the electrical harness from the powertrain coolant pump
connector.
.png)
- Disconnect the electrical harness from the chiller and EXV assembly
connector.
.png)
- Disconnect the electrical harness from the low pressure transducer
connector.
.png)
- Remove the bolt that attaches the suction/liquid line bracket to the
shock tower brace, and then separate the bracket from the brace.
Note: Make sure that the refrigerant has fully recovered before
continuing this procedure.
.png)
- Remove the bolt that attaches the suction/liquid line to the chiller and
EXV assembly, and then remove the line from the chiller and EXV assembly.
.png)
- Remove and discard the o-rings from the suction/liquid line fitting.
- Release the clip that attaches the suction/liquid lines to the
superbottle.
.jpg)
- Release the clip that attaches the electrical harness to the superbottle.
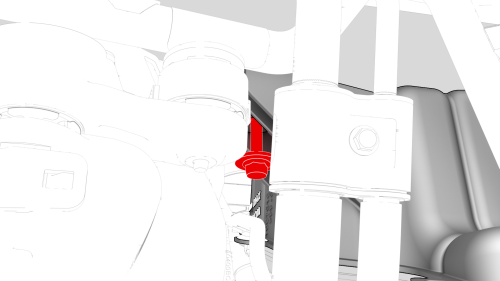
- Remove the bolt that attaches the superbottle to the shock tower brace.
.png)
- Remove the nuts that attach the superbottle to the shock tower brace,
and then remove the superbottle from the vehicle.
.jpg)
Superbottle (RWD) - Install
Install
- Install the superbottle to the shock tower brace, and then install the
nuts that attach the superbottle to the shock tower brace.
- Install the superbottle to the shock tower brace, and then install the
nuts that attach the superbottle to the shock tower brace.
.png) Torque 8 Nm
Torque 8 Nm
- Install the bolt that attaches the superbottle to the shock tower brace.
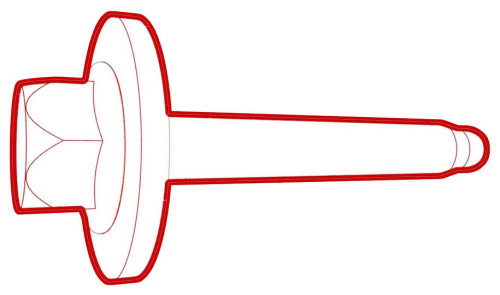 Torque 8 Nm
- Fasten the clip that attaches the electrical harness to the superbottle.
- Install the clip that attaches the suction/liquid lines to the
superbottle.
- Install new o-rings onto the suction/liquid line fitting, install the
suction/liquid line fitting into the chiller and EXV assembly, and then
install the bolt that attaches the suction/liquid line to the chiller and
EXV assembly.
.png) Torque 5.5 Nm
Torque 5.5 Nm
- After installing the assembly, refill the refrigerant. See A/C
Refrigerant (Recovery and Recharge).
Note: Perform installation of components removed concurrently with
refrigerant refill.
- Install the suction/liquid line bracket onto the shock tower brace, and
then install the bolt that attaches the bracket to the brace.
.png) Torque 5.5 Nm
Torque 5.5 Nm
- Connect the electrical harness to the low pressure transducer connector.
- Connect the electrical harness to the chiller and EXV assembly
connector.
- Connect the electrical harness to the power train coolant pump
connector.
- Fasten the clip that attaches the electrical harness to the liquid
suction line.
- Connect the electrical harness to the HV battery coolant pump connector.
- Connect the radiator outlet hose to the front right of the superbottle,
and then fasten the clip.
- Connect the radiator inlet hose to the front left of the superbottle,
and then fasten the clip.
- Connect the coolant hose from the chiller and EXV assembly, and then
fasten the clip.
- Install the battery vent hose to the chiller and EXV assembly hose, and
then fasten the clip that attaches the battery vent hose to the chiller and
EXV assembly hose.
- Install the electrical harness to the chiller and EXV assembly hose, and
then fasten the clip that attaches the electrical harness to the hose
- Connect the electrical harness to the chiller and EXV assembly hose
coolant temperature sensor connector.
- Fasten the clip that attaches the electrical harness to the lower LH
side of the superbottle.
- Connect the electrical harness to the 5-way valve actuator connector.
- Connect the electrical harness to the superbottle level sensor
connector.
- Connect the powertrain pump to sill connector hose to the rear right of
the superbottle, and then fasten the clip.
- Connect the electrical harness to the powertrain pump to sill hose
coolant temperature sensor connector.
- Fasten the clip that attaches the battery return hose to the superbottle.
- Connect the battery return hose to the rear left of the superbottle, and
then fasten the clip.
- Connect the powertrain supply hose at the lower LH side of the
superbottle, and then fasten the clip.
- Remove the coolant drain from under the vehicle.
- Install the front aero shield. See Panel - Aero Shield - Front (Remove
and Replace).
- Connect 12V power. See 12V Power (Disconnect and Connect).
Note: Do not install the rear apron at this time.
- Connect a laptop with Toolbox to the vehicle.
- Using Toolbox, run the 5-way valve actuator self-test, "TEST-SELF_VCFRONT_X_FIVE-WAY-VALVE."
Note: This Toolbox routine tests and calibrates the 5-way valve
actuator.
- Disconnect the laptop from the vehicle.
- Perform a cooling system vacuum refill. See Cooling System (Vacuum
Refill).
- After the A/C refrigerant recharge has fully completed, verify the
operation of the A/C system.
- Install the underhood storage unit. See Underhood Storage Unit (Remove
and Replace).
READ NEXT:
Active Grille Shutter (Remove and Replace)
Remove
Remove the cooling fan module. See Module - Cooling Fan (Remove and
Install).
Release the side clips that attach the active grille shutter
SEE MORE:
Remove
Remove the LH front door trim panel. See Panel - Door Trim - Front - LH
(Remove and Install).
Remove the LH front door inner belt seal. See Seal - Inner Belt - Front
Door - LH (Remove and Replace).
Remove the front LH door glass. See Glass - Door - LH - Front (Remove
and Replace)
Note:
This procedure was formulated using a release candidate or production
model. Follow safety requirements and use extreme caution when working on or
near high-voltage systems and components.
SPECIAL TOOLS
Tool, Inductive Heating (1032900-00-A)
Remove
Remove the 2nd row seat cushion. See Sea
 Air Distribution
