Tesla Model 3: Understanding Tire Markings
Tesla Model 3 2017-2024 Owner's Manual / Specifications / Wheels and Tires / Understanding Tire Markings
Laws require tire manufacturers to place standardized information on the sidewall of all tires. This information identifies and describes the fundamental characteristics of the tire. It also provides the tire identification number (TIN) for certification of safety standards, and in case of a recall.
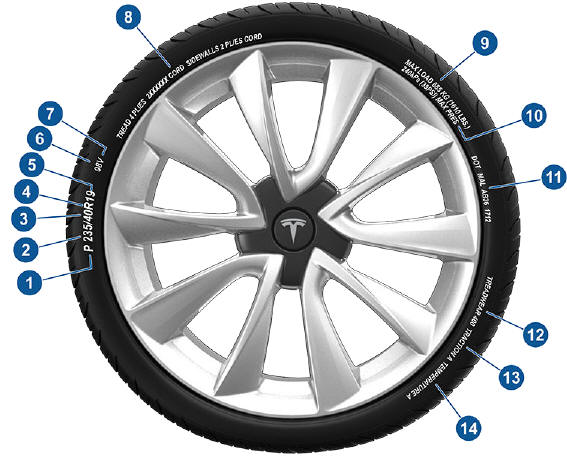
- Tire category. P indicates that the tire is for passenger vehicles.
- Tire width. This 3-digit number is the width (in millimeters) of the tire from sidewall edge to sidewall edge.
- Aspect ratio. This 2-digit number is the sidewall height as a percentage of the tread width. So, if the tread width is 205 mm, and the aspect ratio is 50, the sidewall height is 102 mm.
- Tire construction. R indicates that the tire is of Radial ply construction.
- Wheel diameter. This 2-digit number is the diameter of the wheel rim in inches.
- Load index. This 2 or 3-digit number is the weight each tire can support. This number is not always shown.
- Speed rating. When stated, indicates the maximum speed (in mph) at which the tire can be used for extended periods. Q=99 mph (160 km/h), R=106 mph (170 km/h), S=112 mph (180 km/h), T=118 mph (190 km/h), U=124 mph (200 km/h), H=130 mph (210 km/h), V=149 mph (240 km/h), W=168 mph (270 km/h), Y=186 mph (300 km/h).
- Tire composition and materials. The number of plies in both the tread area and the sidewall area indicates how many layers of rubber coated material make up the structure of the tire. Information is also provided on the type of materials used.
- Maximum tire load. The maximum load which can be carried by the tire.
- Maximum permissible inflation pressure. This pressure should not be used for normal driving.
- U.S. DOT Tire Identification Number (TIN). Begins with the letters DOT
and indicates
that the tire meets all federal standards. The next 2 digits/letters
represent the plant
code where it was manufactured, and the last 4 digits represent the week and
year of
manufacture. For example, the number 1712 is used to represent the 17th week
of 2012.
The other numbers are marketing codes used at the manufacturer's discretion. This information can be used to contact consumers if a tire defect requires a recall.
- Treadwear grade. This number indicates the tire's wear rate. The higher the treadwear number is, the longer it should take for the tread to wear down. A tire rated at 400, for example, lasts twice as long as a tire rated at 200.
- Traction grade. Indicates a tire's ability to stop on wet roads. A higher graded tire should allow you to stop your vehicle in a shorter distance than a tire with a lower grade. Traction is graded from highest to lowest as AA, A, B, and C.
- Temperature grade. The tire's resistance to heat is grade A, B, or C, with A indicating the greatest resistance. This grading is provided for a correctly inflated tire, which is being used within its speed and loading limits.
READ NEXT:
 Uniform Tire Quality Grading
The following information relates to the tire
grading system developed by the National
Highway Traffic Safety Administration
(NHTSA), which grades tires by tread wear,
traction and temperature per
Tire and Loading Glossaries
General Wheel and Tire Terms
Accessory Weight
The combined weight (in excess of those items replaced) of
items available as factory installed equipment.
Bead
The inner edge of a tire tha
Roadside Assistance
This is crucial information for owners who have breakdowns or emergencies while driving. It gives a summary of the services and contact details available for Tesla's roadside assistance program.
This
SEE MORE:
Controlling the Passenger Front Airbag
Model 3 has an occupancy sensor in the front passenger seat that controls the
status of the front
airbag.
Note: The occupancy classification system (OCS) meets the
regulatory requirement of FMVSS 208
and automatically detects when inflating the passenger front airbag would be
unnecessary or
Motor Assembly - Rear (Remove and Replace)
Remove
Remove the rear drive unit. See Drive Unit - Rear
(Remove and Replace).
Remove the rear drive unit inverter. See Inverter -
Rear Drive Unit (Remove and Install).
Position
© 2019-2024 Copyright www.tmodel3.com
