Tesla Model 3: Vent Assembly - HV Battery - RH (Remove and Replace)
Tesla Model 3 2017-2026 Service Manual / Battery System / HV Battery Enclosure / Vent Assembly - HV Battery - RH (Remove and Replace)
Remove
- Use Toolbox to put the vehicle into Factory Mode.
- Invoke diagnostics on the touchscreen.
- Inspect the Notifications for either a BMS_a123 or a BMS_W123 alert.
- If:
- Either alert is present - Contact Service Engineering. Do not perform this procedure.
- Neither alert is present - Continue to the next step.
- Exit diagnostics and restart the touchscreen.
- Use Toolbox to exit Factory Mode.
- Disconnect 12V power. See 12V Power (Disconnect and Connect).
- Perform the vehicle electrical isolation procedure. See Vehicle Electrical Isolation Procedure.
- Remove the mid aero shield panel. See Panel - Aero Shield - Mid (Remove and Replace).
.png)
- Release the fir tree clips that attach the coolant hoses to the RH shear plate.
- Put on personal protective equipment.
Warning: HV insulating gloves and leather glove protectors must be worn when exposed to the interior of the HV battery.
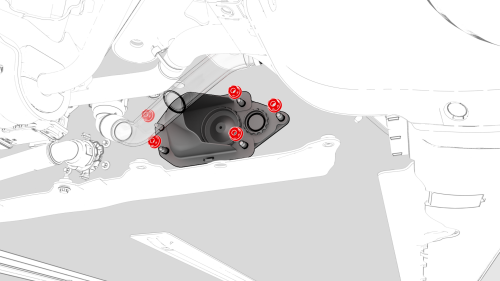
- Remove the nuts (x5) that attach the RH vent assembly to the HV battery, and then remove the vent assembly from the battery.
Install
- Put on personal protective equipment
Warning: HV insulating gloves and leather glove protectors must be worn when exposed to the interior of the HV battery.
- Install the RH vent assembly to the HV battery, and then install the
nuts (x5) that attach the vent assembly to the battery.
 Torque 10 Nm
 - Perform an HV battery air leak test. See HV Battery Air Leak Test.
- If the new vent assembly does not have a breather valve preinstalled, install one now. See Breathers - HV Battery (Remove and Replace).
- Fasten the fir tree clips that attach the coolant hoses to the RH shear plate.
- Install the mid aero shield panel. See Panel - Aero Shield - Mid (Remove and Replace).
- Connect 12V power. See 12V Power (Disconnect and Connect).
READ NEXT:
 Coolant - HV Battery (Drain and Refill)
SPECIAL TOOLS
Drive Unit Pressure Test Fixture (1053600-00-B)
Adapter, Coolant Reservoir Pressure Test (1130942-00-B)
Kit, Coolant Leak Test Adapters, Model 3 (1132185-00-B)
Kit, Coolant Drain &
Penthouse Coolant (Drain and Refill)
Penthouse Coolant- Drain
SPECIAL TOOLS
Drive Unit Pressure Test Fixture (1053600-00-C)
Kit, Coolant Leak Test Adapters, Model 3 (1132185-00-B)
Kit, Coolant Drain & Fill Adapters, M3 (1133843-00-A)
SEE MORE:
Module - Cooling Fan (Remove and Replace)
Remove
Remove the cooling fan module. See Module - Cooling Fan (Remove and
Install).
Release the clips (x14) that attach the active grille shutter to the
cooling fan module, and then remove the active grille shutter from the
module.
Remove the screws (x2) that attach the radiat
Insulators - HV Battery (Install)
Warning:
Only technicians who have been trained in High Voltage Awareness are
permitted to perform this procedure. Proper personal protective equipment (PPE)
and insulating HV gloves with a minimum rating of class 0 (1000V) must be worn
at all times a high voltage cable, busbar, or fitting is ha
© 2019-2026 Copyright www.tmodel3.com
