Tesla Model 3: Adjustable Top Loop (Remove and Replace)
Tesla Model 3 2017-2026 Service Manual / Safety and Restraint / Seatbelts / Adjustable Top Loop (Remove and Replace)
Remove
- Open both LH doors and lower both LH windows.
- Move the LH front seat fully forward.
.jpg)
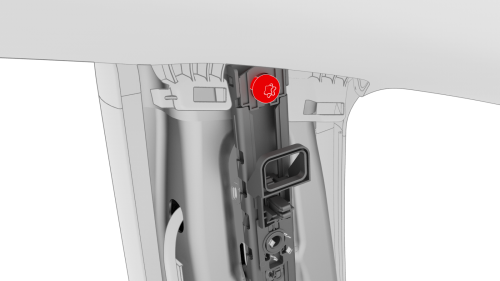
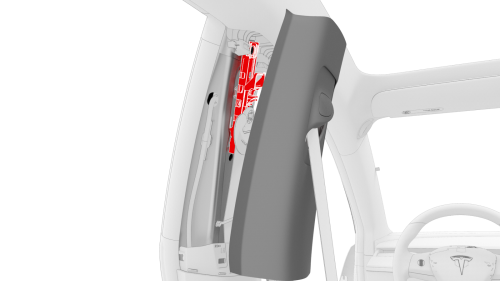
Release the clips that attach the LH upper B-pillar trim to the vehicle.
.png) Tip: Release the clips at the bottom of the LH upper B-pillar trim first, and
then release the clips at the top of the trim.
Tip: Release the clips at the bottom of the LH upper B-pillar trim first, and
then release the clips at the top of the trim.
- Set the LH upper B-pillar trim aside.
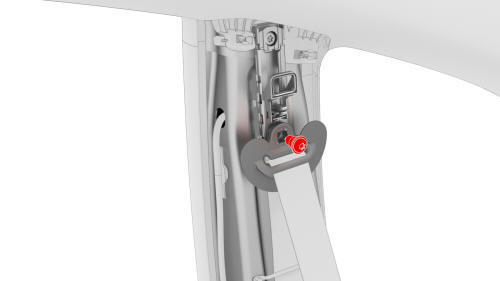
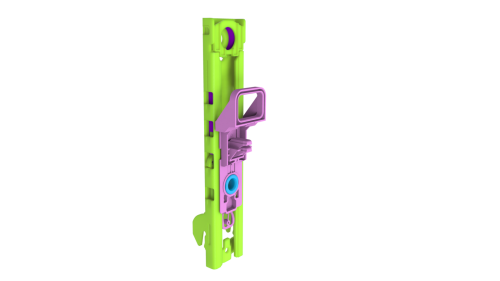
- Remove and discard the patchbolt that attaches the upper D-ring to the B-pillar.
- Remove the bolt that attaches the adjustable top loop to the B-pillar.
Note: The patchbolt is permanently attached to the adjustable top loop
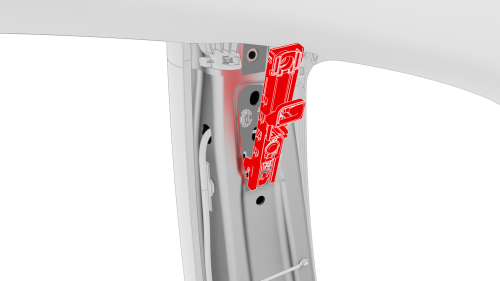
- Pull the top of the adjustable top loop away from the B-pillar, and then
slide upwards to remove the adjustable top loop from the vehicle.
Install
- Position the adjustable top loop on the B-pillar, and then install the
new patchbolt that attaches the adjustable top loop to the B-pillar.
 Torque
20 Nm
Torque
20 Nm
- Install the new patchbolt that attaches the upper D-ring to the
B-pillar.
.png) Torque 20 Nm
Torque 20 Nm
- Lower the adjustable top loop to align it with the LH upper B-pillar trim.
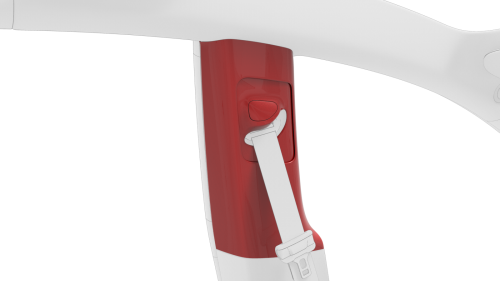
- Insert the top portion of the LH upper B-pillar trim under the headliner to align the clips, and then press the bottom of the trim to fully engage all of the clips.
Note: Make sure the rubber door seals completely overlap the trim
READ NEXT:
 Seatbelt - 1st Row - LH (Remove and Replace)
SPECIAL TOOLS
Key, Seat Belt Release, Model 3 (1133787-00-A)
Remove
Remove the LH instrument panel end cap. See End Cap - Instrument Panel -
LH (Remove and Replace).
Remove the LH middle A-pill
Seatbelt - 2nd Row - Center (Remove and Replace)
Remove
Remove the 2nd row lower seat cushion. See Seat Cushion - Lower - 2nd
Row (Remove and Replace).
Remove the rear underhood apron. See Underhood Apron - Rear (Remove and
Replace).
Disco
Seatbelt - 2nd Row - LH (Remove and Replace)
Remove
Remove the rear underhood apron. See Underhood Apron - Rear (Remove and
Replace).
Remove the cabin intake duct. See Duct - Cabin Intake (Remove and
Replace).
Disconnect 12V power. See
SEE MORE:
Vent Hose - 12V Battery (Remove and Replace)
Remove
Remove the rear underhood apron. See
Underhood Apron - Rear (Remove and Replace).
Remove the cabin intake duct. See
Duct - Cabin Intake (Remove and Replace).
Remove the hood latch cover. See
Cover - Hood Latch (Remove and Replace).
Remove the underhood storage unit. See
Underhood S
Vehicle Hold
When Model 3 is stopped, Vehicle Hold can
continue to apply the brakes even after you
remove your foot from the brake pedal. When
driving on a hill or on a flat surface, brake as
you normally would. After coming to a
complete stop, simply press the brake pedal
again (until the touchscreen disp
© 2019-2026 Copyright www.tmodel3.com
