Tesla Model 3: Bracket - License Plate - Rear (EMEA) (Remove and Replace)
Tesla Model 3 2017-2026 Service Manual / Exterior Fittings / License Plate Mountings / Bracket - License Plate - Rear (EMEA) (Remove and Replace)
Remove
- Remove the screws (x4) that attach the rear license plate to the rear license plate bracket, if a license plate is installed. Otherwise, skip to the next step.
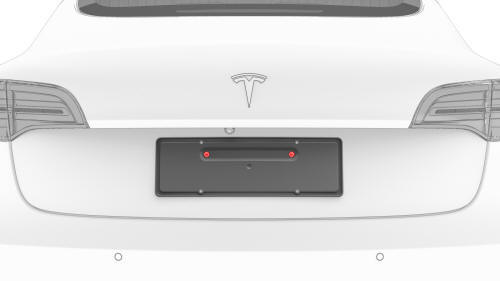
- Remove the screws (x2) that attach the rear license plate bracket to the vehicle, and then remove the bracket from the vehicle.
Install
- Verify that the thread inserts were not damaged during the removal of the screws.
- Clean the trunk lid surface with isopropyl alcohol (IPA) wipes, and then allow the surface to dry before continuing.
- Install the screws (x2) that attach the rear license plate bracket to
the vehicle.
.png) Torque 1.2 Nm
Torque 1.2 Nm - Install the screws (x4) that attach the rear license plate on the rear
license plate bracket, if applicable.
Torque 1.2 Nm
READ NEXT:
 Mirror - Door - LH (Remove and Replace)
Remove
Use a plastic trim tool to pry up along the inner edge of the mirror
cover.
Lift upward to release the tabs that attach the mirror cover to the LH
door mirror, and then remove
Skull Cap - Door Mirror - LH (Remove and Replace)
Remove
Outside Edge of Skull Cap
Inside Edge of Skull Cap
Pull outward to release the clips that attach the rear of the LH door
mirror skull cap to the LH door mirror.
Pry up along the
SEE MORE:
Seat Belts
Wearing Seat Belts
Using seat belts and child safety seats is the
most effective way to protect occupants if a
collision occurs. Therefore, wearing a seat belt
is required by law in most jurisdictions.
Both the driver and passenger seats are
equipped with three-point inertia reel seat
belts.
Raise Vehicle - 2 Post Lift
DRAFT
Warning:
This procedure was derived from pre-production computer
models, and might not reflect the real-world situation. Warnings and cautions
might be missing. Follow safety requirements and use extreme caution when
working on or near high voltage systems and components. Do not redistri
© 2019-2026 Copyright www.tmodel3.com
