Tesla Model 3: During Charging
During charging, the charge port light (the Tesla "T" logo) pulses green, and the touchscreen displays the charging status. The frequency at which the charge port light pulses slows down as the charge level approaches full. When charging is complete, the light stops pulsing and is solid green.
Note: If Model 3 is locked, the charge port light does not light up.
If the charge port light turns red while charging, a fault is detected. Check the touchscreen for a message describing the fault. A fault can occur due to something as common as a power outage. If a power outage occurs, charging resumes automatically when power is restored.
Note: When charging, particularly at high currents, the refrigerant compressor and fan operate as needed to keep the Battery cool.
Therefore, it is normal to hear sounds during charging.
Note: Air conditioning performance is generally not affected by charging. However, under certain circumstances (for example, you are charging at high currents during a particularly warm day), the air coming from the vents may not be as cool as expected and a message displays on the touchscreen. This is normal behavior and ensures that the Battery stays within an optimum temperature range while charging to support longevity and optimum performance.
Warning: Never spray liquid at a high velocity (for example, if using a pressure washer) towards the charge port while charging. Failure to follow these instructions can result in serious injury or damage to the vehicle, charging equipment, or property.
Stopping Charging
Stop charging at any time by disconnecting the charge cable or touching Stop Charging on the touchscreen.
Note: To prevent unauthorized unplugging of the charge cable, the charge cable latch remains locked and Model 3 must be unlocked or able to recognize your authenticated phone before you can disconnect the charge cable.
However, in cold ambient temperatures below 41Вє F (5Вє C), the charge port remains unlocked whenever the vehicle is not charging, even when Model 3 is locked.
To disconnect the charge cable:
- Press and hold the button on the
connector handle to release the latch.
Alternatively, unlock the vehicle by opening a door, using a key card or key fob, or touching Stop Charging on the touchscreen. These methods unlock the charge port as well.
- Pull the connector from the charge port.
Note: The charge port automatically closes within approximately 10 seconds of removing the connector from the charge port.
Caution: Tesla strongly recommends leaving Model 3 plugged in when not in use. This maintains the Battery at the optimum level of charge.
Manually Releasing Charge Cable
If the usual methods for releasing a charge cable from the charge port (using the charge handle release button, touchscreen, or mobile app) do not work, carefully follow these steps:
- Ensure that Model 3 is not actively charging by displaying the charging screen on the touchscreen. If necessary, touch Stop Charging.
- Open the rear trunk.
- Pull the charge port's release cable downwards to unlatch the charge cable.
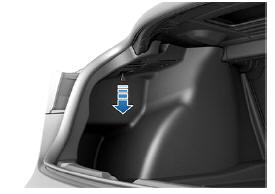
Note: The release cable may be recessed within the opening of the trim.
- Pull the charge cable from the charge port.
Caution: The release cable is designed for use only in situations where the charge cable cannot be released from the charge port using the usual methods. Continuous use may result in damage to the release cable or charging equipment.
Warning: Do not perform this procedure while your vehicle is charging or if any orange high voltage conductors are exposed. Failure to follow these instructions can result in electric shock and serious injury or damage to the vehicle. If you have any uncertainty as to how to safely perform this procedure, contact your closest Service Center.
Warning: Do not attempt to remove the charge cable while simultaneously pulling the release cable. Always pull the release cable before attempting to remove the charge cable from the charge port.
Failure to follow these instructions can result in electric shock and serious injury.
Charge Port Light
- WHITE: The charge port door is open.
Model 3 is ready to charge and the connector is not inserted, or the charge port latch is unlocked and the connector is ready to be removed.
Note: In cold ambient temperatures below 41Вє F (5Вє C), the charge port remains unlocked whenever the vehicle is not charging. In these situations, the charge port light is white.
- BLUE: Model 3 detects that a connector has been plugged in.
- BLINKING BLUE: Model 3 is communicating with the connector. Either Model 3 is preparing to charge, or a charging session is scheduled to begin at a specified future time.
- BLINKING GREEN: Charging is in progress.
As Model 3 approaches a full charge, the frequency of the blinking slows.
- SOLID GREEN: Charging is complete.
- SOLID AMBER: The connector is not fully plugged in. Realign the connector to the charge port and insert fully.
- BLINKING AMBER: Model 3 is charging at a reduced current (AC charging only).
- RED: A fault is detected and charging has stopped. Check the touchscreen for a fault message.
READ NEXT:
 Charging Status and Settings
The charging screen displays on the
touchscreen whenever the charge port door is
open. To display the charging screen at any
time:
Touch the charging icon on the
"Cards" area on the tou
Scheduled Charging and Scheduled
Departure
There are two ways in which you can schedule
your vehicle's charging:
Scheduled Charging: When you set a
scheduled charging time, Model 3 displays
the set time to begin charging when you
Maintenance
This section discusses several facets of car maintenance for long-term and optimal performance. This is a suggested maintenance plan for the Model 3, along with information on when to schedule frequen
SEE MORE:
Bushing - Rear Drive Unit - RH (Remove and Replace)
SPECIAL TOOLS
Kit, Drive Unit Bushing R&R, Model 3
(1137785-00-A)
Remove
Remove the rear drive unit. See Drive Unit -
Rear (Remove and Install)
Breather - Front Drive Unit (Remove and Replace)
Remove
Remove the front subframe assembly. See
Subframe Assembly - Front (Dual Motor) (Remove and Install).
Remove the front drive unit breather.
Torque 5 Nm
Install
Installation procedure is the reverse of removal.
