Tesla Model 3: Flood Ports - 2nd Generation (Retrofit)
Tesla Model 3 2017-2026 Service Manual / Battery System / HV Battery Enclosure / Flood Ports - 2nd Generation (Retrofit)
.jpg)
Procedure
Note: This procedure destructively removes the 1st generation flood ports and installs 2nd generation flood ports.
- Connect a laptop with Toolbox 3 to the vehicle.
- In Toolbox, click in the Search field, and then click Tools.
- From the Tools menu, click Active Alerts.
- Click Read Alerts and check for a BMS_a123, BMS_a151, or a BMS_a035 alert.
- If:
- Any of the alerts are present - Investigate and correct the low isolation condition before continuing with this procedure.
- None of the alerts are present - Continue to the next step.
- Disconnect the laptop from the vehicle
- Perform the vehicle electrical isolation procedure. See Vehicle Electrical Isolation Procedure
- Remove the rear HV battery skid plate. See Skid Plate - HV Battery - Rear (Remove and Replace).
.png)
- Release the clips that attach the HV battery coolant hoses to the LH shear plate.
.png)
- Release the clips that attach the HV battery coolant hoses to the RH shear plate
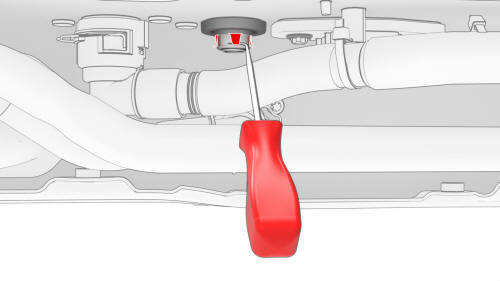
- Use a 90º pick to permanently bend open the tabs (x4) of the LH 1st generation flood port retainer ring.
Note: It is acceptable if the tabs break off.
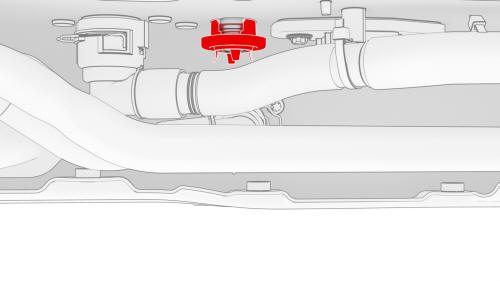
- Pull the retainer ring of the LH flood port down and off
.png) Twist
the retainer ring as it is pulled down.
Twist
the retainer ring as it is pulled down.
- Rotate the LH flood port core 60º and pull it down and out of the underside of the HV battery penthouse.
- Repeat step 11 through step 13 for the RH 1st generation flood port.
- Use an IPA wipe to clean the area around the openings where the flood ports were removed.
.jpg)
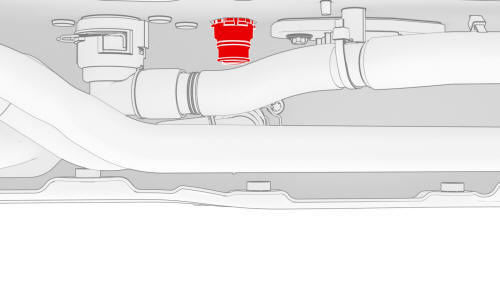
- Install a 2nd generation flood port into the opening at the LH underside of the HV battery penthouse.
Note: Press up firmly to fully seat the flood port and fasten the clips (x8) internally.
- Repeat step 16 for the RH underside of the HV battery penthouse
- Fasten the clips that attach the HV battery coolant hoses to the RH shear plate.
- Fasten the clips that attach the HV battery coolant hoses to the LH shear plate.
- Check that the HV connections at the rear of the HV battery are tight and secure.
- Install the rear HV battery skid plate. See Skid Plate - HV Battery - Rear (Remove and Replace).
- Perform a penthouse air leak test. See Penthouse Air Leak Test.
READ NEXT:
 Gasket - Cover - HV Battery (Remove and Replace)
Remove
Note: There are two types of HV battery cover gaskets: an older
platter perimeter gasket, and a newer penthouse perimeter gasket. These are
referred to as platter type and penthouse type. Thi
HV Battery Air Leak Test
Pack Enclosure Leak Tester, HV Battery (1026636-00-A)
Pack Kit, Enclosure, Leak Test, HV Battery, Complete (1140501-00-A)
Kit, Encl Leak Test Adapters, HV Battery (1144879-00-A)
Procedure
Perform th
Penthouse Air Leak Test
SPECIAL TOOLS
Pack Enclosure Leak Tester, HV Battery (1026636-00-A)
Pack Kit, Enclosure, Leak Test, HV Battery, Complete (1140501-00-A)
Kit, Encl Leak Test Adapters, HV Battery (1144879-00-A)
Kit, D
SEE MORE:
Light - Turn Signal / Fog - Front - LH (Remove and Replace)
Remove
Remove the LH front wheel. See
Wheel (Remove and Install).
Remove the LH front wheel arch liner. See
Wheel Arch Liner - Front - LH (Remove and Replace).
Disconnect the electrical connector from the LH front turn signal/fog
light.
Release the clips that attach the fascia elect
Speaker - Dash - Center (Remove and Replace)
Remove
Remove the LH and RH instrument panel end caps. See End Cap - Instrument
Panel - LH (Remove and Replace).
Remove the LH and RH middle A-pillar trims. See Trim - A-Pillar - Middle
- LH (Remove and Replace).
Remove the LH and RH upper A-pillar trims. See Trim - A-Pillar - Upper -
LH
© 2019-2026 Copyright www.tmodel3.com
