Tesla Model 3: Glass - Backlight (Remove and Replace) - Remove
Tesla Model 3 2017-2024 Service Manual / Body / Windshield and Body Glass / Glass - Backlight (Remove and Replace) / Glass - Backlight (Remove and Replace) - Remove
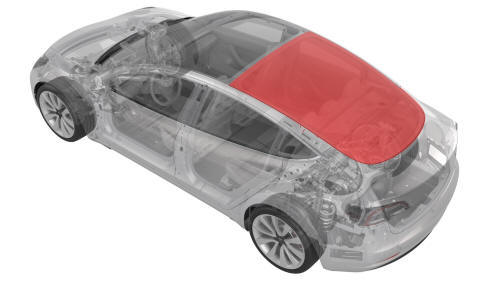
Remove
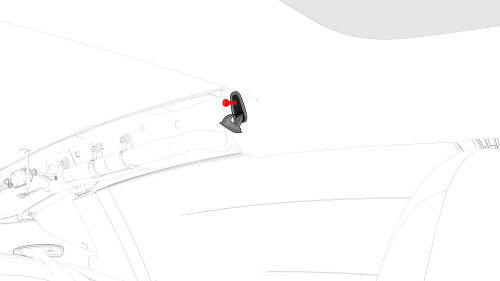
- Release the clips that attach the screw covers to the LH and RH rear coat hooks.
- Remove the screws that attach the LH and RH rear coat hooks to the body.
- Remove the package tray trim. See Trim - Package Tray (Remove and Install).
- Remove the FM antenna amplifier. See Amplifier - Antenna - FM (Remove and Replace).
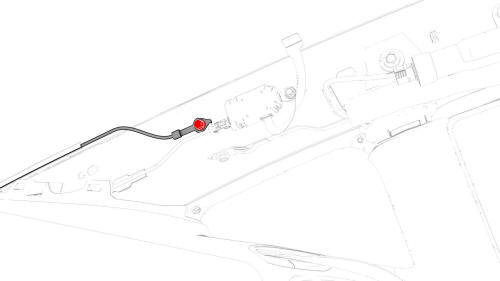
- Remove the bolt that attaches the backlight glass heater ground strap to the LH C-pillar.
- Remove the backlight glass LH heater ground strap from the backlight glass.
- Disconnect and discard the backlight glass LH heater ground strap from the backlight glass LH heater connector.
Note: The new backlight glass comes with a new heater ground strap preinstalled.
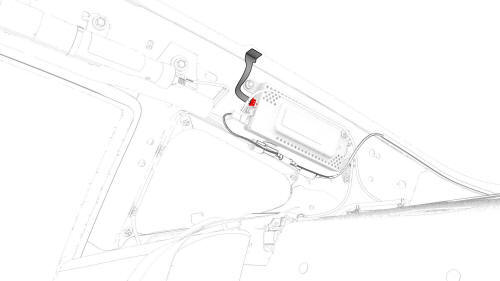
- Disconnect the backlight electrical harness from the tuner connector on the RH C-pillar.
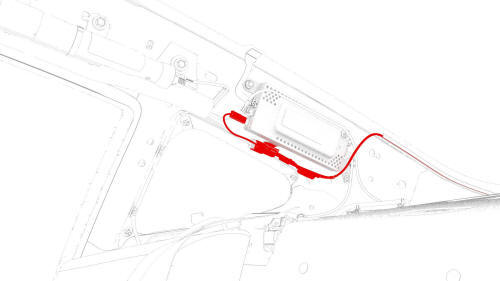
- Disconnect the antenna electrical harness from the turner connector and body harness on the RH C-pillar.
- Remove the antenna electrical harness from the backlight glass.
- Disconnect and discard the antenna electrical harness from the backlight glass RH heater connector.
Note: The new backlight glass comes with a new antenna electrical harness preinstalled.
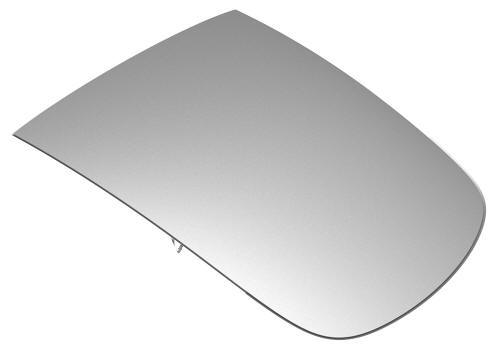
- Remove and discard the seals from the inside of the backlight glass.
Note: The new backlight glass comes with new seals preinstalled.
- Open the trunk.
- Remove and discard the rear seal from the backlight glass.
Note: The new backlight glass comes with a new rear seal preinstalled.
- Apply masking tape to the exterior of the LH and RH roof pillars to protect the paint from damage.
- Cut a suitable length of square wire to use with T-handles.
- Secure the wire to the starter tool and push the tool through the urethane at the lower side of the RH C-pillar.
- Remove the wire from the starter tool and remove the tool from the urethane.
- Secure each end of the wire with a T-handle.
- With an assistant, use the T-handles to cut the urethane that attaches the backlight glass to the body. Cut in a counter-clockwise motion over the top of the backlight glass to the lower side of the LH C-pillar. Return to the starting point in a clockwise motion and continue past the bottom of the backlight glass to the lower side of the LH C-pillar.
Caution:
Use caution when working around the headliner area.
- Cut the square wire and remove the T-handles.
- Attach suction cups to the LH and RH sides of the backlight glass.
- With an assistant, remove the backlight glass from the vehicle.
- Use a razor blade to carefully remove the old urethane from the body.
- Use an IPA wipe to clean the urethane path.
READ NEXT:
 Glass - Backlight (Remove and Replace) - Install
Attach suction cups to the LH and RH sides of the new backlight glass.
With an assistant, position the backlight glass onto the vehicle for a
dry fit and note any locations where the net pads nee
Glass - Body - Rear Quarter - LH (Remove and Replace)-
Remove
Remove
Open the LH rear door.
Fully lower the LH rear window.
Open the trunk.
Release the clip that attaches the rear primary seal to the C-pillar
using a clip prytool.
Pull the LH rea
SEE MORE:
AC charging interruptedCheck
power source or charging
equipment(CP_a055)
Charging stopped because communication
between the vehicle and the external charging
equipment was interrupted.
Confirm whether the external charging
equipment is powered by looking for any
status lights, displays, or other indicators on
the equipment.
If the equipment is not powered, try
Speaker - Dash - LH (Remove and Replace)
Remove
Remove the LH and RH instrument panel end caps. See End Cap - Instrument
Panel - LH (Remove and Replace).
Remove the LH and RH middle A-pillar trims. See Trim - A-Pillar - Middle
- LH (Remove and Replace).
Remove the LH and RH upper A-pillar trims. See Trim - A-Pillar - Upper -
LH
© 2019-2024 Copyright www.tmodel3.com
