Tesla Model 3 Owners & Service Manuals

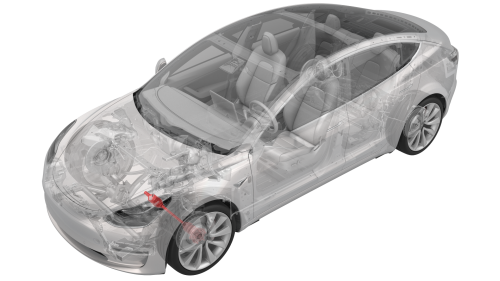
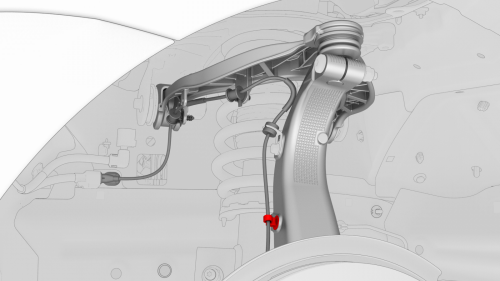
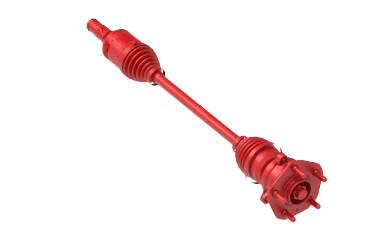
Tesla Model 3: Halfshaft - Front Drive Unit - LH (Remove and Replace)

Tesla Model 3 2017-2025 Service Manual / Front Drive Unit / Front Gearbox and Halfshafts / Halfshaft - Front Drive Unit - LH (Remove and Replace)

Halfshaft - Front Drive Unit - LH - Remove

 Halfshaft - Front Drive Unit - LH (Remove and Replace)

SPECIAL TOOLS

Tool, Axle Extraction, Model 3 (1133386-00-A)

Tool, Hub Puller, Hydraulic (1096075-00-A)

Remove

  1. Remove the LH wheel center cap. See Cap - Wheel (Remove and Replace).
  2. Loosen the LH wheel lug nuts.

 Caution: Use only hand tools to remove or install the fasteners. Do not use impact or power tools.

 Caution: Use a 6 point socket. Do not use a 12 point socket or a specialty socket.

  Halfshaft - Front Drive Unit - LH - Remove

  1. Loosen the LH front drive unit halfshaft nut.
  2. Raise and support the vehicle. See Raise Vehicle - 2 Post Lift.
  3. Remove the LH front wheel. See Wheel (Remove and Install).

  Halfshaft - Front Drive Unit - LH - Remove

  1. Remove and discard the LH front drive unit halfshaft nut and washers.

 Note: The washers are attached to the nut.

  Halfshaft - Front Drive Unit - LH - Remove

  1. Remove and discard the bolt that attaches the LH front ABS wheel speed sensor to the LH front knuckle.

  Halfshaft - Front Drive Unit - LH - Remove

  1. Release the clip that attaches the LH front ABS wheel speed sensor to the LH front knuckle, and then set the sensor aside.

  Halfshaft - Front Drive Unit - LH - Remove

  1. Remove the bolt that attaches the LH front brake hose bracket to the LH front knuckle.

  Halfshaft - Front Drive Unit - LH - Remove

  1. Remove and discard the nyloc nut that attaches the LH tie rod end to the LH front knuckle, and then remove the tie rod end from the knuckle.

  Halfshaft - Front Drive Unit - LH - Remove

  1. Remove the bolt and nut that attach the LH front upper control arm to the LH front knuckle.

  Halfshaft - Front Drive Unit - LH - Remove

  1. Remove the bolt and nut that attach the LH strut to the LH front lower lateral link.
  2. Position the hydraulic hub puller tool on the LH front wheel studs, and then hand-tighten the wheel lug nuts (x5).
  3. Remove the LH front drive unit halfshaft from the LH front hub assembly, and then set the halfshaft aside.

Note: While holding the hub in position, turn the hydraulic hub puller tool handle clockwise to separate the LH front drive unit halfshaft from the hub assembly.

  1. Remove the hydraulic hub puller tool from the LH front wheel studs.
  2. Install the axle extraction tool between the front drive unit and the inner joint of the LH front drive unit halfshaft, and then strike the handle of the extraction tool with a dead blow hammer to unseat the halfshaft.
  3. With assistance, remove the LH front drive unit halfshaft from the vehicle, and then install a halfshaft plug into the opening of the gearbox.

Note: Move the LH front knuckle assembly aside to provide enough clearance to safely remove the LH front drive unit halfshaft. 

Halfshaft - Front Drive Unit - LH - Install

Install

  Halfshaft - Front Drive Unit - LH - Install

  1. Apply approximately 1 gram of Molykote M-77 Lubricant Paste only to the hub mating face on the outboard side of the LH front drive unit halfshaft.

 Caution: Do not apply any lubricant to the halfshaft splines. If lubricant is mistakenly applied, wipe the splines clean with a shop towel.

  1. Remove the halfshaft plug from the gearbox, and then with assistance, install the LH front drive unit halfshaft into the front drive unit.

Note: Move the LH front knuckle assembly aside to provide enough clearance to safely install the LH front drive unit halfshaft.

  Halfshaft - Front Drive Unit - LH - Install

  1. Install the LH front drive unit halfshaft into the LH front hub assembly, and then hand-tighten a new front drive unit halfshaft nut and washers to prevent the halfshaft from falling out of the hub.

Note: The washers are attached to the nut.

  Halfshaft - Front Drive Unit - LH - Install

  1. Hand-tighten the bolt and nut that attach the LH strut to the LH front lower lateral link.

  Halfshaft - Front Drive Unit - LH - Install

  1. Install the bolt and nut that attach the LH front upper control arm to the LH front knuckle. Torque 56 Nm

  Halfshaft - Front Drive Unit - LH - Install

  1. Install the new nyloc nut that attaches the LH tie rod end to the LH front knuckle.  Torque 180 Nm

  Halfshaft - Front Drive Unit - LH - Install

  1. Install the bolt that attaches the LH front brake hose bracket to the LH front knuckle. Torque 5 Nm

  Halfshaft - Front Drive Unit - LH - Install

  1. Install the clip that attaches the LH front ABS wheel speed sensor to the LH front knuckle.

  Halfshaft - Front Drive Unit - LH - Install

  1. Install the new bolt that attaches the LH front ABS wheel speed sensor to the LH front knuckle. Torque 5 Nm
  2. Install the LH front wheel and hand-tighten the wheel lug nuts.
  3. Lower the vehicle until the tires are touching the ground. See Raise Vehicle - 2 Post Lift.
  4. Fully tighten the wheel lug nuts. See Wheel (Remove and Install).

  Halfshaft - Front Drive Unit - LH - Install

  1. Fully tighten the new LH front drive unit halfshaft nut and washers. Torque 245 Nm

 Note: The washers are attached to the nut.

  1. Install the wheel center cap. See Cap - Wheel (Remove and Replace).
  2. Remove the vehicle from the lift and drive the vehicle onto an alignment rack.

  Halfshaft - Front Drive Unit - LH - Install

  1. Fully tighten the bolt and nut that attach the LH strut to the LH front lower lateral link, and then mark the bolt and nut with a paint pen. Torque 106 Nm Torque 106 Nm

    READ NEXT:

     Heat Exchanger - Front Drive Unit (Remove and Replace)

    Remove Remove the front subframe assembly. See Subframe Assembly - Front (Dual Motor) (Remove and Install) Release the clip that connects the front drive unit inverter-heat exchanger hose

    SEE MORE:

     Vehicle Loading

    Load Capacity Labeling It is important to understand how much weight your Model 3 can safely carry. This weight is called the vehicle capacity weight and includes the weight of all occupants, cargo and any additional equipment added to your Model 3 since it was manufactured. Two labels attac

     Handle - Exterior Release - Door - Front - LH (Remove and Replace)

    Warning: The side impact airbag deployment depends on the front door sensor's ability to detect a side impact from air pressure. Make sure that there are no uncovered holes in the front door shells. Additionally, always reinstall plugs or tape when servicing or inspecting the front doors and t

    © 2019-2025 Copyright www.tmodel3.com