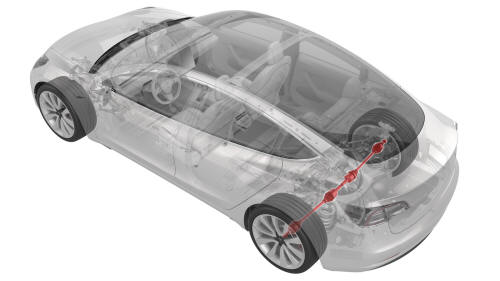
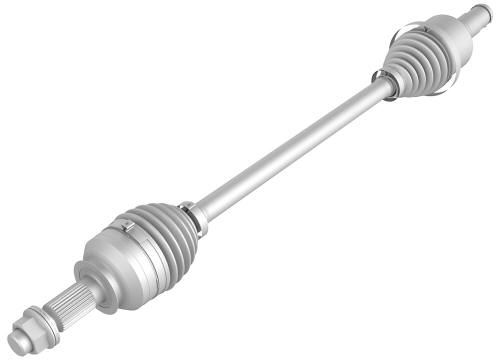
Tesla Model 3: Halfshaft - Rear Drive Unit - LH - Remove
SPECIAL TOOLS
Kit, EPB Release, Handheld (1134520-00-A)
XP-10 Power Supply, XP-10 (1129348-00-A)
Tool, Axle Extraction, Model 3 (1133386-00-A)
Hub Puller Tool, Hydraulic (1096075-00-A)
Remove
- Raise the vehicle on a 2 post lift. See Raise Vehicle - 2 Post Lift.
- Loosen the LH rear wheel lug nuts, but do not remove the wheel at this time. See Wheel (Remove and Install).
- Loosen the LH rear axle nut, but do not remove the nut at this time.
- Remove the mid aero shield panel. See Panel - Aero Shield - Mid (Remove and Replace).
.jpg)
- Remove the bolt that attaches the LH rear suspension cover.
- Remove the LH rear wheel.
- Remove the LH rear wheel arch liner. See Wheel Arch Liner - Rear - LH (Remove and Replace).
- Release the LH rear caliper parking brake. See Parking Brake - Caliper - Rear - LH (Release).
.png)
- Remove and discard the bolts that attach the LH rear caliper bracket to the knuckle.
- Remove the LH rear brake caliper from the LH rear suspension, and then allow it to hang from the body using an S-hook.
.jpg)
- Remove and discard the bolt that attaches the rear LH ABS wheel speed sensor to the knuckle, and then remove the sensor from the knuckle.
.jpg)
- Release the clip and remove the grommet that attach the rear LH ABS wheel speed sensor cable to the rear LH knuckle and subframe bracket.
.jpg)
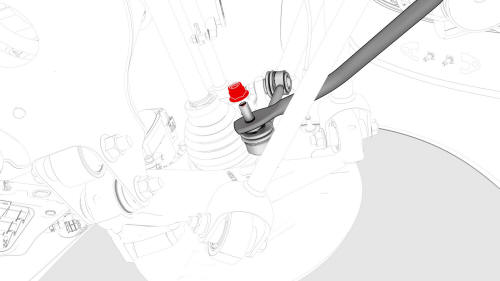
- Remove and discard the nut, and remove the washer that attach the LH halfshaft to the hub assembly.
.jpg)
- Remove the bolt that attaches the brake rotor to the hub. Note: Remove the lug nut previously installed for early production vehicles.
- Install the hub puller onto the LH rear rotor, and then install and hand-tighten the puller washers (x5) and the lug nuts (x5) onto the rotor studs.
- Use the hub puller to free the halfshaft from the hub splines. Note: The halfshaft is removed at a later step.
- Remove the lug nuts (x5) and the puller washers (x5) from the LH rear rotor studs, and then remove the hub puller from the rotor.
- Install the bolt that attaches the brake rotor to
the hub.
.jpg) Torque 5 Nm
Torque 5 Nm
Note: Reinstall the lug nut previously installed for early production vehicles.
- Install a spring compressor onto the LH rear coil spring. Line up the hooks per image and verify that the spindle goes through the body opening when the suspension is compressed.
- Position a support stand underneath the LH rear suspension.
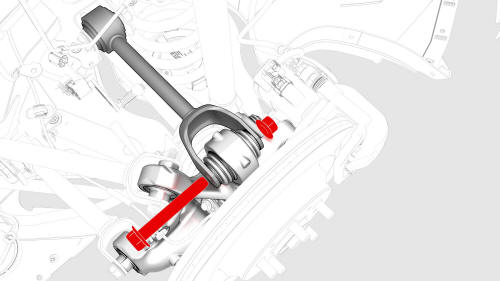
- Remove the bolt and nut that attach the LH upper aft link to the knuckle.
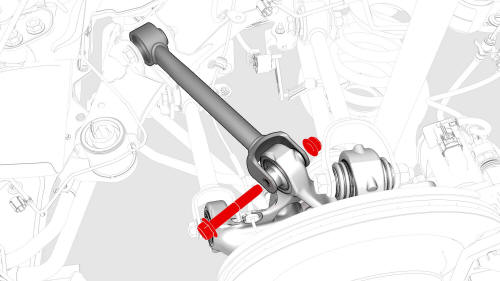
- Remove the bolt and nut that attach the LH upper fore link to the knuckle.
- Remove the bolt and nut that attach the LH toe link to the knuckle.
- Remove and discard the nut that attaches the rear stabilizer bar link to the rear stabilizer bar.
Note: Break the nut loose, and then counter-hold the ball joint with a 5 mm hex wrench.
.jpg)
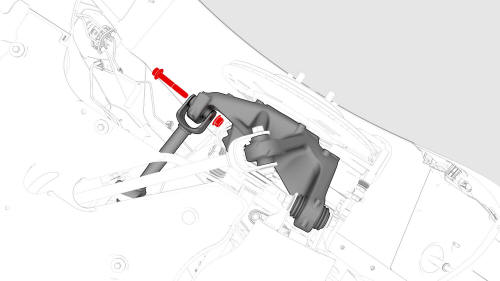
- Remove the bolts that attach the LH rear damper at the top mount. Torque 41 Nm
- Lower the support stand to gain access for halfshaft removal.
- Separate the halfshaft from the hub assembly, and then move the halfshaft aside.
- Install the axle extraction tool between the rear drive unit and the inner joint of the LH halfshaft, and then strike the handle end of the extraction tool with a dead blow hammer to unseat the halfshaft.
- Remove the halfshaft from the vehicle, and then
install a halfshaft plug into the opening of the
gearbox.
READ NEXT:
 Halfshaft - Rear Drive Unit - LH - Install
Install
Apply approximately 1 gram of
Molykote
Heat Exchanger - Rear Drive Unit (Remove and
Replace)
Remove
Note: Rear subframe assembly components have been removed
from illustrations for clarity. It is
Oil Pump - Rear Drive Unit(Remove and Replace)
Remove
Disconnect 12V power. See
12V Power (Disconnect and Connect).
Drain the gearbox fluid from the rear drive unit. See
Gearbox Fluid - Rear Drive Unit (Drain and Refill).
Remove the bo
SEE MORE:
Seal - Trunk (Remove and Replace)
Remove
Open the trunk.
Lift up the rear trunk floor, and then remove it from the vehicle.
Remove the trunk sill trim. See
Trim - Sill - Trunk (Remove and Replace).
Release the trunk seal from the trunk perimeter, and then remove the
seal from the body.
Install
Install the trunk
Before Using Summon
Summon (if equipped) allows you to
automatically park and retrieve Model 3 while
you are standing outside the vehicle. Summon
uses data from the ultrasonic sensors to move
Model 3 forward and reverse up to 39 feet (12
meters) in, or out of, a parking space.
To move Model 3 a longer distance
