Tesla Model 3: Halfshaft - Rear Drive Unit - LH - Install
Install
.jpg)
- Apply approximately 1 gram of Molykote M-77 Lubricant Paste only to the hub mating face on the outboard side of the LH rear drive unit halfshaft.
Caution: Do not apply any lubricant to the halfshaft splines. If lubricant is mistakenly applied, wipe the splines clean with a shop towel.
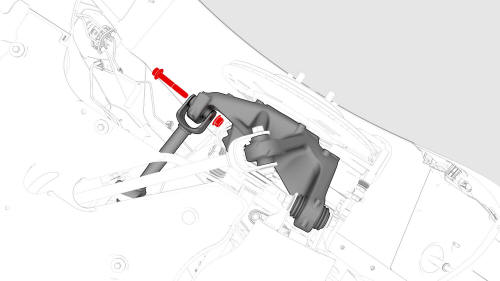
- Remove the halfshaft plug from the gearbox, and then install the halfshaft into the rear drive unit.
- Swing out the upper section of the knuckle and mate the halfshaft to the hub.
- Use the support stand to raise the LH rear suspension.
- Install the washer, and install and hand-tighten a new nut to attach the halfshaft to the LH rear hub.
- With an assistant, install and hand-tighten the bolt and nut that attach the LH toe link to the knuckle.
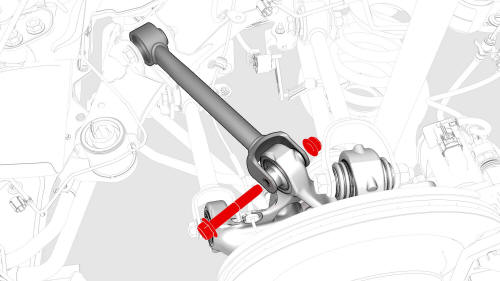
- With an assistant, installl and hand-tighten the bolt and nut that attach the LH upper fore link to the knuckle.
- With an assistant, install and hand-tighten the bolt and nut that attach the LH upper aft link to the knuckle.
- Install a new nut to attach the rear stabilizer bar
link to the rear stabilizer bar, and then mark the nut
with a paint pen.
 Torque 55 Nm
Note: Counter-hold the ball joint with a 5 mm hex wrench.
.jpg)
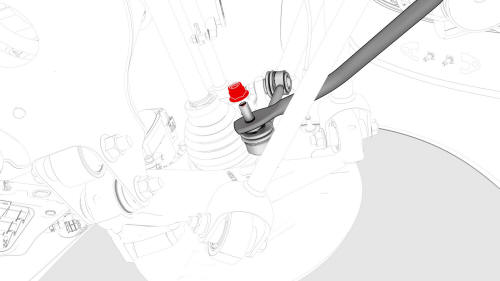
- Install the bolts that attach the LH rear damper at the top mount. Torque 41 Nm
.png)
- Raise the support stand to simulate vehicle at ride height.
Note: Make sure that the support stand do not block access to adjust the spring compressor or suspension bolts.
Note: Use the rear ride height torque gauge to verify that the rear suspension is set to ride height specifications and adjust the support stand or spring compressor tool , if necessary.
.jpg)
- Measure the distance between the bottom of the quarter panel to the center of the rear axle to make sure that the rear suspension is set to ride height: The distance should measure 378 mm.
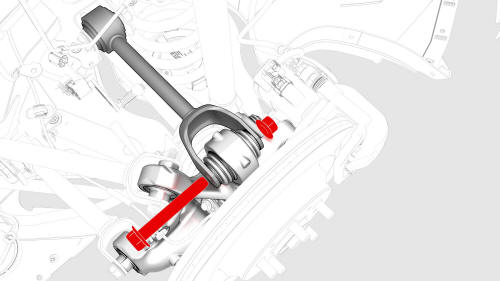
- Tighten the bolt and nut that attach the LH toe link
to the knuckle, and then mark the bolt and nut with a
paint pen.
 Torque 76 Nm
- Tighten the bolt and nut that attach the LH upper
fore link to the knuckle.
Torque 76 Nm
- Tighten the bolt and nut that attach the LH upper
aft link to the knuckle, and then mark the bolt and nut
with a paint pen.
Torque 134 Nm
- Remove the support stand from underneath the LH rear suspension.
.png)
- Remove the spring compressor from the LH coil spring.
.jpg)
- Install the LH rear suspension cover to the lower aft link, and then install the bolt that attaches the suspension cover to the link. Torque 6 Nm
- Hand-tighten the LH axle nut again.
.jpg)
- Install the rear LH ABS wheel speed sensor to the LH
rear knuckle, and then install a new bolt to secure the
sensor to the knuckle.
.jpg) Torque 5 Nm
Torque 5 Nm
.jpg)
- Install the grommet and fasten the clip that attach the rear LH ABS wheel speed sensor cable to the rear LH knuckle and subframe bracket.
.png)
- Install the bolts that attach the LH rear caliper
bracket to the knuckle.
.jpg) Torque 80 Nm
Torque 80 Nm
- Install the bolt that attaches the electrical harness bracket to the LH rear brake caliper. Torque 5 Nm
.jpg)
- Connect the electrical harness to the LH rear brake caliper connector.
- Install the LH rear wheel arch liner. See Wheel Arch Liner - Rear - LH (Remove and Replace).
- Install the LH rear wheel, and then hand-tighten the lug nuts that attach the LH rear wheel to the hub.
- Lower the vehicle and put the vehicle into Park.
.jpg)
- Tighten the LH rear axle nut. Torque 245 Nm
- Tighten the wheel lug nuts. Torque 175 Nm
- Install the LH rear wheel center cap or the hub cap.
- Remove the vehicle from the lift.
- Perform the four wheel alignment check. See Four Wheel Alignment (Check).
READ NEXT:
 Heat Exchanger - Rear Drive Unit (Remove and
Replace)
Heat Exchanger - Rear Drive Unit (Remove and
Replace)
Remove
Note: Rear subframe assembly components have been removed
from illustrations for clarity. It is
Oil Pump - Rear Drive Unit(Remove and Replace)
Remove
Disconnect 12V power. See
12V Power (Disconnect and Connect).
Drain the gearbox fluid from the rear drive unit. See
Gearbox Fluid - Rear Drive Unit (Drain and Refill).
Remove the bo
Oil Screen - Rear Drive Unit
(Remove and Replace)
SPECIAL TOOLS
Tool, Oil Pump Screen Removal, Model 3 (1140378-00-A)
Remove
Remove the oil pump. See
Oil Pump - Rear Drive Unit (Remove and Replace).
Use the special tool to remove the oil sc
SEE MORE:
Cap - Wheel (Remove and Replace)
SPECIAL TOOLS
Wheel Trim Removal Tool (1044206-00-A)
Remove
Remove the wheel cap according to the type of wheel.
18 inch pinwheel wheel: See step
2
19 inch stiletto wheel: See step
3
Gently pull the wheel cap with both hands to release the clips that
attach the wheel cap to the wh
Latch - Door - Rear - LH (Remove and Replace)
Remove
Remove the front LH door closeout panel. See Closeout Panel - Door -
Front - LH (Remove and Install).
Disconnect the electrical harness from the door latch connector.
Remove the bolts that attach the latch to the rear of the door.
Torque 10 Nm
Press the latch cabl
