Tesla Model 3: Harness - Charge Port to HV Battery (Three-Phase) - Install
Install
- Put the new charge port harness into the vehicle and feed the harness through the LV electrical harness.
Caution: Install the charge port harness carefully to prevent damage to the harness.
- With an assistant, route the charge port harness into position. Have a second person hold the rear of the charge port harness (charge port inlet side) as the harness is fed under the LV electrical harness.
Caution: Install the charge port harness carefully to prevent damage to the harness.
- Install the clips (x3) that attach the charge port harness to the vehicle at the C-pillar.
Note: The number of clips on newer vehicles might vary.
.jpg)
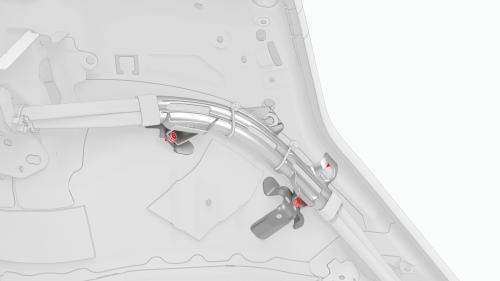
- Connect the charge port harness to the penthouse.
Note: Use one hand to support the charge port harness connector while the other hand latches the locking tab. Once installed, verify that the latch is not damaged and is fully secured into the latched position.

- Connect the 3-phase connector of the charge port harness to the penthouse.
Note: Push down the red locking tab to secure the connector.
.jpg)
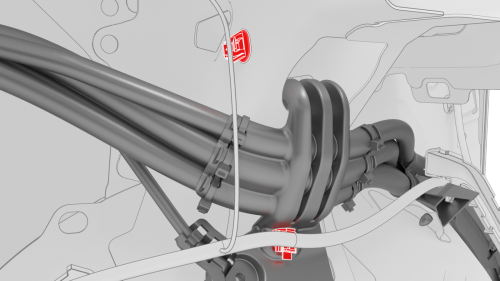
- Install the bolts (x2) that attach the charge port
harness bracket to the vehicle at the penthouse.
.jpg) Torque 10 Nm
Torque 10 Nm
.png)
- Install the clips (x2) that attach the electrical harness to the charge port harness bracket at the penthouse.
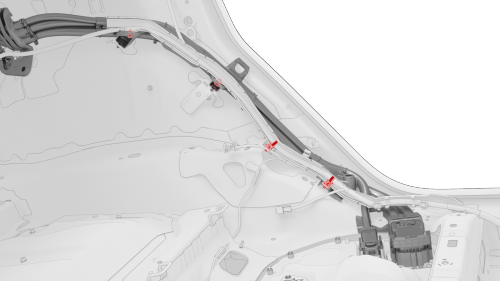
- Install the clips (x4) that attach the LV electrical harness along the C-pillar area.
- Install the charge port harness on the vehicle near the charge port assembly, and then install the clips (x2) that attach the LV electrical harness onto the charge port harness.
Note: Lift the charge port harness reference point up and over the body. The reference point should be reset into the body.
.jpg)
- Install the bolt that attaches the charge port harness ground to the body. Torque 6 Nm
.jpg)
- Install the charge port door grommet on the body
.jpg)
- Install the bolts (x3) that attach the charge port
assembly to the charge port door assembly.
.jpg) Torque 6 Nm
Torque 6 Nm - Insert the manual release cable back into the locking tab; push down on the release back to secure it into the locking tab.
.jpg)
- Install the clips that attach the charge port closeout panel.
.jpg)
- Install the edge clip that attaches the LV electrical harness to the charge port closeout panel.
.jpg)
- Connect the LV charge port ECU electrical connectors.
.jpg)
- Connect the electrical harness to the taillight connector.
- Install the LH trunk side trim. See Trim - Side - Trunk - LH (Remove and Replace).
- Install the trunk garnish. See Garnish - Trunk (Remove and Replace).
- Install the trunk sill trim panel. See Trim - Sill - Trunk (Remove and Replace).
- Install the trunk floor trim. See Trim - Floor - Trunk (Remove and Replace).
- Close the trunk.
- Install the LH 2nd row seat back. See Seat Back - 2nd Row - LH (Remove and Install).
- Install the LH 2nd row buckle. See Buckle - 2nd Row - LH (Remove and Replace).
- Install the LH rear sill panel trim. See Trim - Sill Panel - Rear - LH (Remove and Replace).
- Install the LH 2nd row seat side bolster. See Bolster - Side - Seat - 2nd Row - LH (Remove and Replace).
- Reconnect 12V power. See 12V Power (Disconnect and Connect).
- Install the 2nd row lower seat cushion. See Seat Cushion - Lower - 2nd Row (Remove and Replace).
- Move the driver seat and front passenger seat back to their original position.
- Use a laptop to log on to Garage.
- In Garage, enter the VIN and click the Firmware tab.
- In Garage, click the deploy tab, and then click on the ota icon.
Note: If there are no firmware packages available, there might be a firmware package staged on the vehicle; skip to step 34.
- In Garage, click the Jobs tab and confirm that the firmware is being staged.
- On the touchscreen, select the clock icon, and then select Install Now to start the firmware update.
Note: Check the touchscreen after the displayed firmware installation time to ensure that the firmware package was successfully installed.
- In Garage, refresh the Jobs tab and verify that the firmware was successfully installed. Note: If the firmware was not successfully installed, go back to step 32 and redeploy the firmware package.
- Verify for proper operation of the charge port. Use the customer's mobile connector, if available.
- Install the rear underhood apron. See Underhood Apron - Rear (Remove and Replace).
- Close the hood and all doors.
Harness - HV Battery to Front Drive Unit (Remove and Replace)
SPECIAL TOOLS
Lever Lock, HV Connector, Model 3 (1140311-00-A)
Remove
Refer to the procedure to remove the HV battery center rail ski for dual-motor vehicles. See Ski - Center Rail - HV Battery (Dual Motor) (Remove and Replace).
Install
Refer to the procedure to install the HV battery center rail ski for dual-motor vehicles. See Ski - Center Rail - HV Battery (Dual Motor) (Remove and Replace).
Harness - HV Battery to PTC Heater and A/C Compressor (Dual Motor) (Remove and Replace)
SPECIAL TOOLS
Lever Lock, HV Connector, Model 3 (1140311-00-A)
Remove
Refer to the procedure to remove the HV battery center rail ski for dual-motor vehicles. See Ski - Center Rail - HV Battery (Dual Motor) (Remove and Replace)
Install
Refer to the procedure to install the HV battery center rail ski for dual-motor vehicles. See Ski - Center Rail - HV Battery (Dual Motor) (Remove and Replace).
Harness - HV Battery to PTC Heater and A/C Compressor (RWD) (Remove and Replace)
SPECIAL TOOLS
Lever Lock, HV Connector, Model 3 (1140311-00-A)
Remove
Refer to the procedure to remove the HV battery center rail ski for rear wheel drive vehicles. See Ski - Center Rail - HV Battery (RWD) (Remove and Replace).
Install
Refer to the procedure to install the HV battery center rail ski for rear wheel drive vehicles. See Ski - Center Rail - HV Battery (RWD) (Remove and Replace).
READ NEXT:
 Harness - HV Battery to Rear Drive Unit - Remove
SPECIAL TOOLS
Lever Lock, HV Connector, Model 3 (1140311-00-A)
Remove
Remove the rear subframe as
Harness - HV Battery to Rear Drive Unit - Install
Install
Fully raise the handle on the rear drive unit HV
electrical harness.
SEE MORE:
Speaker - Front Door - LH (Remove and Replace)
Remove
Remove the LH front door trim panel. See Panel - Door Trim - Front - LH
(Remove and Replace).
Disconnect the electrical connector from the front door speaker.
Remove the screws that attach the front door speaker to the door, and
then remove the speaker.
Torque 4 Nm
In
HV Header - Inverter - Rear Drive Unit - Install
Install
Install a new retainer into the header, and then
fasten the clips (x6) that attach the retainer to the
header.
