Tesla Model 3: Harness - HV Battery to Rear Drive Unit (Remove and Replace)
SPECIAL TOOLS
Lever Lock, HV Connector, Model 3 (1140311-00-A)
Remove
Install
Caution:
Make sure that the harness fits the connector
squarely and tightly.
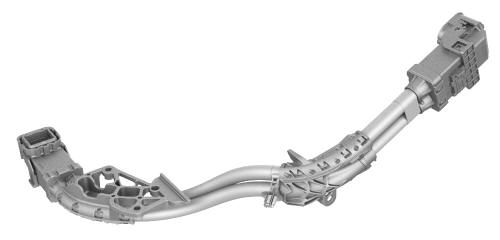
Harness - HV Battery to Rear Drive Unit - Remove
.png)
.jpg)
.png)
.jpg)
.png)
.png)
.png)
Harness - HV Battery to Rear Drive Unit - Install
.png)
.png) Torque 6 Nm
Torque 6 Nm
READ NEXT:
 External Charging Connectors
Mobile Connector
Firmware Update - CHAdeMO Charging Adapter
CAN Setup
Connect the USB-CAN dongle to a laptop that is equipped with Toolbox
Connect the CHAdeMO CAN programming connector to the USB-CAN
SEE MORE:
Pretensioners
Pretensioner - Outboard Lap - 1st Row - LH (Remove and Replace)
Note: This procedure was formulated using a release candidate or
production model. Follow safety requirements and use extreme caution when
working on or near high-voltage systems and components
Remove
Remove the 2nd row lower seat
Bumper - Front (Remove and Replace)
Remove
Raise and support the vehicle.
Remove the rear underhood apron
Remove the cabin intake duct.
Remove the hood latch cover.
Remove the underhood storage unit.
Remove the front fascia assembly.
Remove the LH front airbag sensor.
Remove the center front airbag sensor.
Remove the RH fr
